

There’s nothing quite like sinking into a chair you built yourself—knowing every joint is perfectly fitted, every curve shaped to your exact specifications. Whether you’re crafting your first dining chair or advancing to complex lounge designs, understanding how to make chairs that last requires blending precise woodworking skills with ergonomic science. This guide cuts through the guesswork, delivering proven techniques used by professional furniture makers to create chairs that withstand decades of use while providing exceptional comfort.
Building chairs successfully starts with respecting their structural demands—they must support 225 pounds on the seat while handling 150 pounds of back pressure simultaneously. Many beginners fail by focusing only on aesthetics, neglecting the critical engineering principles that prevent wobbling or collapse. You’ll learn exactly which joints deliver 1,200+ pounds of tensile strength, how to calculate perfect seat dimensions for your body type, and why certain wood species outperform others in high-stress areas. By the end of this guide, you’ll have the confidence to build chairs that rival professional craftsmanship.
Calculate Perfect Seat Dimensions for Comfort
Determine Your Ideal Seat Height and Depth
Your chair’s comfort hinges on precise measurements tailored to your body. For standard adult chairs, measure 16-18 inches from floor to compressed seat surface—this ensures your feet rest flat while maintaining proper circulation. Dining chairs specifically need 17-19 inches to align with standard table heights (28-30 inches). Seat depth should measure 15-17 inches for most users, providing thigh support without cutting off circulation behind your knees. Measure yourself sitting comfortably to establish your personal baseline.
Backrest angles vary significantly by chair type. Upright dining chairs require just 5-10 degrees of recline for proper posture during meals. Office chairs benefit from 10-20 degrees of recline for extended sitting comfort. Lounge chairs can recline 20-30 degrees for relaxation, but ensure lumbar support remains positioned 6-10 inches above the seat surface. Pro tip: Create a cardboard template of your back profile to transfer accurate curves to your chair design.
Select Strong Wood Species for Lasting Chairs
Match Wood to Structural Demands
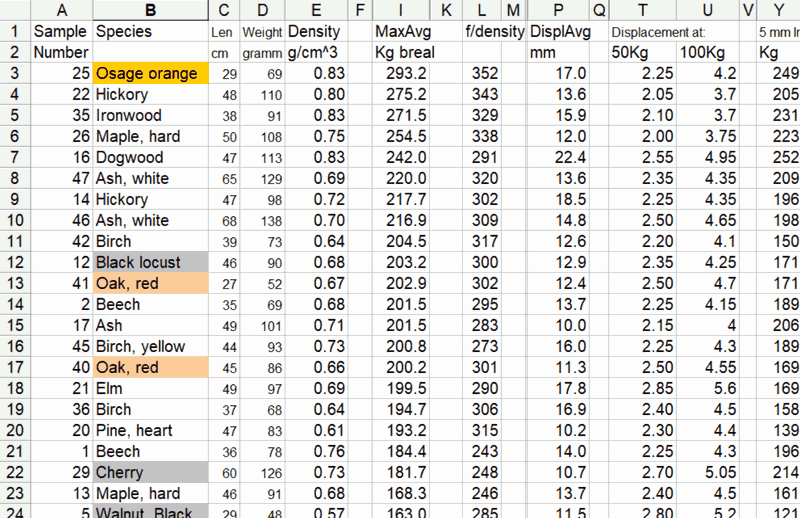
Oak provides exceptional strength (1,200-1,300 psi bending strength) making it ideal for legs and stretchers that bear the most stress. Maple delivers superior hardness (1,450 Janka rating) perfect for high-wear areas like armrests and seat edges. Cherry machines smoothly with beautiful aging properties, though it requires pre-drilling for screws due to its density—best for decorative elements rather than primary structure.
Walnut offers excellent dimensional stability with 1,010 psi bending strength, making it suitable for both structural and visible components. For budget projects or painted chairs, pine provides adequate strength (600-800 psi) at lower cost but requires careful handling to avoid dents. Critical warning: Never use plywood for chair legs or primary structural components—they lack the necessary strength and can fail catastrophically under load.
Set Up Your Workshop for Chair Construction
Essential Tools for Chair Building Success
Start with these must-have hand tools: a 12-inch combination square for precise layout, dovetail saw for clean joinery cuts, half-round rasp for shaping curves, and multiple bar clamps (24, 36, and 48-inch sizes) for assembly. Power tools that save significant time include a 10-inch table saw for precise ripping, band saw for curved cuts, and drill press for perfectly perpendicular holes.
Pro tip for beginners: Rent specialized equipment like mortising machines before investing—many woodworking shops offer hourly rates. Safety first: Always wear eye protection and hearing protection when operating power tools, and maintain clear pathways around your work area to prevent tripping while carrying heavy components.
Master Mortise and Tenon Joints for Chair Frames
Create Fail-Proof Connections That Last Generations
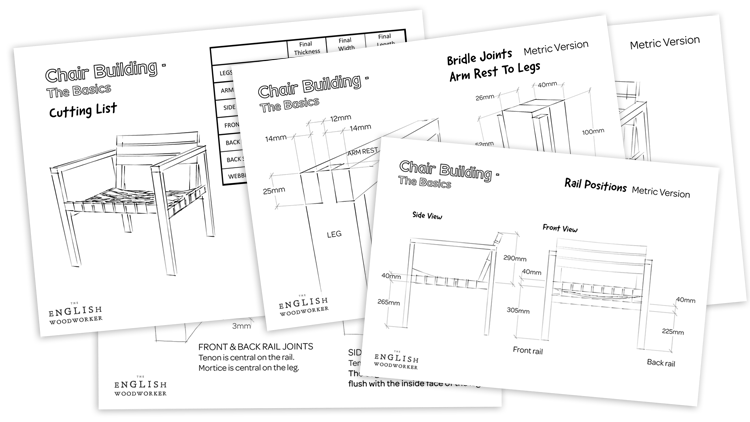
Tenon thickness must equal exactly 1/3 your stock thickness—too thick and you’ll split the mortise, too thin and strength suffers. Tenon length should be 4-5 times the thickness for optimal strength. Through mortises require 1/16 inch total clearance for assembly, while blind mortises allow tighter 1/32 inch clearance. Mark mortises using a router with edge guide for perfect alignment every time.
Critical mistake to avoid: Rushing the dry-fit process. Always assemble your chair frame without glue first, checking for square with diagonal measurements. Apply even clamping pressure (150-200 pounds for seats, 100-150 pounds for frame joints) and allow 24 hours cure time for slow-set PVA glue. Pro tip: Add a small amount of wood flour to your glue for tenon joints—it fills microscopic gaps and creates a stronger bond.
Build Your Chair: 5-Phase Construction Process
Phase 1: Material Preparation and Cutting
Start with detailed plans and a precise cut list allowing 1/8 inch extra material for final fitting. Acclimate lumber for 48-72 hours in your workshop before cutting to prevent post-construction warping. Mill components to final dimensions through jointing, planing, and ripping—maintain consistent 3/4 to 7/8 inch thickness for most structural parts.
Phase 2: Component Fabrication and Joinery
Cut legs to length with parallel ends, adding traditional tapers at 1/8 inch per foot on inside faces only. Machine stretchers with tenons on both ends, maintaining 1/2 to 5/8 inch shoulders. For solid wood seats, use biscuit or domino joinery every 8-10 inches with alternating grain direction to prevent warping. Time estimate: This phase typically takes 4-6 hours for your first chair.
Upholster for Maximum Comfort and Support
Create Professional-Quality Cushions
Use high-density foam (2.0-2.5 pounds per cubic foot) for seat cushions that maintain shape over time. Memory foam (3-5 pound density) provides superior pressure relief for chairs used more than 2 hours daily. Cut foam cleanly with an electric carving knife or band saw with fine-tooth blade—never tear or rip foam as this compromises its integrity.
Wrap foam with a 1/2 inch layer of Dacron to prevent fabric wear and create smooth contours. Attach fabric systematically starting from the center and working outward with pneumatic stapler using 1/4 to 3/8 inch staples. Pro tip: Always stretch fabric diagonally first before securing sides—this prevents wrinkles and ensures uniform tension.
Test Your Chair’s Strength Before Use
Critical Load Testing Protocol
Apply a 300-pound distributed load on the seat for 24 hours before trusting the chair with regular use. Check for permanent deformation exceeding 1/8 inch—any more indicates structural weakness. Perform the wobble test by applying 50 pounds of lateral force at the seat front—if movement exceeds 1/16 inch, reinforce joints immediately.
User testing requires 30-minute sessions with target users documenting comfort ratings on a 1-10 scale. Pay special attention to pressure points behind knees and in the lumbar region. Critical warning: Never skip strength testing—chair failures can cause serious injury from falls.
Maintain Your Handmade Chair for Decades
Annual Inspection and Care Routine
Check all joints annually using the wobble test—tighten any loose connections immediately to prevent joint degradation. Reapply finish every 3-5 years based on use intensity; high-traffic dining chairs need refinishing more frequently than occasional-use lounge chairs. Clean upholstery monthly with appropriate cleaners—avoid water-based solutions on natural fabrics as they can cause shrinkage.
Quick repair techniques include: resizing loose tenons with thin veneer shavings, replacing broken spindles using originals as templates, and fixing seat sag by adding support slats underneath. Pro tip: Keep scraps of your original wood and finish for future repairs—this ensures perfect color and texture matching.
Building chairs successfully combines technical precision with creative design. Start with simple designs using proven mortise and tenon joints before advancing to complex styles—your first chair will teach you more than any book could. Remember the golden rule: measure twice, cut once, and always test fit before applying glue. With proper construction techniques, your handmade chair will provide decades of comfortable seating while showcasing your woodworking mastery. Final tip: Document your process with photos and notes—this creates a valuable reference for your next chair project and helps you track improvements in your craftsmanship.


