

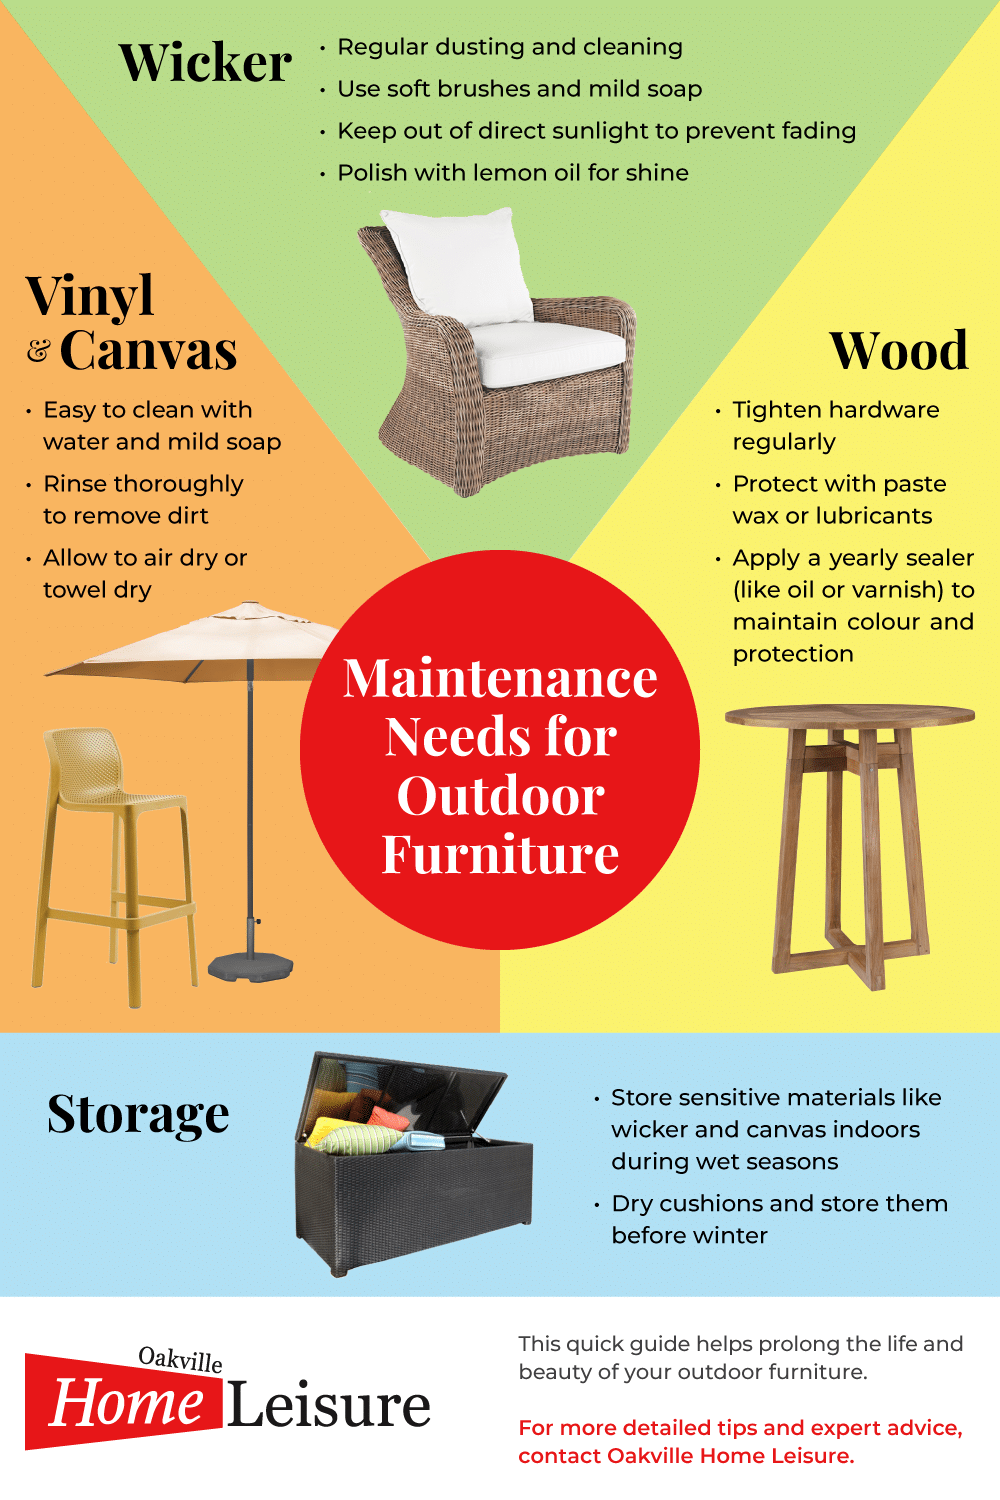
Your once-gorgeous patio chairs have become victims of pollen, bird droppings, and that mysterious white film that appears after every rainstorm. Before you drag them to the curb, know this: most patio furniture can look brand new with the right approach. Whether you’re dealing with sun-faded plastic, rusty metal, or moldy wood, this guide will walk you through exactly how to clean every type of patio chair without damaging the material. Discover the exact methods professionals use to make outdoor furniture look like it just left the showroom—methods that take less time than you think and require mostly items you already have at home.
Identify Your Chair Material First
The biggest mistake people make when cleaning patio chairs is using the wrong method for their material. Aluminum cleaned like wood can end up pitted, while plastic treated like metal might develop scratches that accelerate future damage. Before you grab a brush or mix any solution, take 5 minutes to identify what you’re working with—this simple step prevents costly mistakes and ensures your chairs last for years.
Plastic and Resin Chairs
Look for lightweight construction with uniform color throughout the material. High-density polyethylene (HDPE) and polypropylene chairs feel slightly flexible when pressed. These non-porous surfaces won’t absorb liquids, making them resistant to stains but prone to oxidation that creates that annoying white film. Recycled plastic lumber has a textured surface that mimics wood but maintains plastic’s weather resistance. Pro tip: If your chair is flexible enough to bend slightly without cracking, it’s definitely plastic-based.
Metal Chairs
Aluminum chairs feel surprisingly light for metal and develop white oxidation rather than red rust. Wrought iron is heavy, often features ornate designs, and shows red rust spots where paint has chipped. Steel chairs are magnetic, heavier than aluminum, and may have a powder-coated finish that peels over time. Before cleaning, run a magnet over the surface—aluminum won’t attract it while steel will. This simple test prevents you from using acidic cleaners that could damage aluminum.
Gather Your Cleaning Arsenal

Don’t grab whatever’s handy from your cleaning closet—using the wrong tools can scratch surfaces or leave residues. Having the proper equipment ready saves time and prevents damage, turning what could be a frustrating chore into a smooth process that yields professional results.
Essential Tools
Stock a dedicated patio cleaning kit with these must-haves: a long-handled soft-bristle brush for reaching chair backs and undersides, plus a small detail brush for crevices; color-coded microfiber cloths (blue for metals, green for wood, yellow for plastic); a garden hose with adjustable nozzle that offers both fan spray and gentle mist settings; multiple 32-ounce spray bottles labeled for different solutions; and an old toothbrush for intricate designs. Keep this kit stored together so you’re always ready for quick cleanups.
Cleaning Solutions by Material
Create these targeted solutions before starting: universal soap mix (1 tablespoon Dawn per gallon warm water) for routine cleaning; vinegar solution (equal parts white vinegar and water) for mineral deposits; baking soda paste (3:1 ratio with water) for gentle scrubbing; bleach solution (1/4 cup per gallon) only for severe mold on non-porous surfaces; and specialty cleaners like teak cleaner for wood chairs. Never mix chemicals—especially bleach with vinegar or ammonia—as this creates dangerous fumes. Always test solutions on an inconspicuous area first.
Clean Plastic Chairs Fast
Plastic chairs get neglected because they seem “easy to clean,” but improper methods actually accelerate deterioration. Using a pressure washer on plastic might seem efficient, but it forces dirt deeper into microscopic pores and can create hairline cracks that become visible later. Follow these material-specific techniques to maintain that like-new appearance season after season.
Daily Maintenance Method
Start by dry brushing your entire chair with a soft-bristle brush to lift loose dirt and pollen. Next, rinse thoroughly with your garden hose set to fan spray—this removes debris without forcing it into crevices. Apply your soap solution using a microfiber cloth, working in circular motions that follow the chair’s contours. For stubborn spots, let the solution dwell for 2-3 minutes before gently scrubbing. Rinse until water runs completely clear, then air dry or wipe with a clean cloth. This 15-minute routine prevents buildup that requires intensive cleaning later.
Remove Stubborn Stains
For tree sap, gently dab the area with rubbing alcohol on a cotton ball—avoid rubbing as this spreads the sap. Sunscreen stains respond well to cornstarch: cover the stain, wait 30 minutes for the powder to absorb the oil, then brush away before tackling with hot soapy water. White oxidation (that chalky film) disappears with baking soda paste: apply, let sit 15 minutes, then scrub gently in the direction of any texture patterns. Never use abrasive cleaners like Comet on plastic—they create microscopic scratches that make future cleaning harder.
Restore Metal Chairs to Shine
Metal chairs develop unique problems that require specific solutions. Aluminum shows white oxidation instead of rust, while wrought iron battles corrosion at every joint and crevice. Using the same cleaner for both materials leads to damaged finishes and accelerated deterioration. These targeted approaches keep metal chairs looking sharp while preventing future damage.
Aluminum Chair Deep Clean
Spray your soap solution generously over the entire chair, paying special attention to joints and crevices where oxidation hides. Using your soft brush, scrub following the metal’s grain direction—this minimizes visible scratches. For stubborn oxidation, create a paste of cream of tartar and hydrogen peroxide, apply with a cloth using circular motions, and let sit 10 minutes before rinsing. Always dry immediately with microfiber to prevent water spots, especially on anodized finishes. Monthly cleaning prevents buildup that requires aggressive treatment.
Fix Rust on Wrought Iron
For light rust, gently work #0000 steel wool over affected areas until smooth. For severe rust, follow a progressive sanding approach: start with 120-grit, then 220-grit, finishing with 400-grit for a smooth surface. Wipe thoroughly with mineral spirits to remove residue before applying rust converter (Naval Jelly) within two hours. Prime with rust-inhibiting primer the same day, then touch up with matching paint. Never skip the primer step—this creates a barrier that prevents rust from reappearing beneath your paint.
Revive Wood Chairs Naturally
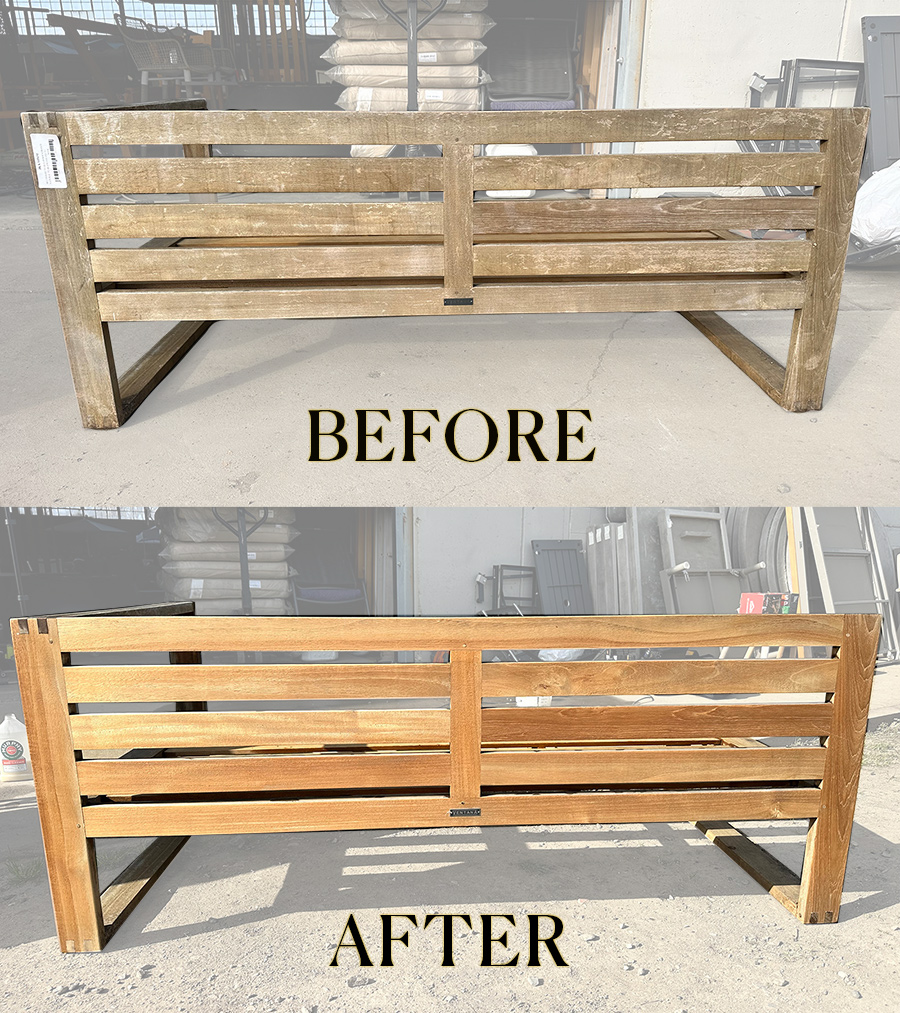
Wood patio chairs develop character as they age, but improper cleaning can accelerate deterioration. Many well-intentioned owners reach for power washers that damage the wood fibers, creating a rough surface that traps dirt and moisture. These gentle yet effective methods preserve your wood chairs’ natural beauty while addressing common problems like mold and graying.
Teak Chair Restoration
Use a dedicated teak cleaner applied with a soft brush following the wood grain—never against it. Let the cleaner dwell for 3-5 minutes (no longer, as this dries out the wood), then gently scrub to lift weathered fibers. Rinse thoroughly with low-pressure water to avoid forcing dirt deeper into the grain. For mold, mix 1 cup bleach with 1 cup detergent and 1 gallon warm water, spray generously, keep wet for 15 minutes, scrub with a stiff nylon brush, then rinse until runoff is clear. Always neutralize with a 1:4 vinegar solution afterward to prevent future mold growth.
Deep-Clean Wicker Without Damage
Wicker chairs collect dirt in their intricate weaves, but aggressive cleaning destroys the material. Pressure washing is the #1 cause of premature wicker failure—those delicate strands can’t handle high water pressure. These careful techniques clean deep into the weave while preserving the chair’s structural integrity.
Synthetic Wicker Technique
Start by vacuuming with a brush attachment to remove loose debris from the weave. Spray your mild soap solution generously into the weave, then work it in with a soft brush using gentle circular motions. For tight corners, use an old toothbrush to reach deep into the pattern. Rinse with the gentlest setting on your hose—never use pressure—and allow at least 24 hours for complete drying, flipping the chair periodically. For mold in the weave, use a vinegar solution (1 cup vinegar, 1 cup water, 2 drops dish soap), let it dwell for an hour, then gently scrub before rinsing.
Build Your Seasonal Schedule
Most patio chair damage happens between cleanings. Establishing a simple seasonal routine prevents minor issues from becoming major problems, extending your furniture’s life by years. This system takes less time than deep cleaning once a year and keeps your chairs looking great all season long.
Spring Opening Checklist
Begin each season with a complete inspection: check for loose joints, rust spots, wood splitting, and fabric tears. Perform a deep clean of all surfaces using material-appropriate methods. Tighten all screws and connections—this prevents wobbling that accelerates wear. Apply protective treatments specific to each material (teak oil, metal wax, UV protectant for fabrics). Test all moving parts like swivel mechanisms to ensure smooth operation before regular use begins.
Solve Common Problems Fast
When issues arise between scheduled cleanings, having instant solutions prevents small problems from becoming permanent damage. Keep this quick-reference guide handy for immediate fixes that maintain your chairs’ appearance and structural integrity.
| Problem | Quick Fix | Prevention |
|---|---|---|
| White film on plastic | 1:1 vinegar rinse, microfiber buff | Squeegee after rain |
| Black spots on wood | Bleach solution + wood brightener | Increase air flow |
| Sticky metal residue | Goo Gone followed by soap wash | Monthly cleaning |
| Faded cushions | Fabric spray dye for outdoor use | UV protective spray |
| Rusty screws | Replace with stainless steel | Annual inspection |
Safety and Storage Tips
Protecting yourself while cleaning is as important as protecting your furniture. Many people unknowingly mix dangerous chemical combinations or skip essential safety steps that could prevent injury. These protocols keep you safe while ensuring your cleaning efforts don’t inadvertently damage your patio chairs.
Chemical Safety Rules
Never mix bleach with ammonia or vinegar—this creates toxic chlorine gas. Always work in well-ventilated outdoor spaces when using chemicals. Wear nitrile gloves for all cleaning solutions, even mild ones, to protect your skin. Test every solution in an inconspicuous area first to check for adverse reactions. Store all chemicals in their original containers with safety labels intact—never in food containers that could cause accidental ingestion.
Start with the easiest material first to build confidence. Your patio chairs can look spectacular again—it just takes the right approach for each material. With these professional techniques, you’ll spend less time cleaning and more time enjoying your refreshed outdoor space.


