

Your weather-beaten lawn chairs don’t deserve the landfill—they deserve a revival. When UV rays fade fabrics and sagging slings ruin your patio’s appeal, reupholster lawn chairs to save 60-75% compared to replacement costs while creating custom outdoor seating that reflects your style. Whether you’re wrestling with stretched aluminum-frame slings or deteriorating steel-frame webbing, this guide delivers field-tested techniques to transform tired furniture into durable statement pieces. You’ll master precise measurement methods, discover weatherproof fabric secrets, and implement professional attachment systems that withstand years of sun and storms.
Most homeowners don’t realize worn-out lawn chairs can be restored for $35-$95 per seat—far below the $300+ price tag of new premium sets. By reupholster lawn chairs yourself using factory-compatible materials, you’ll extend furniture life by 5-8 years while eliminating 40+ pounds of metal waste per chair. Let’s dive straight into solutions that turn your patio restoration from daunting to doable.
Fix Aluminum Frame Slings with Factory-Compatible Replacements

Skip generic “outdoor fabric” kits that shrink or stretch. For aluminum-frame chairs, precision-fit sling replacements deliver instant results without frame modifications. Major brands like Hampton Bay, Telescope Casual, and Brown Jordan use standardized sling dimensions—meaning your 20-year-old chair likely accepts modern replacements.
Exact Pricing for Chair & Chaise Slings
Standard Dining Chairs
– Complete 1-piece sling: $59 (saves $11 vs. retail)
– Separate back panel: $33
– Seat-only panel: $33
Pro Tip: Order both panels separately if your backrest angle is steep—this allows independent tension adjustment.
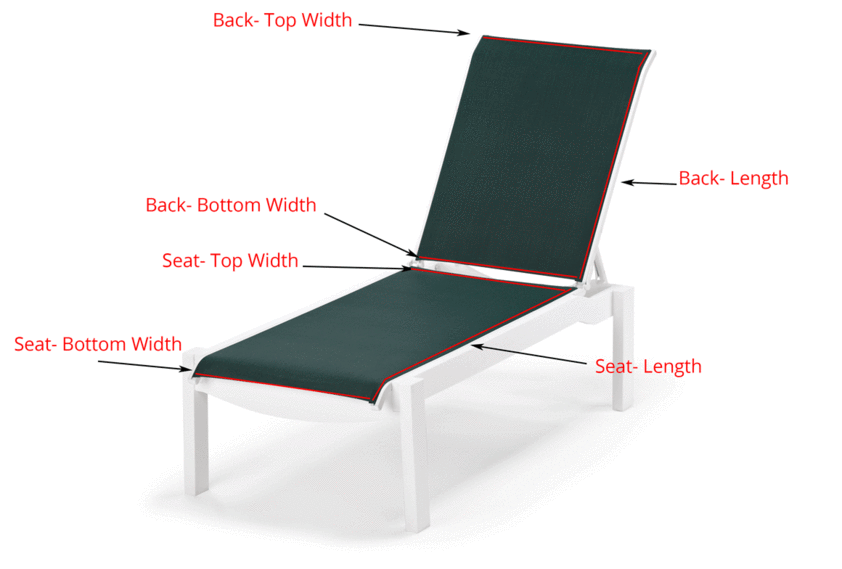
Chaise Lounge Upgrades
– Full replacement sling: $94
– Seat section: $60
– Backrest panel: $43
Warning: Measure chaise arm height first—some Martha Stewart models require 3″ wider slings to prevent fabric bowing.
Specialty Seating Solutions
– Recliner slings: $72
– Love seat 4-piece set: $122
– Ottoman sling: $35
– Coordinating placemats: $10 each
Avoid Common Sling Replacement Mistakes
Measurement Errors
A ¼” discrepancy causes wrinkles or dangerous looseness. Always:
1. Remove old sling completely before measuring
2. Record exact width at narrowest frame point
3. Note slot depth where sling edges tuck in
Critical: Aluminum frames warp over time—measure diagonally across both seat and back sections.
Installation Blunders
– Skipping frame cleaning leads to slippage (scrub slots with vinegar)
– Overtightening screws cracks frame welds (use hand-tight only)
– Ignoring directional weave causes premature sagging (match old sling’s grain pattern)
Install Steel Frame Webbing Like a Pro
Steel chairs demand different tactics than aluminum. Instead of slings, these use polyurethane webbing with arrowhead ends pressed into frame slots—a system requiring heat for flexibility. Attempting cold installation cracks the material.
Heat-Activated Arrowhead Method
Why This Works
Factory technicians boil water to heat webbing to 200°F before installation. The warmth makes plastic pliable enough to:
1. Insert arrow tip into frame slot
2. Wrap webbing 1-2 times around frame leg
3. Shape cone fold on opposite side for clean finish
Time-Saver: Use a hairdryer on high for 90 seconds per end instead of boiling water—safer and equally effective.
Hidden Grommet System for Permanent Results
When original slots are damaged, this professional alternative hides all hardware:
1. Thread parachute cord through stainless steel grommets
2. Space grommets 4″ apart along dual support bars
3. Wrap canvas cover over front frame with grommets concealed underneath
4. Anchor back section to lower support bar using extra fabric reinforcement
Durability Hack: Double-stitch stress points where seat meets back—this prevents tearing after 2+ years of use.
Execute Flawless Sling Replacement in 3 Phases
Your success hinges on systematic execution. Allow 2-3 hours for your first chair—rushing guarantees misalignment.
Phase 1: Strategic Preparation
Essential Tools Checklist
– Sharp fabric scissors (pinking shears prevent fraying)
– Rubber mallet (for gentle frame adjustments)
– Flathead screwdriver (loosen screws without stripping)
Critical Prep Steps
1. Photograph original sling orientation—note which slots held tensioned sections
2. Soak frame slots with vinegar to dissolve rust/corrosion
3. Label all disassembled screws by location (use masking tape markers)
Phase 2: Precision Measurement Protocol
The 3-Point Verification System
1. Measure old sling’s flat dimensions (not stretched)
2. Compare to frame’s inner slot-to-slot distance
3. Order replacement 1/8″ smaller than frame measurement (fabric stretches when tensioned)
Warning: Big-box store slings often run ½” oversized—verify dimensions against your chair’s actual frame.
Phase 3: Tension-Controlled Installation
Step-by-Step Attachment
1. Insert one arrow end fully into slot
2. Pull webbing taut while wrapping around frame leg
3. Insert opposite end, maintaining even tension
4. Gradually tighten screws in star pattern (like car tires)
5. Trim excess fabric flush with frame edges using hot knife
Pro Move: Test sit on chair before final screw tightening—adjust tension if you feel bounce.
Prevent Costly Failures with Pro Maintenance
Your restoration’s longevity depends on two factors: material quality and seasonal care. Avoid these pitfalls that doom DIY projects:
Weatherproofing Non-Negotiables
– ✘ Using indoor fabrics (UV rays degrade polyester in 6 months)
– ✓ Choosing AAMA 2605-certified materials (tested for 5+ years’ sun exposure)
– ✘ Skipping frame powder coating touch-ups
– ✓ Applying clear rust inhibitor to exposed metal annually
Seasonal Protection Protocol
– Store chairs indoors during winter (or use breathable covers)
– Clean monthly with 1:10 vinegar-water solution (no bleach!)
– Inspect attachment points after storms for loosened screws
Maximize Savings with Smart Material Choices
You don’t need Sunbrella’s premium price tag for lasting results. These cost-cutting strategies deliver equal durability:
Budget-Friendly Fabric Comparison

| Material Type | Cost | Lifespan | Best For |
|---|---|---|---|
| Standard Outdoor Polyester | $35/chair | 3-5 years | Budget restorations |
| Sunbrella Sling Fabric | $65/chair | 7-10 years | High-sun climates |
| Heavy-Duty Polyurethane | $42/chair | 5-7 years | Steel frame chairs |
Insider Tip: Request free fabric samples from Patio Sling Site—they’ll send actual material swatches to test against your patio colors.
Transform Your Entire Patio Set This Weekend
Whole-set projects follow identical principles with bulk efficiencies:
– 4-chair dining set: Complete in 8-10 hours (2-3 hours per chair after first)
– Wholesale pricing: $48/sling for 4+ chairs (vs. $59 retail)
– Color coordination: Match frame powder coating to new slings ($15 add-on)
Start by identifying your chair brand from the 20+ manufacturers covered (check frame stamps for “Telescope” or “Winston”). Order fabric swatches first—126 color options mean you’ll find the perfect match. Most replacements ship within 5 business days, letting you enjoy refreshed seating by next weekend.
Final Takeaway: Reupholster lawn chairs to rescue furniture that still has structural integrity. With $35 materials and 3 hours of work, you’ll create custom outdoor seating that outlasts store-bought replacements while keeping metal waste out of landfills. Your restored chairs will deliver 5-8 additional years of comfort—proving that the smartest patio upgrade isn’t new furniture, but new life for what you already own.
Next Action: Measure your chair’s frame slots right now with a tape measure. Email photos to Patio Sling Site (info@patioslingsite.com) for free installation guidance before ordering. Most homeowners complete this entire restoration for under $100—imagine the pride when guests ask where you bought those “brand new” statement chairs.


