
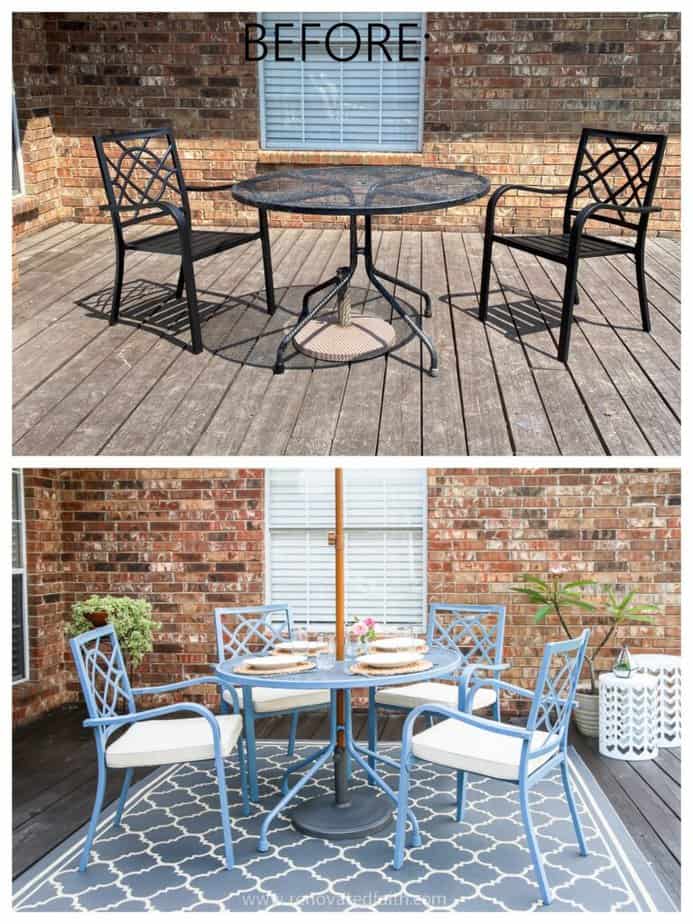
Your faded, peeling patio chairs don’t need replacement—they demand a fresh coat of paint. This weekend project revives tired outdoor furniture into stunning statement pieces for just $30-50 in materials. Most homeowners spend $300-$800 replacing patio sets, but with proper painting techniques, you’ll achieve custom colors and professional results while saving 85-90% of replacement costs. The key lies in matching preparation and application methods to your chair’s specific material—metal, wood, plastic, or mesh—ensuring paint withstands sun, rain, and years of use.
Skipping critical prep steps causes immediate peeling and failure. I’ve seen countless DIYers waste hours by rushing surface cleaning or using incompatible paints. But when you follow the correct process for your chair type, the results last for years. In this guide, you’ll discover material-specific prep protocols, foolproof application methods, and professional tricks that make your patio chairs look like they came straight from a high-end furniture store. Let’s transform your outdoor space without breaking the bank.
Diagnose Your Chair’s Material and Weaknesses
Spot Metal, Wood, Plastic or Mesh Construction
Metal chairs reveal themselves through distinctive weight and texture—wrought iron feels heavy with ornate details, aluminum stays cool to the touch, and steel often shows rust bleeding through paint. Wood chairs display grain patterns visible even under old finish; check for soft spots indicating rot or splinters on edges. Plastic chairs feel lightweight with smooth, non-porous surfaces—look for UV damage like fading or brittleness near joints. Mesh chairs feature vinyl-coated fabric stretched across frames; inspect for fraying threads or weakened attachment points.
Test Structural Integrity Before Painting
Wobble test metal frames by gripping seat and base—excessive movement means loose rivets or welds needing repair. Check wooden joints for separation gaps where legs meet the seat; tap with a screwdriver to reveal hollow spots from rot. Squeeze plastic chair legs gently; brittle material cracks easily under pressure. Examine mesh tension by pressing fabric center—if it sags more than 1 inch, replacement may be necessary before painting. Never paint structurally compromised chairs—fix loose connections first or risk safety hazards.
Execute Flawless Surface Preparation by Material

Clean All Chair Types Professionally
Scrub with TSP substitute using a soft-bristle brush to dissolve grease, pollen, and environmental grime that repel paint. Treat mold spots with dedicated cleaner applied via sponge, working in circular motions until stains disappear. Rinse with low-pressure hose spray to avoid forcing water into joints—hold nozzle 12 inches away to prevent damage. Dry completely for 3-4 hours in shaded area; residual moisture causes immediate paint bubbling.
Metal Chair Rust Elimination Protocol
Remove ALL rust using 80-grit sandpaper or wire wheel attachment on drill—stop only when bare metal appears shiny. Sand entire surface with 120-grit paper to create “tooth” for paint adhesion—skip this and expect peeling within weeks. Wipe with mineral spirits using lint-free cloth to remove metal dust and oils; fingerprints left behind create adhesion failures. Apply rust converter if corrosion persists—watch as it turns rusty areas into black, paintable surfaces.
Wood Chair Restoration Process
Start sanding with 80-grit paper to strip flaking finish, moving toward the grain to avoid scratches. Fill holes with exterior wood filler using putty knife, scraping excess before it dries. Progress to 220-grit sandpaper for final smoothing—your palm should glide smoothly without catching. Never sand pressure-treated wood below its protective layer; light scuffing only preserves chemical protection.
Plastic and Mesh Chair Prep Secrets
Abrade plastic surfaces with 220-grit sandpaper using light pressure—over-sanding creates visible scratches. Wipe with denatured alcohol on paper towel to neutralize static electricity that repels paint droplets. Mask mesh areas with 2-inch painter’s tape pressed firmly along frame edges—run fingernail along seams to prevent bleed-through. Skip sanding vinyl slings; these require replacement instead of painting for lasting results.
Select Paint That Bonds to Your Specific Chair Material
Top Spray Paints for Mixed-Material Chairs
Rust-Oleum Universal All Surface works magic on metal-to-plastic transitions—its built-in primer eliminates separate priming steps. American Accents 2X Ultra Cover delivers opaque color in one coat on weathered surfaces, saving 30% paint versus standard sprays. Rust-Oleum Stops Rust 5-in-1 features vertical fan pattern perfect for chair legs and spindles—its corrosion resistance outperforms standard enamels by 30%.
Critical Paint Type Decisions
Choose oil-based paint for wrought iron or steel chairs in humid climates—it penetrates metal pores for rust prevention. Select exterior acrylic for wood and plastic chairs—its flexibility accommodates expansion/contraction without cracking. Apply rust-converter primer first on severely corroded metal; this chemical treatment creates a stable base for topcoats.
Strategic Color Selection for Longevity
Opt for warm neutrals like hammered brown or black—they hide scratches better than light colors while complementing any décor. Avoid pure white on plastic chairs; UV exposure causes yellowing within one season. Embrace 2025’s satin warm caramel for sophisticated appeal that coordinates with stone patios and wood decks. Always test colors on hidden chair areas first—sunlight dramatically alters appearance.
Perfect Spray Painting Technique for Flawless Coverage
Create an Ideal Painting Environment
Work in garage with doors open or shaded backyard area—direct sunlight dries paint too fast causing orange-peel texture. Lay drop cloths 3 feet beyond chairs to catch overspray; secure edges with painter’s tape to prevent tripping. Check conditions using weather app—ideal painting occurs between 60-80°F with humidity below 70%. Hang chairs from hooks if possible; this allows 360-degree access without repositioning.
Professional Spray Method for Smooth Finish
Hold can 8 inches from surface—too far causes dry spray, too close creates runs. Move spray in continuous motion starting trigger before reaching chair edge, releasing after passing it. Apply first coat vertically across seat, then second coat horizontally for even coverage. Use light coats drying 90 minutes apart—heavy coats cause drips that ruin smooth finishes. Watch for “orange peel” texture indicating too-warm conditions; move to shade immediately if noticed.
Protect Non-Paintable Areas Like a Pro
Sling Chair Masking Precision
Apply 2-inch blue painter’s tape along every metal-to-mesh seam, stretching tape slightly as you press for tight seal. Seal edges with credit card to prevent seepage—this 5-minute step saves hours of cleanup later. Cover mesh with kraft paper secured by tape, avoiding newspaper (ink transfers to wet paint). Allow extra masking time—budget 25 minutes per sling chair versus 10 minutes for solid-back models.
Hardware and Glass Protection Tactics
Remove all screws and bolts before painting—reassemble with fresh hardware for like-new appearance. Wrap glass tabletop edges with FrogTape® for delicate surfaces; its patented seal prevents bleed-through. Insert plastic bags over chair legs if painting while assembled—tape openings tightly to frames. Never skip masking—repairing paint on cushions takes longer than proper prevention.
Accelerate Drying Without Compromising Finish
Smart Curing Timelines for Safe Handling
Wait 75 minutes between coats—touching too soon creates fingerprint marks requiring sanding. Move chairs carefully after 3 hours—dragging causes edge chipping even when paint feels dry. Delay full use for 24 hours—seating weight before complete cure creates permanent indentations. Apply second coat within 4 hours for optimal layer bonding; wait overnight if exceeding this window.
Weather-Adaptive Drying Strategies
Increase airflow with box fan set on low—speeds drying without blowing dust onto wet paint. Cover chairs with plastic sheet if unexpected rain threatens—remove immediately when dry to prevent moisture trapping. Avoid ceiling fans during drying; air currents create uneven texture on horizontal surfaces. Never use hairdryer—excessive heat causes cracking and poor adhesion.
Apply Protective Topcoats for Extreme Weather Resistance
Material-Specific Sealant Application
Spray metal chairs with clear rust-inhibiting topcoat—especially in coastal areas where salt air accelerates corrosion. Brush wood chairs with marine-grade spar urethane; its UV blockers prevent graying and cracking. Maintain 10-inch spray distance on topcoats—same as paint application for uniform thickness. Apply only one topcoat layer—multiple coats create slippery surfaces on chair seats.
Longevity-Boosting Maintenance Plan
Inspect chairs every 4 months for chips, focusing on armrests and leg joints where wear concentrates. Touch up damage immediately using small artist brush—wait and rust spreads under surrounding paint. Store chairs upright under covered patio during winter; this doubles paint lifespan versus ground storage. Clean with mild soap only—vinegar solutions degrade protective topcoats within weeks.
Fix Common Painting Mistakes Immediately
Emergency Peeling and Bubbling Solutions
Peeling within days means surface contamination—strip paint with 150-grit sandpaper and restart prep process. Bubbling indicates moisture trapped under paint—sand affected areas, dry 48 hours, and repaint. Rust bleeding through requires immediate rust-converter application before repainting. Orange-peel texture needs light sanding with 320-grit paper between coats for smooth finish.
Prevention Tactics for Future Projects
Always test adhesion by applying tape to dried paint—if it pulls off flakes, prep was inadequate. Keep paint can warm in 70°F room before use—cold cans cause poor atomization. Shake can for full 2 minutes after ball starts rattling; under-shaking creates uneven color. Work top-to-bottom—painting seat before legs prevents drips on finished surfaces.
Maximize Your Paint Job’s Lifespan to 8+ Years
Documented Real-World Performance
Properly prepped metal chairs maintain flawless finish for 8 years with seasonal touch-ups—my client’s hammered brown dining set proves this. Chairs under roof coverage show minimal wear after 5 years versus 2 years for fully exposed sets. Annual maintenance (cleaning + spot touch-ups) extends service life 40% beyond neglect scenarios. Correct topcoat application prevents 95% of weather-related failures observed in DIY projects.
Immediate Value Creation
Complete set transformation costs $38 average—versus $550 for comparable new furniture. Active work time stays under 3 hours with proper preparation—drying time does the heavy lifting. Custom colors impossible to buy become your unique outdoor signature. Increase home appeal visibly—painted chairs elevate entire patio aesthetics while protecting your investment.
Your newly painted patio chairs will become the centerpiece of outdoor gatherings, turning weathered eyesores into conversation starters. By matching preparation to material and applying these professional techniques, you’ve created a custom look that saves hundreds while lasting for years. The satisfying click of a well-painted chair leg on your deck, the compliments from neighbors, and the pride of transformation make this weekend project priceless. Now grab a cold drink, admire your work, and enjoy your revitalized outdoor sanctuary—all while knowing you outsmarted replacement costs with smart painting strategy.


