
That dining set gathering dust in your garage? With the right approach, you can transform it into a stunning focal point for under $200. Whether you’re working with a thrift store find or refreshing Grandma’s hand-me-downs, this guide walks you through every step—from assessing your pieces to applying that final protective coat. Properly executed painting old table and chairs creates furniture that looks professionally refinished while saving you hundreds compared to store-bought alternatives.
Your dining set deserves more than a quick coat of paint. The difference between a shoddy DIY job and a professional-looking transformation comes down to understanding your materials, choosing the right products, and following proven techniques. This comprehensive guide eliminates guesswork, giving you the confidence to tackle even intricate chair spindles and large tabletop surfaces with ease.
Diagnose Your Furniture’s Specific Needs First
Before you crack open a paint can, take time to understand what you’re working with. This quick evaluation prevents costly mistakes and ensures your hard work lasts for years.
Identify Wood Type and Condition
Softwoods like pine absorb paint unevenly, often requiring extra primer coats to prevent blotchiness. Hardwoods such as oak or maple offer smoother surfaces but may resist paint adhesion without proper prep. Test your pieces by pressing a fingernail into an inconspicuous area—softwoods dent easily, hardwoods resist. Check for veneer surfaces by examining edges where the wood grain suddenly stops; these thin layers require gentle sanding to avoid sanding through entirely. Laminate surfaces need special bonding primers designed specifically for non-porous materials to ensure proper adhesion.
Test Existing Finish Type
Quickly determine your current finish with simple tests. Apply a small amount of denatured alcohol to a cotton swab—if the finish dissolves, it’s shellac. Lacquer thinner will soften lacquer finishes. For pre-1978 furniture, always use a lead test kit before sanding. Look for telltale signs of different finishes: polyurethane creates a thick, plastic-like coating; varnish appears as a thinner, amber layer; paint obviously covers the wood grain entirely. This knowledge dictates your sanding approach and primer selection.
Master Surface Preparation for Flawless Results
Proper preparation separates professional results from amateur attempts. Expect to spend 60% of your total project time on these crucial steps.
Deep Clean Every Surface
Remove all hardware first—every screw, knob, and hinge comes off. Vacuum crevices using a brush attachment, then wash with a TSP solution or degreasing cleaner for heavy grime. Rinse thoroughly and allow 24 hours drying time. For built-up furniture polish or oily residues, apply mineral spirits with lint-free cloths. Test in an inconspicuous area first. Focus extra attention on frequently touched areas like chair arms and table edges where oils from skin create adhesion challenges.
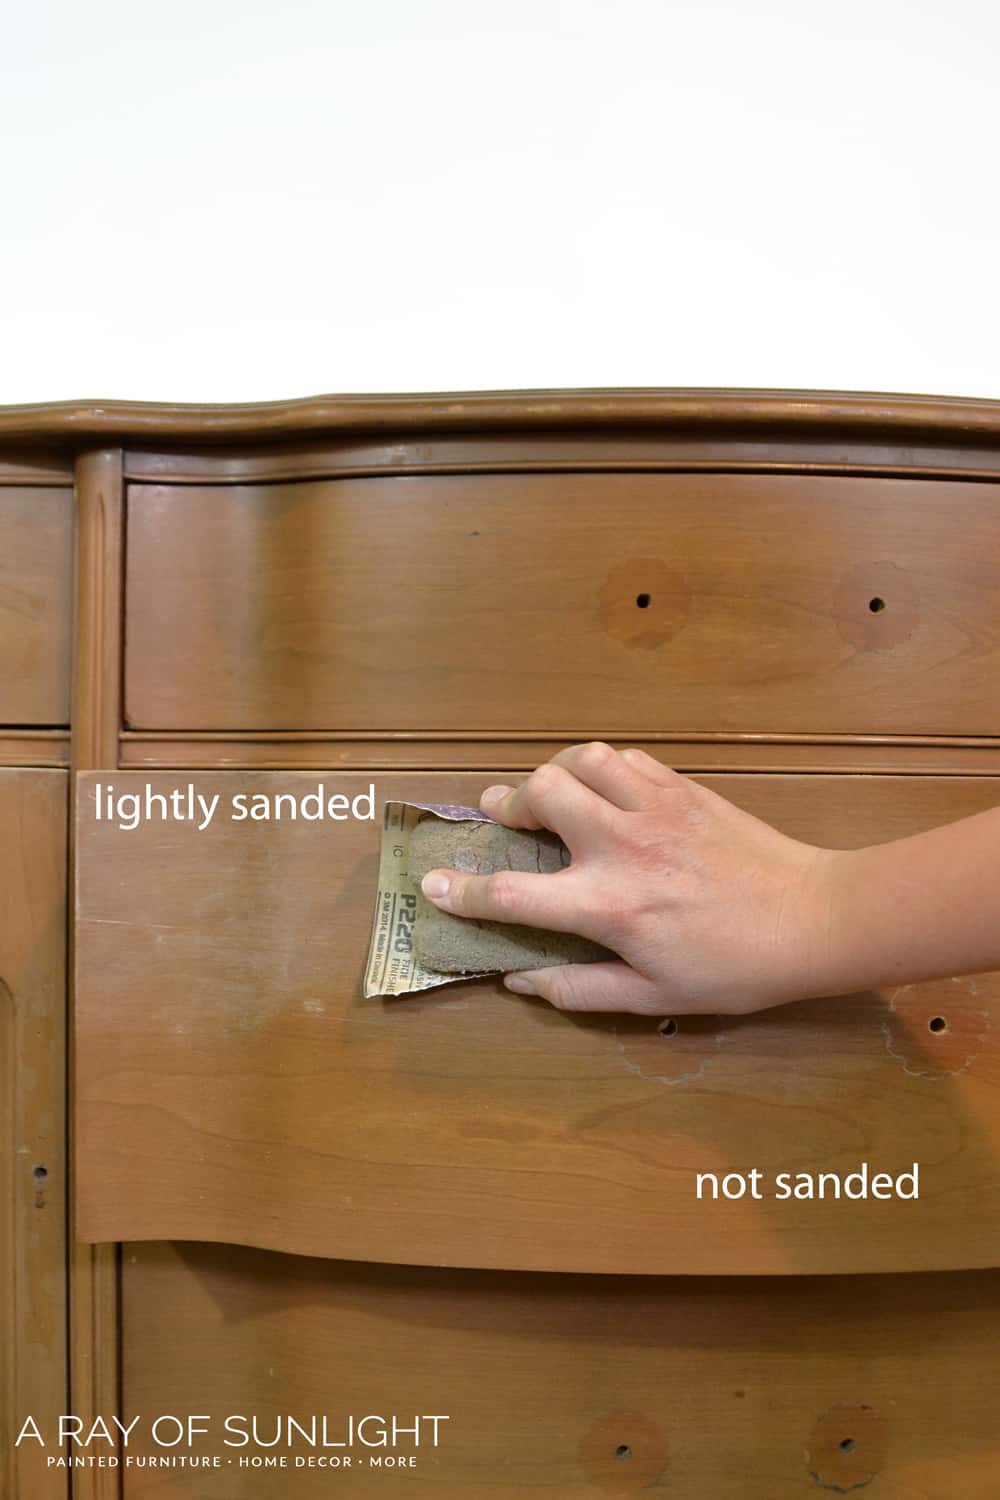
Sand With Purpose, Not Randomly
Start with 80-grit sandpaper only if you need heavy varnish removal or surface leveling. Most projects begin with 120-grit to scuff the surface for paint adhesion. Progress to 180-grit for smoothing, then finish with 220-grit light hand-sanding between coats. Tool selection matters: Use an orbital sander for large flat surfaces like tabletops. Sanding sponges work best for curved chair legs and spindles. For intricate carvings, try detail sanders or sanding cords. Always sand in the direction of the wood grain to avoid visible scratches.
Select Paint System for Your Specific Furniture
Your paint choice dramatically affects the final look, durability, and required effort. Each type offers distinct advantages for furniture applications.
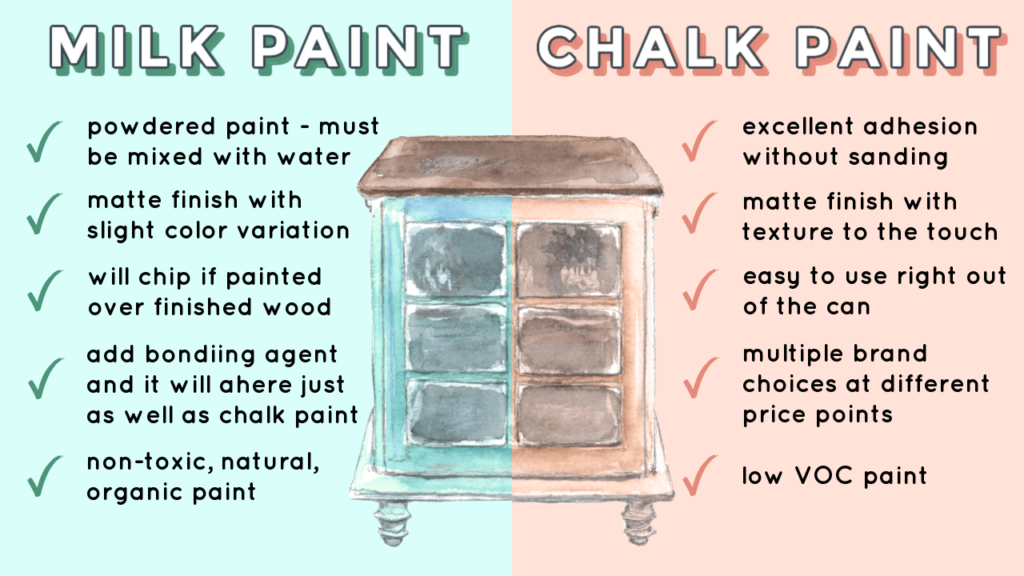
Chalk Paint vs. Latex vs. Oil-Based
Chalk paint requires minimal prep and adheres to most surfaces without extensive sanding. It provides a matte vintage finish perfect for distressing but needs wax or polyurethane topcoat protection. Available in 50+ premixed colors, it’s ideal for achieving that farmhouse or shabby chic look. Latex paint offers water-based cleanup, low odor, and quick 1-2 hour drying between coats. It requires primer on glossy surfaces and comes in all sheens from flat to high-gloss. Benjamin Moore Advance provides furniture-grade durability specifically designed for pieces like yours. Oil-based paint delivers superior durability and leveling but needs 8-24 hours between coats. Its strong odor requires excellent ventilation. While it yellows slightly over time, nothing beats its longevity for high-use surfaces like tabletops.
Sheen Selection by Use Case
Choose high-gloss for maximum durability and easy cleaning on tabletops and chair seats. Semi-gloss offers good durability with less reflection. Satin provides subtle sheen while hiding minor imperfections. Matte or chalk finishes create vintage appearances but show fingerprints and require more maintenance. Pro tip: Consider your room’s lighting. High-gloss finishes amplify natural light but highlight every imperfection. Matte finishes absorb light, creating a softer appearance.
Perfect Your Painting Technique for Professional Results
The difference between amateur and professional results often comes down to technique and patience.
Brush Selection and Loading
Invest in a high-quality angled sash brush (2-2.5 inch) for cutting in edges and spindles. Synthetic bristles work best for water-based paints; natural bristles suit oil-based products. Keep separate brushes for primer and paint to avoid contamination. Loading technique: Dip brush 1/3 into paint, tap against can sides (don’t wipe), and apply in long, smooth strokes. Maintain consistent brush loading to avoid lap marks.
Directional Painting Strategy
Always follow wood grain direction on visible surfaces. Use long smooth strokes on flat areas, dabbing technique for carved details. Maintain consistent pressure and avoid overbrushing, which creates visible brush marks. Edge management: Paint edges first with a brush, immediately following with a roller on flat areas. Use painter’s tape for crisp lines, removing tape while paint remains slightly tacky.
Apply Protective Finishes for Longevity

Your painted furniture needs proper protection to withstand daily use and maintain its beauty.
Topcoat Application Methods
Water-based polyurethane provides clear protection without yellowing. Apply 2-3 thin coats with a foam brush, sanding between coats with 320-grit paper. Allow 24-48 hours for full hardness. For chalk paint finishes, apply clear or dark wax with a lint-free cloth, buffing after 15 minutes. Reapply every 6-12 months. Critical warning: Never skip the topcoat on tabletops or chair seats—these high-traffic areas will quickly show wear without proper protection.
Follow This 5-Day Painting Schedule
Spread the work across five days for professional results without exhaustion.
Day 1: Remove hardware, deep clean, make repairs, and start initial sanding. Work systematically—chairs first, then table. Day 2: Complete sanding, fill imperfections, and apply primer to all surfaces. Label hardware bags for easy reinstallation. Day 3: Lightly sand primer with 320-grit, apply first paint coat, and let dry overnight in a dust-free area. Day 4: Sand between coats, apply second coat, and plan hardware reattachment after 24 hours. Day 5: Apply topcoat if needed, cure 48-72 hours before use. Use this time to clean and update hardware.
Fix Common Painting Problems Immediately
When Paint Won’t Stick
Peeling or flaking usually indicates inadequate prep or incompatible products. Complete removal and starting over solves this. Fish eye or cratering results from surface contamination—clean thoroughly with degreaser and apply a primer sealer. Quick fix: For minor peeling, sand the affected area, apply bonding primer, and repaint.
Fixing Surface Imperfections
Brush marks stem from low-quality brushes or overbrushing. Sand smooth with 320-grit and reapply using proper technique. Runs and sags occur from applying too much paint—sand smooth when dry and repaint thinly. Pro tip: Add Floetrol to latex paint to improve flow and leveling without thinning the paint.
Smart Budgeting for Your Painting Project
5-Piece Dining Set Cost Breakdown
- Paint and primer: $40-60 for chalk paint set, $25-35 for latex paint and primer
- Brushes and tools: $30-50 for quality brushes, $15-25 for sandpaper and supplies
- Hardware updates: $20-40 for new knobs or pulls, $50-100 for chair cushion updates
- Total range: $100-200 for complete transformation
Budget hack: Buy sample pots of paint for small projects or touch-ups instead of full quarts. Repurpose old t-shirts as lint-free rags for wax application.
Maintain Your Painted Furniture for Years
Weekly and Annual Care
Dust weekly with a microfiber cloth, cleaning spills immediately with a damp cloth. Avoid harsh chemicals or ammonia-based cleaners. Every year, inspect for chips or wear, touching up as needed. Apply a fresh coat of clear protective finish every 2-3 years for high-use pieces. Critical maintenance step: Never place hot dishes directly on painted surfaces—always use trivets to prevent heat damage.
When to Consider Another Refinishing Project
Consider refinishing when damage exceeds 30% of the surface area. Evaluate if your current style still fits your décor, factoring in time investment versus replacement cost. Quality painted furniture typically lasts 5-10 years before needing refreshment. If you love the piece structurally but hate the color, a simple repaint takes less time than you think—just follow these same preparation steps.
Your old table and chairs hold incredible potential. With these techniques, you’ll create a custom piece that reflects your style while saving hundreds compared to buying new. The satisfaction of transforming something worn into something wonderful? That’s priceless. Start your painting old table and chairs project this weekend—you’ll be dining in style before you know it.


