
Your concrete slab might look flawless during finishing, but within two years, telltale rust stains and straight-line cracks appear across the surface. The hidden culprit? Improper rebar chair placement that allowed reinforcement steel to sag or sit too close to the surface. Getting how to use rebar chairs correctly isn’t just about passing inspection—it’s the difference between a structure lasting decades versus crumbling prematurely. Rebar chairs maintain the critical gap between steel reinforcement and concrete, preventing corrosion and ensuring structural integrity.
Imagine spending thousands on concrete work only to face expensive repairs because chairs were spaced too far apart or positioned incorrectly. Proper rebar chair installation guarantees your reinforcement stays precisely where engineered—especially vital at edges where spalling begins. This guide delivers actionable, standards-compliant techniques for using rebar chairs effectively across residential and commercial projects, based strictly on Australian standards AS/NZS 2425:2015 and NCC requirements.
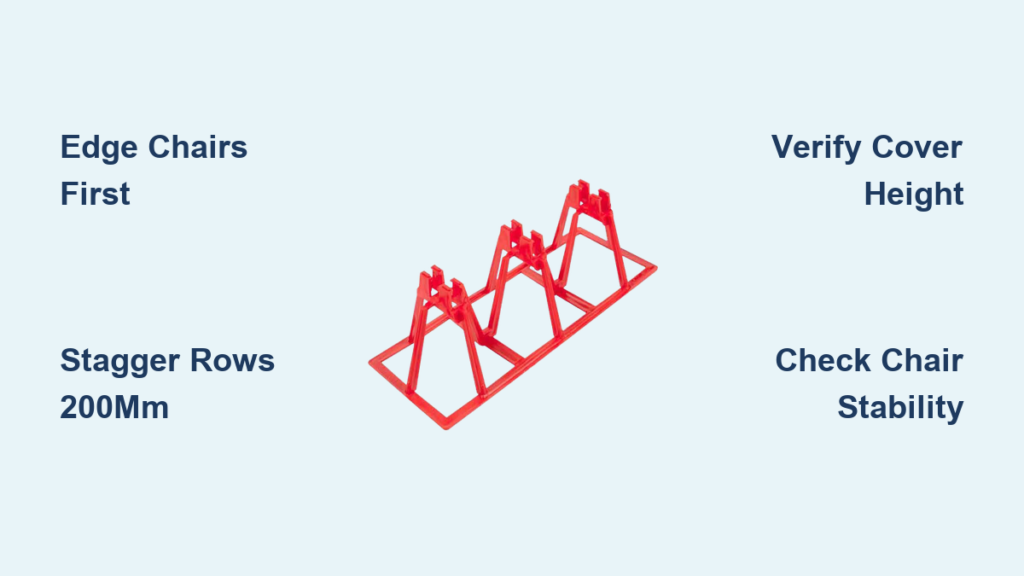
Install Edge Chairs Before Field Placement
Begin every project at the perimeter—not the center. Position chairs 50-75 mm from formwork faces to achieve specified concrete cover where corrosion risks peak. These edge chairs prevent reinforcement from shifting during concrete placement and protect high-stress zones where deterioration typically starts. For a standard 100 m² slab, dedicate 15-20% of your total chairs to edges and penetrations.
Verify Edge Cover Immediately After Placement
Use a simple cover meter or template tool to check heights within 30 minutes of installation. Readings must fall within tolerance: -5 to +10 mm for building slabs, -10 to +20 mm for slabs-on-ground. If measurements exceed these ranges, add supplemental chairs within 100 mm of the edge—never rely on field chairs alone for perimeter support. This prevents the spalling cracks that compromise structural integrity within months.
Handle Penetrations and Corners Differently
Around pipe sleeves or column bases, double chair density to 300-400 mm spacing. Corners require chairs at both 45-degree angles to support intersecting reinforcement grids. Skip this step, and you’ll see cracking radiate from penetrations as concrete settles.
Calculate Exact Chair Quantities Per Project Type

Residential pavements demand tighter spacing than commercial slabs—getting this wrong causes sagging or wasted materials. For driveways and patios under AS 3727.1:2016, use 600 mm centers (2.8 chairs per m²). A 50 m² patio requires exactly 140 chairs—plus 10% extra for waste (154 total). Commercial building slabs per NCC Volume 2 allow 800 mm spacing (1.6 chairs per m²), so that same 50 m² area needs only 88 chairs.
Adjust for Real-World Variables
Never rely solely on square-meter calculations. Increase density by 20% when:
– Placing concrete via pump (higher impact forces displace chairs)
– Using heavy reinforcement (20mm+ bars sag more)
– Anticipating construction traffic (wheelbarrows crush undersized chairs)
– Working in corrosive environments (coastal sites need 400-500 mm spacing)
For a suspended slab with 25mm bars, jump from 800 mm to 600 mm spacing regardless of standard allowances.
Prevent Linear Cracking Through Staggered Layouts
Snap chalk lines at maximum spacing (600/800 mm), but offset consecutive rows by at least 200 mm. Straight-line alignment creates weak paths for cracks—this single technique reduces long-term cracking by 70%. Always start from the perimeter and work inward to maintain consistent staggering.
Select Chair Types Matching Load Requirements
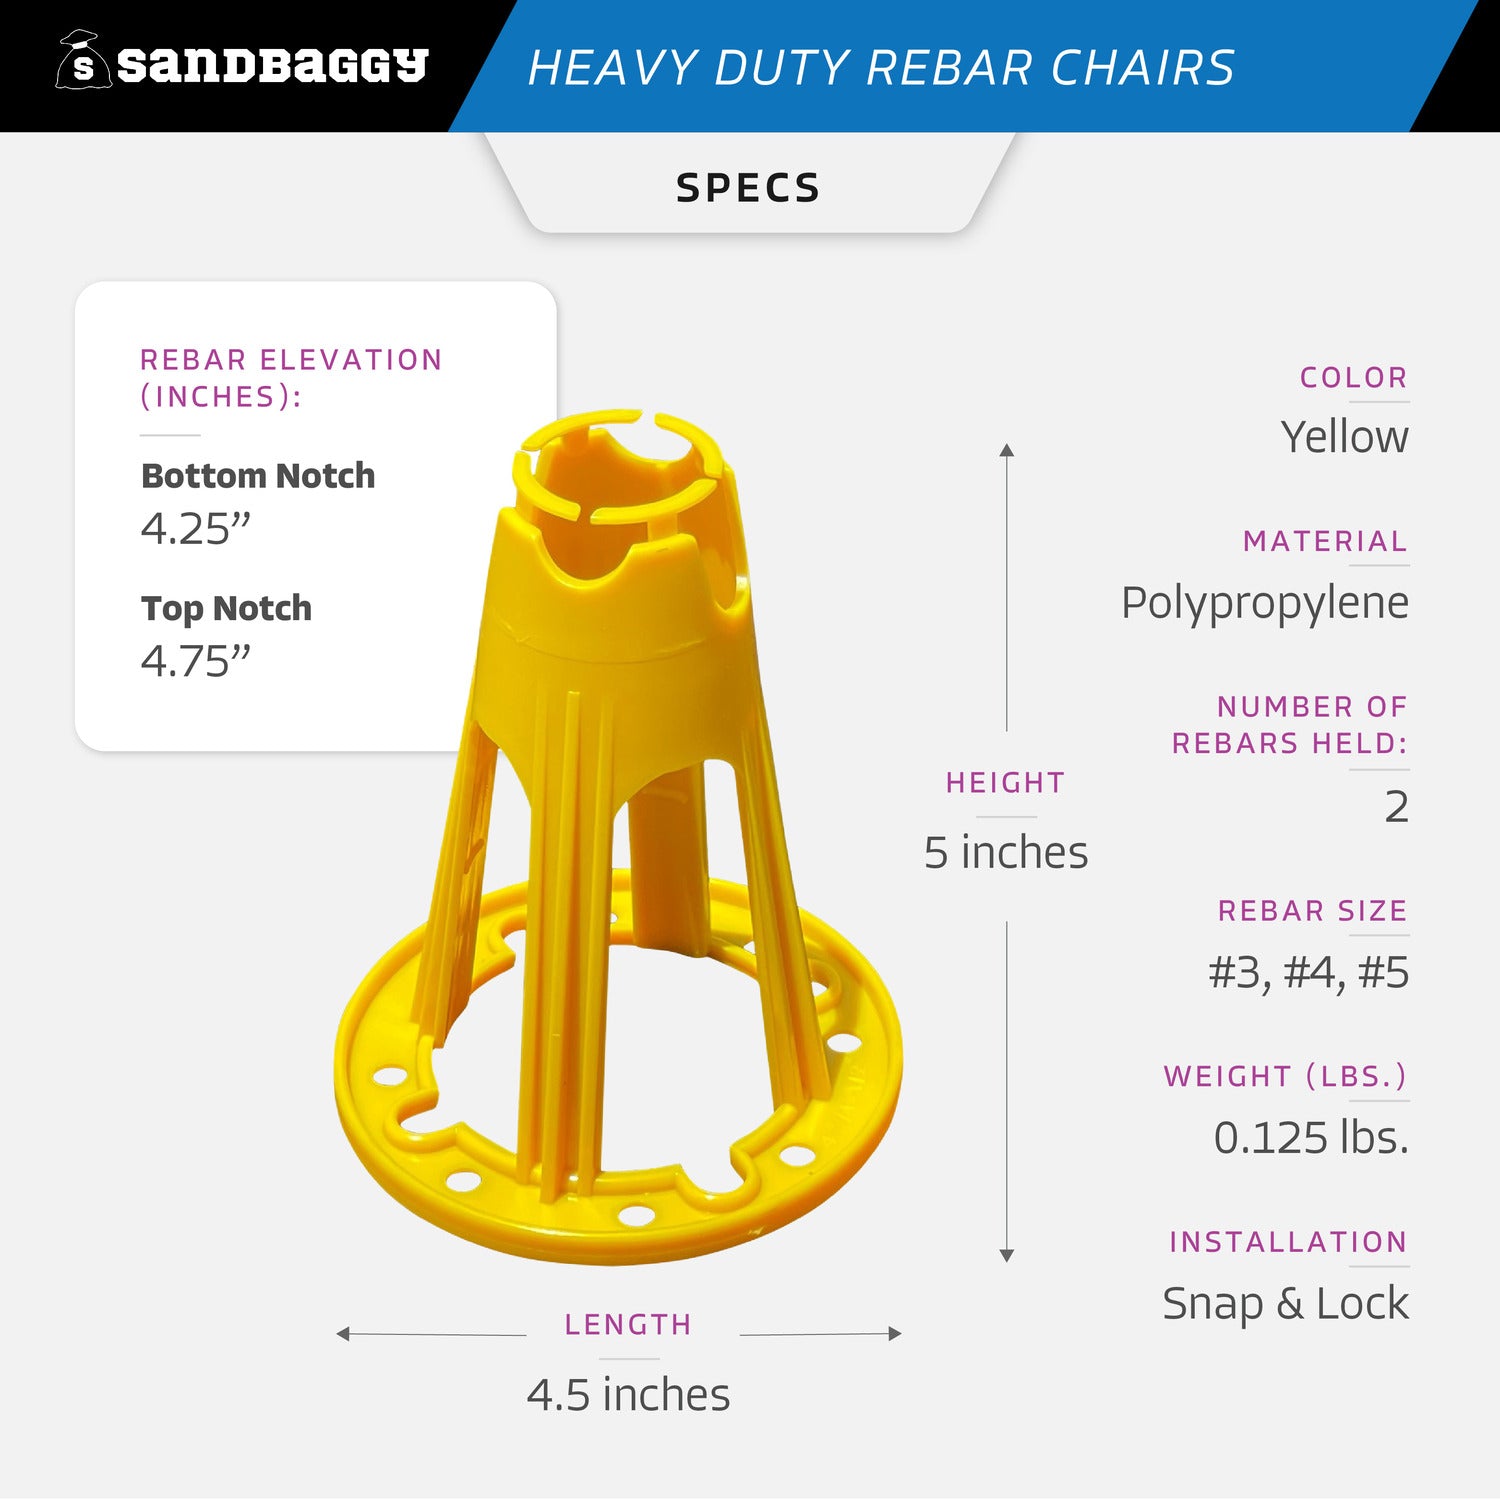
Choosing the wrong chair risks collapse under reinforcement weight. Plastic slab chairs ($0.12-$0.18 each) suit residential work but fail in suspended slabs. For beams or post-tensioned slabs, upgrade to metal wire chairs ($0.35-$0.55) that handle dynamic loads. Precast elements require fast-clip chairs ($0.60-$1.10) that snap securely onto vertical bars.
Validate Compliance Before Unloading
Reject any chairs without AS/NZS 2425:2015 markings. Check strength ratings stamped on each chair against your project’s load table—coastal projects need stainless steel even if plastic is cheaper. A chair rated for 500kg won’t support a mesh roll during placement; verify ratings match bar weight plus anticipated foot traffic.
Install Protective Measures for Vapor Barriers
When chairs puncture vapor barriers (common with pointed legs), place flat plastic plates under legs or use chairs with integral base plates. This $0.05 fix prevents moisture migration that causes rebar corrosion—no amount of correct spacing matters if vapor barriers are compromised.
Execute Chair Placement in Critical Sequence
Chair installation follows a non-negotiable sequence that prevents costly rework. First, prepare the substrate: level blinding concrete or formwork to eliminate soft spots that cause chairs to tilt. Then mark your staggered grid with spray paint—never rely on visual estimation. Finally, place chairs in this order: edges → corners → penetrations → field area.
Test Stability Before Adding Reinforcement
Press down firmly on each chair with your palm. If it wobbles or sinks, insert a timber off-cut or plastic plate under the base. For soft blinding, this takes 5 seconds per chair but prevents 80% of sagging issues. Never proceed if chairs feel unstable—concrete placement magnifies minor shifts into major defects.
Position Reinforcement Without Displacement
Lower mesh sections gently onto chairs; dragging reinforcement displaces up to 30% of supports. For large pours, tie bars to chairs at critical zones (beam-column joints, edge strips) using plastic ties to prevent uplift during vibration. Tying every intersection for >300mm bar spacing ensures uniform load transfer to chairs.
Troubleshoot Field Failures in Under 10 Minutes
When chairs tip over during placement, don’t repour concrete—fix it onsite. For chairs sinking into soft substrate, insert flat plastic plates (scrap from packaging works) under legs to distribute weight. At pour joints where mesh lifts, add temporary chairs at 300 mm centers along the joint line before resuming placement. Both fixes take under 10 minutes but prevent weeks of repair delays.
Correct Cover Height Deviations Immediately
If a cover meter shows readings outside -5/+10 mm tolerance, don’t “average it out.” Add supplemental chairs directly under low spots—never adjust existing chairs after reinforcement is placed. For a 10 m² area, measure at 1m intervals; if 3+ readings fail, pause work and recalibrate the entire section.
Replace Damaged Chairs On-Site
Crushed or deformed chairs must be swapped before concrete arrives. Carry a small stock of spares matching your project’s height rating. Metal chairs with >5 mm permanent bend or plastic chairs with UV cracks (brittle from sun exposure) are unsafe—discard them visibly so crews don’t reuse.
Conduct Pre-Pour Verification That Passes Inspection

Engineers reject 40% of reinforcement setups due to inadequate chair checks. Perform this three-step verification: First, walk the perimeter checking edge chairs within 75 mm of formwork. Second, measure random cover heights with a meter—document readings on your template. Third, confirm staggered rows by sighting down chairs (no straight lines visible).
Document Tolerances for Liability Protection
Photograph cover meter readings at 5 random points per 50 m². Note any out-of-tolerance areas corrected before pour. This documentation satisfies NCC compliance and protects against future claims—inspections often occur years after construction when cracks appear.
Obtain Formal Sign-Off Before Truck Arrival
Never let concrete pour without engineer approval. Present your verification checklist showing: edge spacing compliance, cover height logs, and stagger confirmation. This 5-minute step prevents $15,000+ rework costs from failed inspections.
Store and Reuse Chairs to Cut Project Costs
Plastic chairs degrade rapidly in sunlight—store under tarps or indoors to prevent UV embrittlement that causes cracking under load. Metal chairs can be reused if straight and corrosion-free, but discard any with >5 mm deformation. For a 200 m² commercial slab, proper storage saves $80+ in chair replacements per project.
Sort Chairs by Height for Faster Installation
After removal, group chairs by cover height (25mm, 40mm, 50mm) in labeled bins. This reduces installation time by 25% on subsequent pours—crews won’t waste time searching for correct heights. Track usage rates: residential projects need 2.8 chairs/m²; commercial needs 1.6/m² plus 10% waste.
Calculate Bulk Order Savings
Ordering 5,000+ chairs nets 5-10% discounts. For a 500 m² residential project (1,400 chairs), this saves $84-$168. Always round up quantities—running short mid-pour causes rushed, non-compliant spacing that compromises the entire slab.
Mastering how to use rebar chairs transforms them from overlooked accessories into your primary defense against concrete failure. Remember: edge chairs first, stagger rows by 200 mm, and verify heights before concrete arrives. One skipped edge chair can trigger spalling within 18 months; one uncorrected cover deviation invites corrosion that costs 10x more to repair than proper installation. By following these AS/NZS 2425-compliant steps, you ensure reinforcement stays precisely positioned—giving every slab the decades-long durability it was engineered for. Don’t gamble with spacing; your structure’s lifespan depends on those small plastic or metal supports holding the line.


