
Your concrete slab’s structural integrity depends entirely on correctly positioned reinforcement. Yet countless DIYers and even some contractors pour slabs with rebar resting directly on the ground—a guaranteed recipe for premature cracking and failure. Concrete chairs, those small but critical supports, ensure your reinforcement stays exactly where it needs to be during the pour. When wire mesh or rebar sinks to the bottom of your slab, it becomes structurally useless, leaving you with a surface that cracks within months rather than lasting decades.
Learning how to use concrete chairs properly separates amateur concrete work from professional results. This guide reveals the exact placement techniques and spacing calculations that keep reinforcement in the optimal position—saving you costly repairs down the road. Whether you’re pouring a backyard patio, garage floor, or driveway, mastering concrete chair installation means the difference between a slab that cracks after one winter and one that remains solid for 30 years.
Select the Correct Concrete Chair Material for Your Project

Steel vs Plastic vs Concrete Chairs
Steel chairs deliver unmatched strength for heavy commercial applications where rebar weighs more than 10mm in diameter. Their rigid construction won’t compress under worker traffic, making them ideal for garage floors and driveways that must withstand vehicle loads. These metal supports create permanent positioning that won’t degrade over time.
Plastic chairs offer the best solution for residential wire mesh installations thanks to their corrosion resistance and precise height specifications. Available in standardized heights from 25mm to 100mm, these lightweight supports won’t rust or create thermal bridges in radiant floor systems. For a typical 100mm thick patio slab, 40mm plastic chairs position your mesh perfectly in the lower third of the slab.
Concrete brick chairs serve as a budget-friendly alternative when commercial chairs aren’t available. Use only gray concrete bricks—never red clay bricks—as the latter disintegrate when wet, creating dangerous voids that compromise structural integrity and violate building codes. These masonry units work best for temporary edge supports where precision isn’t critical.
Match Chair Type to Your Specific Application
For wire mesh patios and walkways, 40mm plastic chairs provide ideal support without breaking the bank. Driveways and garage floors require the superior load-bearing capacity of 50-75mm steel chairs to prevent sinking under vehicle weight. When working with heavy rebar (10mm diameter or larger), choose steel chairs specifically rated for the load. For radiant floor systems with PEX tubing, plastic chairs prevent thermal bridging while maintaining proper positioning above insulation.
Calculate Precise Chair Spacing for Structural Integrity
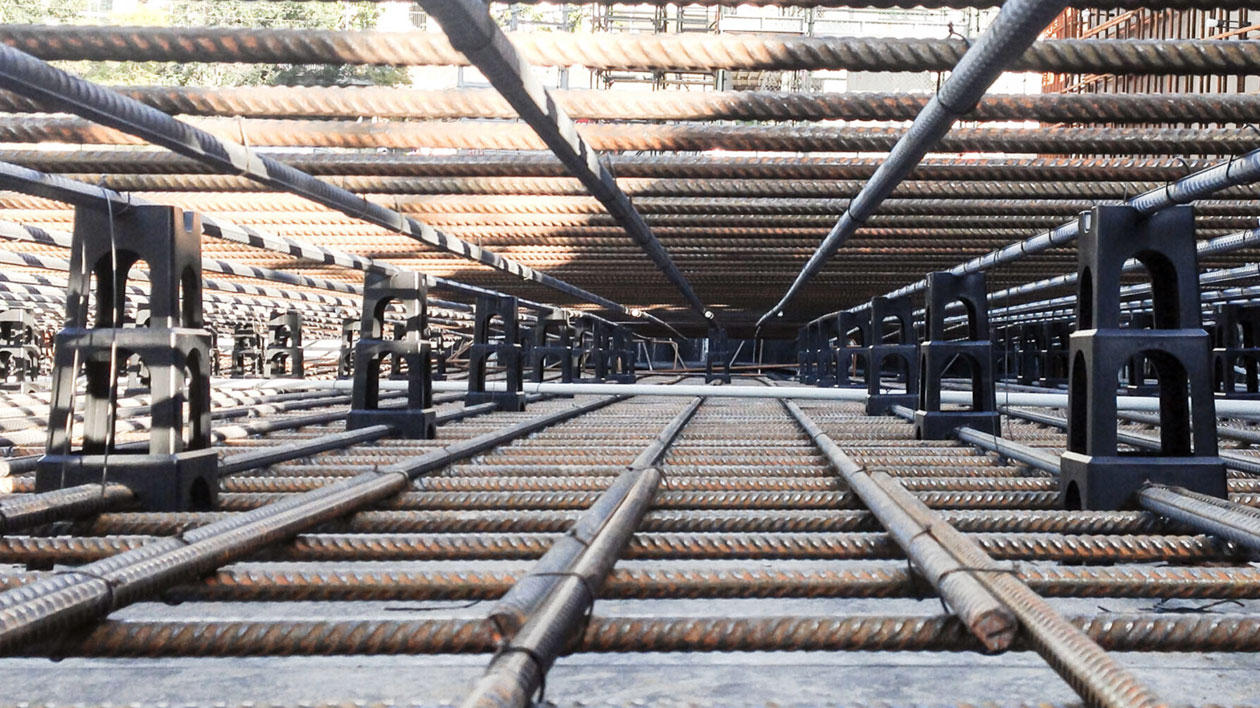
Follow Australian Standards for Maximum Support
Place concrete chairs no more than 800mm apart for building construction, or tighten the spacing to 600mm for residential pavements as specified in AS 3727.1:2016. This spacing translates to approximately one chair per square meter for most residential applications. Ignoring these standards risks reinforcement displacement that leads to structural failure.
Maintain Proper Edge Distance for Concrete Cover
Position your first row of chairs between 50-75mm from all formwork edges to ensure adequate concrete cover. This critical distance prevents reinforcement from contacting the form edges, which would create pathways for moisture and accelerate corrosion. Many cracked slabs result from chairs placed too close to the edge, allowing rebar to shift during the pour.
Prevent Linear Cracking with Strategic Placement
Never align chairs in straight rows across your entire pour—this creates weak points where cracks will inevitably form. Offset adjacent supports by at least 200mm in both directions to distribute stress evenly throughout the slab. Distribute chairs in a staggered grid pattern rather than straight lines to eliminate continuous weak points in your concrete.
Prepare the Substrate and Mark Chair Positions Accurately
Create a Grid Layout for Consistent Spacing
Snap chalk lines across your substrate at 600-800mm intervals based on your project specifications. Mark the intersection points where each chair will sit, starting from the corners and working inward toward the center. Double-check all measurements before placing any chairs—this small investment in precision prevents major problems during the pour.
Ensure Substrate Stability Before Installation
Clean and level your base thoroughly before positioning chairs. Chairs placed on uneven or soft surfaces will tilt or sink when workers step on them, compromising your entire reinforcement system. For soft soil bases common in residential projects, place wider base plates or small concrete pads under each chair to prevent sinking during the pour.
Install Chairs Using Professional Techniques
Begin with Edge Support for Critical Coverage
Install chairs 50mm from all formwork edges first—these perimeter supports maintain proper concrete cover where it matters most. Without adequate edge support, rebar tends to sag against the forms, creating insufficient cover that leads to spalling and corrosion within years.
Verify Chair Stability with the Wiggle Test
Press each chair firmly into the substrate until stable, then perform the essential “wiggle test”—if any chair rocks or tilts, adjust the base or relocate it to firmer ground. Unstable chairs cause reinforcement displacement that creates weak spots throughout your slab. For heavy rebar applications, add extra chairs under intersections where workers will frequently step.
Confirm Uniform Height with Laser Leveling
Use a laser level or string line to verify all chairs sit at identical heights across your entire pour area. Height variations exceeding 10mm create inconsistent reinforcement positioning that leads to weak spots. Properly leveled chairs ensure your rebar maintains the critical position in the lower one-third of your slab thickness.
Position Reinforcement on Chairs with Precision

Install Wire Mesh Without Displacing Chairs
Roll out wire mesh perpendicular to your longest dimension and carefully lift it onto the chairs while maintaining grid alignment. Never drag mesh across chairs—this simple mistake displaces supports and creates uneven positioning. For large pours, cut mesh into manageable 8’×8′ sections to prevent displacement during installation.
Secure Rebar to Chairs at Critical Points
Place rebar directly onto chair saddles and tie it to chairs at every third intersection for spacing 300mm or less. This prevents displacement during concrete placement and worker movement. For heavy rebar applications, increase tie-down frequency to ensure reinforcement stays precisely positioned throughout the pour.
Verify Optimal Reinforcement Height
Your rebar should sit in the lower one-third of your slab thickness—this positioning provides maximum structural performance. For a standard 100mm thick slab, aim for 30-35mm above the substrate. Measure multiple points across your pour area to confirm consistent positioning before proceeding to the concrete placement stage.
Conduct Final Pre-Pour Verification
Perform the Comprehensive Stability Check
Walk your entire pour area and wiggle test every chair. Replace any that feel loose or tilted, and add extra chairs under heavy rebar intersections or high-traffic areas. This final verification prevents the most common failure mode—chairs sinking when workers step on them during concrete placement.
Complete the Pre-Pour Inspection Checklist
Check all chairs for proper seating and stability
Verify rebar height throughout the entire pour area
Confirm no displaced supports exist
Ensure adequate edge clearance (50-75mm) is maintained
Check for straight-line chair patterns that could cause cracking
Avoid Costly Chair Installation Mistakes
Never Attempt Mesh Pull-Up During Pouring
The outdated practice of pulling up wire mesh as concrete is placed proves completely unreliable in real-world conditions. Workers inevitably step on the reinforcement during screeding operations, forcing it back to the bottom where it provides zero structural benefit. Proper chair placement before pouring eliminates this dangerous shortcut.
Prevent Substrate Sinking with Base Reinforcement
Chairs frequently sink into soft substrates or insulation layers. Before installation, test substrate firmness by stepping near planned chair locations—if your foot sinks, add wider base supports or concrete pads under each chair. This simple precaution prevents reinforcement displacement that leads to structural weakness.
Calculate Exact Chair Quantities to Avoid Shortages
For standard residential work, multiply your square meters by 1.2 to account for waste and extra support needs. A 1,800 sq ft garage (167 sq m) requires at least 200 chairs minimum. Increase quantities by 50% when using heavy rebar, thick wire mesh, or spanning distances over 3 meters without intermediate support.
Critical takeaway: Proper chair installation creates concrete slabs that resist cracking for decades rather than months. Your reinforcement must stay precisely positioned in the lower third of the slab during the entire pour—anything less compromises structural integrity. When chairs are correctly spaced, secured, and verified before pouring, you create a foundation that maintains its strength through freeze-thaw cycles, heavy loads, and years of use. Invest the extra time to calculate, position, and secure your chairs properly—your future self will thank you when your concrete remains solid while neighboring slabs crack and crumble.


