
That cherished antique chair in your corner wobbles dangerously with every sit, its fabric torn and wood faded from decades of use. Before you consider replacing it, know this: 90% of antique chair issues stem from loose joints or worn upholstery—problems you can fix with basic tools and one weekend. Whether you rescued a thrift-store treasure or inherited a family heirloom, this guide delivers professional restoration techniques that preserve historical value while making your chair sturdy enough for daily use. You’ll master systematic inspections, joint repairs, and finishing methods that add decades of life without erasing its character.
Most DIYers overcomplicate antique chair repair, but the process breaks down into six repeatable phases: assessment, disassembly, structural fixes, surface prep, upholstery, and finishing. By focusing on problem-specific solutions—like reinforcing rusted metal rods or rebuilding shortened spindles—you’ll avoid the common mistake of stripping original finishes unnecessarily. This isn’t about making your chair look “new”; it’s about respecting its history while ensuring safety. Within 12 hours, you’ll transform a shaky relic into a conversation piece ready for another century of use.
Initial Chair Assessment
Quick Stability Test
Start by shaking the chair side-to-side and front-to-back to pinpoint weak spots. Note where legs wobble at the seat joint—this indicates failed glue bonds—while armrest movement suggests loose tenons. A slight wiggle requires only glue reinforcement, but major gaps mean the joint has separated completely. Critical warning: If you hear cracking sounds during testing, stop immediately—this indicates severe structural damage needing professional help. Document all problem areas with photos before proceeding; these become your repair roadmap.
Identify Damage Types
Examine wood texture for soft, crumbly patches signaling rot—common in chair feet exposed to moisture. Tiny holes or sawdust trails reveal active woodworm infestation requiring immediate quarantine. Water damage appears as dark stains, warped wood, or bubbling veneer. For metal components, check support rods for rust that prevents disassembly. Flip the chair over to locate manufacturer stamps; these help date the piece and guide historically appropriate repairs. Never skip this step—mistaking worm damage for simple wear leads to catastrophic failure later.
Essential Repair Toolkit

Core Tools Needed
Skip expensive specialty gear—these five items handle 95% of repairs:
– 4-6 bar clamps (6″-24″) for joint realignment
– Orbital sander with 120-grit paper for flat surfaces
– Micro sander for spindles and carvings
– Impact driver with #12 2″ wood screws (vintage screws often strip)
– Putty knife for finish removal and glue application
Repair Materials List
Prioritize reversible materials to maintain value:
– Elmer’s Wood Glue for joint restoration (non-toxic and sandable)
– Bondo wood filler for moderate damage (avoid polyester fillers on antiques)
– Minwax Provincial stain for warm, period-appropriate coloring
– Rustoleum Rust Dissolver gel for corroded hardware
– Quilt batting under foam for traditional upholstery bounce
Disassembly and Cleaning Process
Remove Upholstered Seats
Locate four flat-head screws (usually 2″) securing the seat to the frame—often hidden under the front edge. Gently work an old butter knife under screw heads to prevent stripping; vintage screws are brittle. Place screws in labeled containers by location. If upholstery is intact but worn, peel back fabric carefully to salvage padding for reference. Pro tip: Photograph screw placements—reassembly errors cause frustrating wobbles later.
Deep Cleaning Protocol
Mix ¼ cup Murphy’s Wood Soap per gallon of warm water for general cleaning. Wring microfiber rags until nearly dry—oversaturated wood swells and cracks. Scrape decades of grime from joints using a putty knife held at 45 degrees to avoid gouging. For rusted metal, apply Rustoleum gel, wait 15 minutes, then scrub with steel wool. Rinse with clean water spray, then dry thoroughly with towels. Critical step: Air-dry upright for 24 hours minimum—trapped moisture causes glue failure during repairs.
Structural Joint Repairs
Glue Joint Restoration
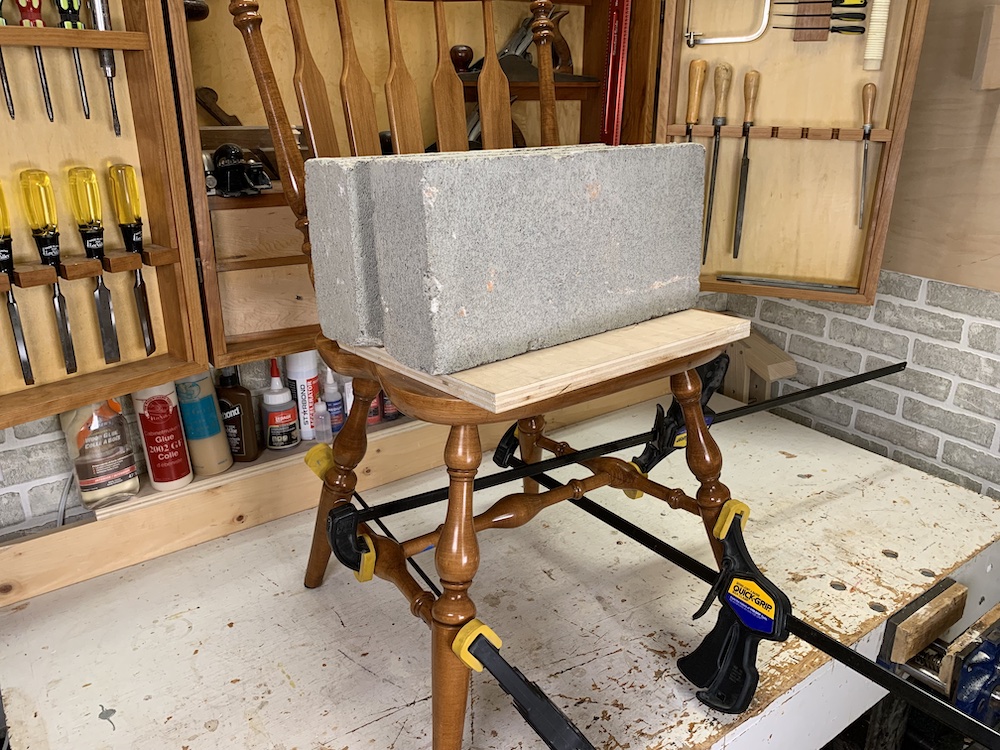
For loose leg-to-seat joints, insert a metal scraper into the gap to create space, then flood with wood glue. Clamp firmly while wiping excess with a damp rag. Reinforce with 2″ brad nails driven from hidden angles—never rely on glue alone for load-bearing joints. Time estimate: Allow 48 hours drying time; antique wood bonds slower than new lumber. Test stability by sitting gently after curing—any movement means re-clamping.
Metal Rod Reinforcement
When rusted support rods won’t budge, pull legs apart just enough to expose the tenon without cutting the rod. Apply glue liberally around the tenon where it enters the seat socket, then push legs back into place. Clamp cross-braces for 24 hours. If rods are severely corroded, drill out remnants and replace with stainless steel dowels coated in wax to allow future disassembly.
Surface Preparation Techniques
Removing Old Finish
Apply Citristrip thickly with a disposable brush, then seal with plastic wrap to prevent drying. Wait 45 minutes before testing—finish should lift like paste. Scrape vertically with a metal scraper to follow wood grain. Avoid: Steel wool on bare wood; it embeds particles that bleed through new finishes. For stubborn areas, reapply stripper but never use heat guns—they blister veneer.
Progressive Sanding System
Start with 120-grit on flat surfaces like seats, switching to sanding blocks for carvings. Always sand with the grain—cross-grain scratches are permanent on antiques. When hitting veneer, reduce pressure immediately; lift damaged sections with a putty knife rather than sanding through. Finish with 180-grit for stain absorption. Visual cue: Wood should feel uniformly smooth, not shiny.
Seat Reconstruction Guide
:max_bytes(150000):strip_icc()/how-to-reupholster-a-chair-seat-1313553-hero-6159ecf49d57407db629829e74deca0f.jpg)
Building New Seat Base
Trace the original seat onto ½” plywood, adding ⅛” margin for fabric wrapping. Cut with a jigsaw using slow, steady strokes to prevent splintering. Create pocket holes with a Kreg jig for invisible attachment, then secure with glue and #12 screws. Critical step: Sand all edges smooth—rough plywood cuts foam and fabric.
Upholstery Made Simple
Layer 1¼” foam over the base, then wrap with quilt batting for professional smoothness. Place fabric face-down, center the padded base, and staple one side fully. Pull fabric taut (not stretched) and staple the opposite side. Work around sides, folding corners like gift wrap: fold under excess fabric at corners before stapling. Trim close to staples with utility knife. Time estimate: 45 minutes for first-time upholsterers.
Rust and Hardware Fixes
Removing Stubborn Rust
Apply Rustoleum gel with a small brush to corroded screws or brackets. Wait 15 minutes, then scrub with wire brush in circular motions. Wipe clean with damp rag—repeat 3-4 times for heavy rust. Note: This leaves subtle scratches that add authentic patina; avoid polishing to mirror finish. For decorative hardware, clean gently with steel wool to preserve historical character.
Common Problem Solutions
Shortened Spindles from Water Damage
Mark extension lines on support notches using an intact spindle as reference. Cut new notches with a hacksaw, staying 1/16″ shallow to allow test-fitting. Smooth edges with sanding block, then drill pilot holes for screws. Pro tip: Insert thin cardboard shims during reassembly to test fit before permanent attachment.
Sharp Edge Repair
Apply wood glue beneath loose splinters on seat edges, clamp firmly, and let cure 24 hours. Sand smooth with 220-grit paper until no snags remain. Safety check: Run a white glove over edges—if it catches, sand further.
Final Assembly Process
Seat Installation
Replace brittle vintage screws with new #12 2″ wood screws—drive slowly to prevent stripping old wood. Snug tightly but stop when resistance increases. Reattach all hardware, then perform the “shake test” again. Critical step: Sit gently in the chair while shifting weight; listen for creaks indicating unresolved joint issues.
Maintenance for Longevity
Post-Restoration Care Plan
Dust weekly with microfiber cloths to prevent grit buildup. Reapply furniture wax every 6 months on high-use chairs—buff to soft sheen with cotton rag. Never place near: Radiators (dries wood), windows (fades finishes), or humidifiers (causes joint failure). Store in consistent 40-50% humidity environments; use hygrometers to monitor.
Annual Inspection Routine
Check all repaired joints each spring for loosening. Keep touch-up supplies matching your finish: a small jar of stain and wax lasts years. Address hairline cracks immediately with glue injection—delaying turns minor issues into major breaks. For complex structural problems, consult the National Preservation Institute’s directory of certified furniture restorers.
Your restored antique chair now blends historical authenticity with reliable strength—proof that patient craftsmanship outlasts fleeting trends. By mastering these techniques, you’ve not only saved a piece of history but gained skills applicable to any wooden treasure. The real victory? Knowing your great-grandchildren will rock in that same chair, tracing their fingers over the very joints you revived. Start with one project, document your process, and soon you’ll confidently tackle even the most battered heirlooms. Every repaired chair preserves a story; yours just added a new chapter.


