
You’re staring at a pile of store-bought patio furniture that wobbles, fades, and never quite fits your space. What if you could craft a custom lounge chair for under $150 that cradles your body perfectly while soaking up the sun? This guide delivers a battle-tested method for building an adjustable cedar lounge chair combining Adirondack comfort with chaise lounge versatility. Using only straight boards and basic tools, you’ll create a weather-resistant masterpiece that costs 70% less than retail alternatives—and turns heads every time you host.
Forget complicated joinery or expensive machinery. This project leverages cedar’s natural rot resistance and your circular saw’s precision to build a chair with three distinct positions: upright for reading, reclined for coffee breaks, and fully flat for afternoon naps. By the time you finish sanding, you’ll have a functional heirloom piece designed to survive 10+ years of sun and rain. Let’s transform raw lumber into your new favorite backyard sanctuary.
Why Tight-Knot Cedar Beats Pine for Outdoor Lounge Chairs
Cedar isn’t just recommended—it’s your armor against backyard furniture killers. Its natural oils repel insects and resist rot 5x longer than pressure-treated pine, while weighing 30% less for effortless patio repositioning. But not all cedar is equal: tight-knot boards prevent weak spots where slats meet braces. Visit the lumberyard early, inspecting each board for consistent color and minimal knots near edges.
Grab these exact materials for one chair:
– Cedar 1×10 boards (8′ lengths): 3 total (side panels + headrest)
– Cedar 2×4 boards (8′ lengths): 3 total (frame + legs)
– Cedar 1×4 boards (8′ lengths): 3 total (back slats)
– Exterior-grade 1½” screws: 1 box
– ⅝” exterior hinges: 2 sets
Skip this step and regret it later: Lay boards on your driveway before cutting. Arrange light-to-dark planks intentionally—this creates a sunset gradient effect when installed. White wood? Only if you enjoy annual resealing; it lacks cedar’s natural defenses.
Cut Perfect Curves Without a Router
Your circular saw and jigsaw handle 100% of shaping—no specialty tools required. Precision here prevents wobble and ensures smooth reclining.
Trace the Adirondack Curve Template Like a Pro
- Print the side panel template (included in resource PDF) at 100% scale
- Tape it 23″ from the foot end of your 85″ 1×10 board
- Mark a critical ¾” offset at the head end for reclining geometry
- Draw a 3½” rise at the foot end for leg elevation
- Cut outside the line with your jigsaw (you’ll sand to final shape)
Critical mistake to avoid: Cutting both side panels identically. Flip the template for the second panel to create mirror images—smooth factory faces must face outward on both sides. If cuts wander, don’t panic; minor errors vanish during assembly.
Cut Back Slats in Color Sequence Order
- Start with middle boards using Template #1 (minimizes waste)
- Progress to outer boards with Templates #2 and #3
- Maintain 37½” length for all 1×4 slats
- Keep factory-smooth sides facing down during cutting
Pro tip: Clamp boards to sawhorses diagonally—this prevents kickback when cutting curves. Work in 20-minute intervals; fatigue causes costly mistakes.
Pre-Drill Every Screw Hole (Or Watch Cedar Split)

Cedar’s softness is its Achilles’ heel. Skip pre-drilling and your $5 board becomes kindling.
Create a Foolproof Drilling Jig
- Grab a 6″ scrap 2×4
- Drill two ⅜” holes: ¾” from edges, ⅜” from end
- Countersink holes to ¼” depth
- Label “SLAT END”
Why this works: Cedar splits when screws compress wood fibers. Your jig ensures consistent hole placement away from vulnerable edges. Always drill ⅛” wider than screw shaft diameter—this creates expansion space for humidity changes.
Install Slats with Deck-Spacer Precision
- Start at the foot, placing first slat tight against 2×4 frame
- Insert 5/16″ spacers (use ¼” + 1/16″ plastic shims)
- Work toward the head, adjusting spacing near curves
- Drive screws only after verifying alignment with speed square
Time-saver: Apply masking tape along the frame edge as a visual guide—prevents slats from drifting inward.
Build the Adjustable Back Mechanism That Never Jams
This is where store-bought chairs fail. Get these measurements wrong, and your “adjustable” back becomes permanently stuck.
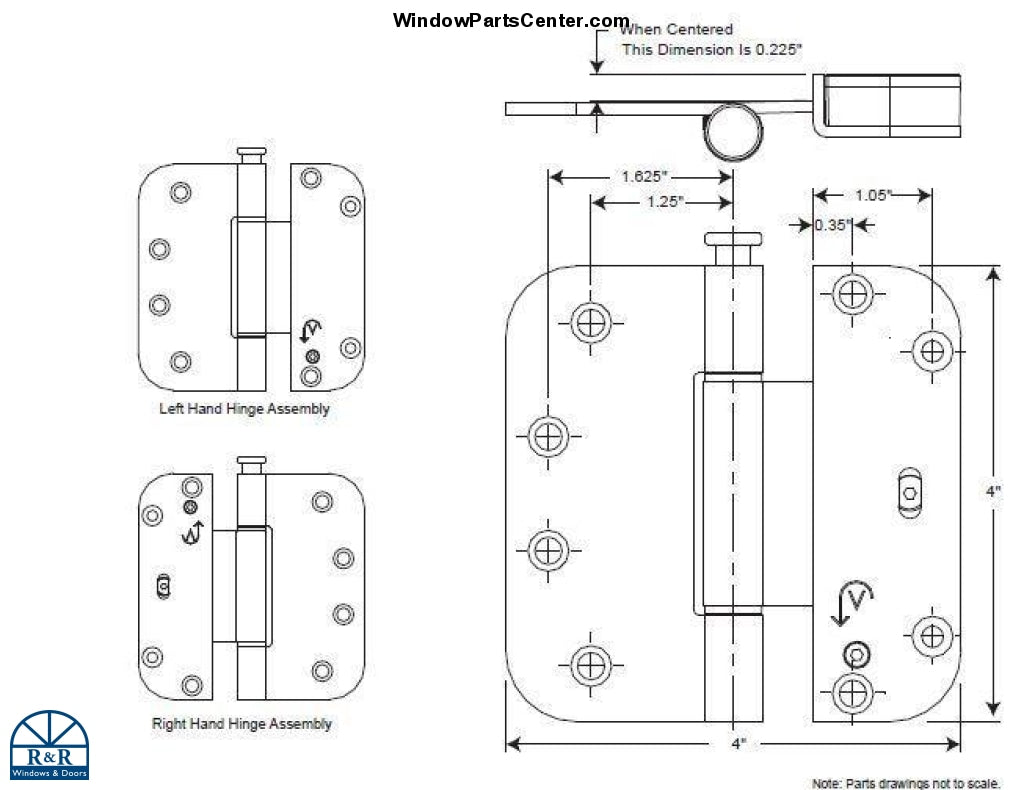
Install Hinges with ⅝” Barrel Overhang
- Position hinges along the 22¼” 2×4 frame piece
- Crucial: Allow ⅝” barrel overhang past frame ends
- Align barrel center with seam between frame and back slats
- Secure while holding back at 45° angle (use scrap wood wedge)
Why overhang matters: Without this clearance, the back binds against side panels during reclining. Test movement before final tightening—smooth pivoting confirms correct placement.
Craft the 3-Position Support System
- Cut two 14″ 2×4 supports at 15° angles
- Attach to chair frame with exterior hinges
- Connect supports with 1×2 crossbar (scrap 1×3 works)
- Rest top edge against:
– Middle brace = upright reading position
– Top brace = 30° recline for coffee breaks
– Flat against frame = 180° sunbathing mode
Pro tip: Sand support contact points to 220 grit—reduces friction for one-finger adjustments.
Sand Only What Matters (Save 45 Minutes)
Don’t waste time on hidden surfaces. Target skin-contact zones:
Priority sanding checklist:
– Top ½” of all slats (where arms/back rest)
– Outer 2″ of side panels (hips/shoulder contact)
– Leg edges (prevents splinters when moving chair)
Use 150-grit sanding sponge in circular motions—cedar’s factory face rarely needs 100-grit. Skip sanding under braces and inside frame joints; finish will seal these areas.
Apply Finish Like a Pro: No Drips, No Missed Spots
Sikkens Cetol SRD (siding/rails/decks formula) penetrates deeper than standard stains, but application technique makes or breaks results.
Master the Between-Slat Coverage
- Dip 2″ foam brush into finish
- Wipe excess on can rim (prevents drips)
- Reach between slats with brush angled at 45°
- Apply thin coat—thick layers peel in UV exposure
Drying secret: Work in late afternoon shade. Direct sun accelerates drying, causing brush marks in curved areas. Allow 24 hours between coats; 2 coats suffice for 5-year protection.
Why Your Chair Will Outlast Store-Bought Models
This design survives because:
– Cedar’s natural oils repel moisture without toxic sealants
– 5/16″ slat gaps prevent water pooling and warping
– Angled leg braces distribute weight evenly (no sinking into grass)
– Adjustable back reduces stress on hinges versus fixed designs
Maintenance shortcut: Every spring, wipe with vinegar-water mix (1:4 ratio) to remove pollen buildup before reapplying finish. Never power-wash—this blasts protective oils from wood fibers.
Three Positions You’ll Actually Use (Not Just Advertised)
- Upright Reading Mode: Supports rest on middle brace—perfect for morning coffee with book in hand
- Conversation Recline: Top brace position creates 30° angle ideal for patio chats
- Full Sunbathing: Lay supports flat; back rests on frame for maximum UV exposure
Warning: Don’t exceed 300 lbs weight limit. Test reclining positions with gradual pressure—sudden force strains hinges.
Your new cedar lounge chair isn’t just furniture—it’s a backyard experience engineered for relaxation. Unlike flimsy retail options, this design ages gracefully: sun-bleached wood develops a silvery patina while maintaining structural integrity. The $147 material cost (vs. $500 store price) pays for itself in avoided replacements, and you’ve just gained a skill to build matching side tables. Now fire up the grill, pour a drink, and sink into seating that actually fits your body—because nothing beats the pride of building your own slice of paradise.


