
That faded armchair you keep meaning to replace? The one with coffee stains you hide under blankets? Stop dreaming about expensive reupholstery. You can create custom-fitted loose covers for chairs that hug every curve perfectly for under £55—about 75% less than professional services. Unlike store-bought slipcovers that slide off or pool at the knees, handmade versions give you washable, style-changing solutions that adapt to your home. This weekend project transforms tired furniture using basic sewing skills and materials you’ll find at any craft store.
Forget complicated patterns or industrial machines. With denim, canvas, or home décor fabric and a standard sewing machine, you’ll craft slipcovers that look professionally tailored. The best part? You’ll save £150+ while gaining a practical, washable shield against spills and wear. By Sunday evening, you’ll have a chair that looks like it came from a boutique—not your sewing room.
Planning Your Chair Cover Project
Quick Cost Comparison
Professional reupholstery starts at £199 for basic armchairs. Your DIY version costs just £14.37 in supplies plus fabric. At £5 per metre for durable upholstery fabrics like denim or twill, you’ll need 3-4 metres total—bringing your investment to £35-55. That’s enough to cover multiple chairs while still having change from a £50 note. Factor in three hours of sewing time, and you’re looking at £12/hour for custom furniture—cheaper than most takeout meals.
Chair Style Assessment
Photograph your chair from every angle before cutting fabric. Break it into these key zones:
– Backrest: Inside panel plus visible outer back
– Seat: Main cushion area and front apron
– Arms: Inner panels, outer sides, and shaped fronts
– Cushion: Removable pads (if present)
Sketch simple geometric shapes over complex curves. For scroll arms, drape newspaper over the chair and trace edges by feel—this creates instant templates without math. Label each section immediately (“left inner arm,” “seat front”) to avoid confusion later.
Fabric Selection Strategy
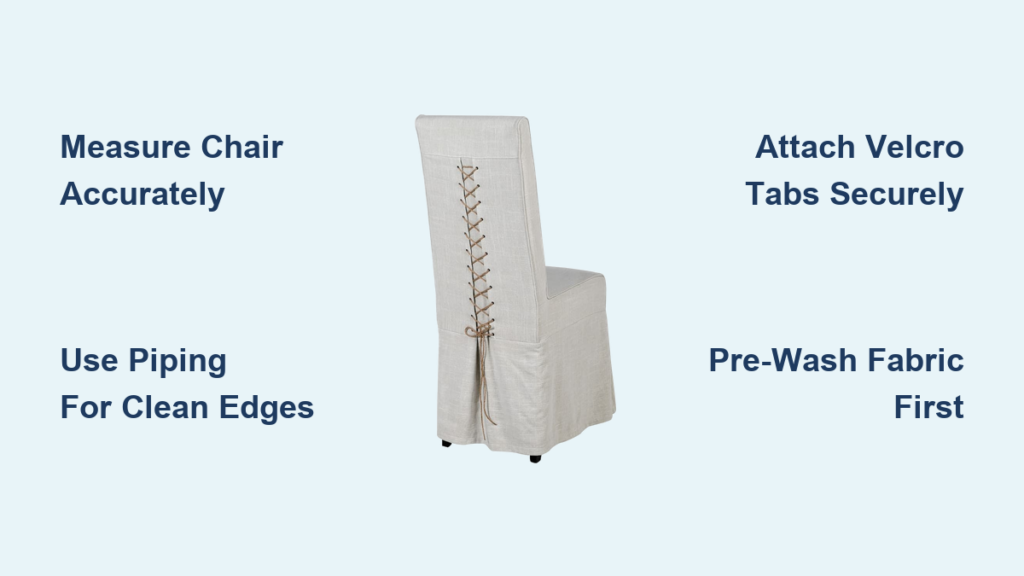
Choose machine-washable fabrics: denim for casual looks, twill for durability, or home décor fabrics for pattern variety. Always pre-wash to prevent shrinkage disasters after sewing. Hold swatches against your chair in natural light—store lighting lies. For directional prints like stripes, mark “UP” on every pattern piece with tailor’s chalk to maintain consistency. Avoid slippery satins; stick to medium-weight weaves that hold shape.
Essential Tools and Materials
Must-Have Supplies
Gather these before starting:
– Fabric: 3-4 metres (standard armchair)
– Piping cord: 5-6 metres for crisp edges
– Velcro: 1 metre hook-and-loop tape
– Thread: Upholstery weight or doubled regular thread
– Marking tools: Water-soluble fabric marker
– Sharp scissors: Dedicated fabric-only pair
– Pins: Long quilting pins for thick layers
– Sewing machine: With piping foot attachment
– Steam iron: For pressing seams flat
Optional Professional Touches
Elevate your results with:
– Serger: For clean, fray-proof seams
– Bias tape: To bind interior edges
– Interfacing: Reinforces Velcro zones
– Snap tape: Alternative to Velcro closures
Creating Perfect Patterns

Template Making Process
Cover complex areas like scroll arms with newspaper. Trace edges by feel, then cut out templates. For straight sections, measure precisely:
– Back height: Top edge to seat base
– Seat depth: Back to front edge
– Arm width: Widest point measurement
Label templates immediately. Transfer to fabric wrong-side-up with 2 cm seam allowances on straight edges, 5 cm extra on curved arms. Pin fabric directly to your chair first—mark seam lines where fabric naturally contours to the frame.
Smart Cutting Layout
Arrange templates like a puzzle to minimize waste. Flip pieces to use directional fabrics efficiently. Pro tip: Cut generously—leave 1″ extra on all sides for fit adjustments. Mark grain lines with chalk to prevent distortion during sewing. For napped fabrics like corduroy, ensure all “UP” arrows point toward the chair back.
Construction Sequence
Build Back Closure System
Create overlapping back pieces with hidden Velcro:
1. Square edges and hem bottom with 1 cm double-fold
2. Press 3 mm folds on inner overlapping edges
3. Sew hook Velcro to front piece, loop to back piece
4. Join right-sides together with 1 cm seam allowance
This invisible closure stays hidden when facing the room. Trim corner bulk before stitching to reduce bulk.
Master Piping Application
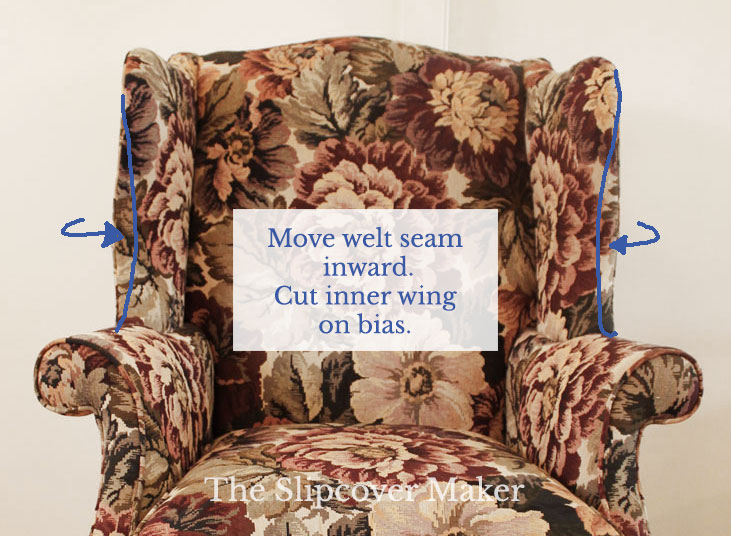
Cut piping 5 cm longer than each edge. Pin with seam allowances aligned, starting at back corners. Sew using piping foot, leaving 2 cm excess at ends. For scroll arms: Apply piping to individual pieces before assembly—continuous runs cause puckers on curves. Ease fabric gradually with frequent pins.
Assemble Main Body
Follow this critical sequence:
1. Sew darts in arm pieces first (trim to 6 mm)
2. Join side panels to inner arms against piping
3. Attach back pieces to sides (stop before arm intersections)
4. Connect seat panel to arms, then to back
5. Sew front panel to seat edge
6. Complete side-to-front connections
Test fit after each major seam. Better to unpick now than after final assembly.
Perfecting the Fit
Real-Time Adjustments
Drape cover over chair and identify issues:
– Baggy corners: Pinch excess fabric into darts
– Tight spots: Release seams slightly, add fabric inserts
– Pulling fabric: Make tiny relief cuts (never through stitching)
Mark problem areas with pins while cover is on the chair. Hand-sew inaccessible intersections with blind stitches.
Secure Bottom Attachment
Create three Velcro tabs:
– Front tab: 52 cm length
– Side tabs: 50 cm each
Fold strips 7.5 cm wide in half lengthwise, press ends inward 1 cm, and stitch close to edges. Attach soft Velcro to tabs, hook Velcro to chair frame underneath. This prevents shifting during use.
Professional Finishing Touches
Interior Seam Options
Treat raw edges for longevity:
– Serger finish: Clean commercial look
– Zig-zag stitch: Machine alternative
– Bias-bound edges: Designer interior detail
Trim seam allowances to 1 cm after finishing to reduce bulk in tight corners.
Hem Variations
Mark hemline with cover on chair for precision. Floor-skimming hems create formal elegance; chair-bottom hems (2 cm clearance) offer casual practicality. Press hems while slightly damp for crisp results.
Troubleshooting Common Issues
Curved Arm Challenges
Clip seam allowances every 2 cm on tight curves. Ease fabric with extra pins and reduce seam allowance to 1 cm. Critical: Apply piping to individual curved pieces—not continuous runs—to avoid puckering.
Pattern Matching Tricks
Center dominant motifs on the chair back. Align stripes at major seams by shifting pattern pieces slightly. Always mark “UP” direction on directional fabrics before cutting.
Fit Corrections
Baggy areas: Pinch excess into darts from wrong side. Tight spots: Release seams and insert narrow fabric strips matching weight and color. Test adjustments with basting stitches first.
Care and Longevity Tips
Machine wash cold on gentle cycle—never hot water. Air dry flat or tumble dry low to prevent shrinkage. Press on wrong side while damp for professional crispness. Reinforce Velcro and high-stress seams annually with extra stitching. Store covers loosely folded in breathable cotton bags; plastic traps moisture causing mildew.
Style Customization Ideas
Skirt Variations
Transform your chair’s personality:
– Box pleats: Formal tailored look
– Gathered ruffles: Casual farmhouse charm
– Tailored bands: Modern minimalist edge
Contrast Details
Use complementary fabric for piping (e.g., navy piping on cream chair). Add quilted panels with batting for extra comfort. Create seasonal sets—lightweight linen for summer, corduroy for winter. Your custom slipcover now delivers professional style with practical washability. Start with dining chairs to build confidence, then tackle wingbacks. In one weekend, you’ve gained a furniture refresh that costs less than takeout—and looks infinitely better.


