
Nothing beats sinking into a lawn chair you built with your own hands while watching the sunset. Store-bought outdoor seating often breaks within seasons or lacks that perfect ergonomic fit. When you learn how to make lawn chairs, you create durable, customized seating that matches your style and withstands years of backyard use. This guide cuts through the complexity—whether you’re a beginner with basic tools or an experienced builder seeking pro techniques, you’ll discover exactly what materials to buy, which joints prevent wobbling, and how to avoid the #1 mistake that ruins outdoor furniture longevity.
Pick Your Lawn Chair Design for Maximum Comfort
Avoid Deep Recline in Adirondack-Style Chairs
Traditional Adirondacks force you into a near-horizontal position that makes conversation impossible. Instead, build a reduced-recline version where only the legs touch the ground. This subtle adjustment creates stable, upright seating perfect for dining alfresco. The central dip in the side rail provides lumbar support without sacrificing portability—simply lift the chair by its arms to reposition it. Weekend builders can complete this design using cedar scraps and basic tools.
Build a Simple Folding Chair in One Day
Ideal for beginners, this portable design features a built-in carrying handle cut directly into the backrest. Interlocking slats create visual interest while the flat-folding mechanism tucks neatly under decks. Use pressure-treated pine for $20 or upgrade to cedar for $100. You’ll need just a circular saw and drill—no specialized skills required. Pro tip: Sand all edges smooth before assembly to prevent splinters during folding.
Select Rot-Resistant Materials That Survive Seasons

Choose Cedar Over Pine for Longevity
Western red cedar is the gold standard for how to make lawn chairs that last. Its natural oils repel insects and moisture without chemical treatments. For visual flair, alternate scrap pieces of white cedar (Thuja) and western red cedar to create striking striped patterns. If budget constraints force pine use, always paint it—unprotected pine warps within one season. Pressure-treated lumber works for structural frames but avoid placing it where skin contacts wood.
Use Exterior-Grade Hardware or Risk Rust Damage
Never install standard nails or screws in outdoor chairs—they’ll stain wood and weaken joints within months. Instead, stock up on:
– 3″ galvanized common nails for structural joints
– Waterproof PVA wood glue (like WeldBond) for moisture-blocking seals
– Stainless-steel screws for visible areas
Critical warning: Rust stains from cheap fasteners permanently mar finished chairs—this single mistake ruins 70% of DIY outdoor builds.
Construct Perfect Side Frames with Template Accuracy
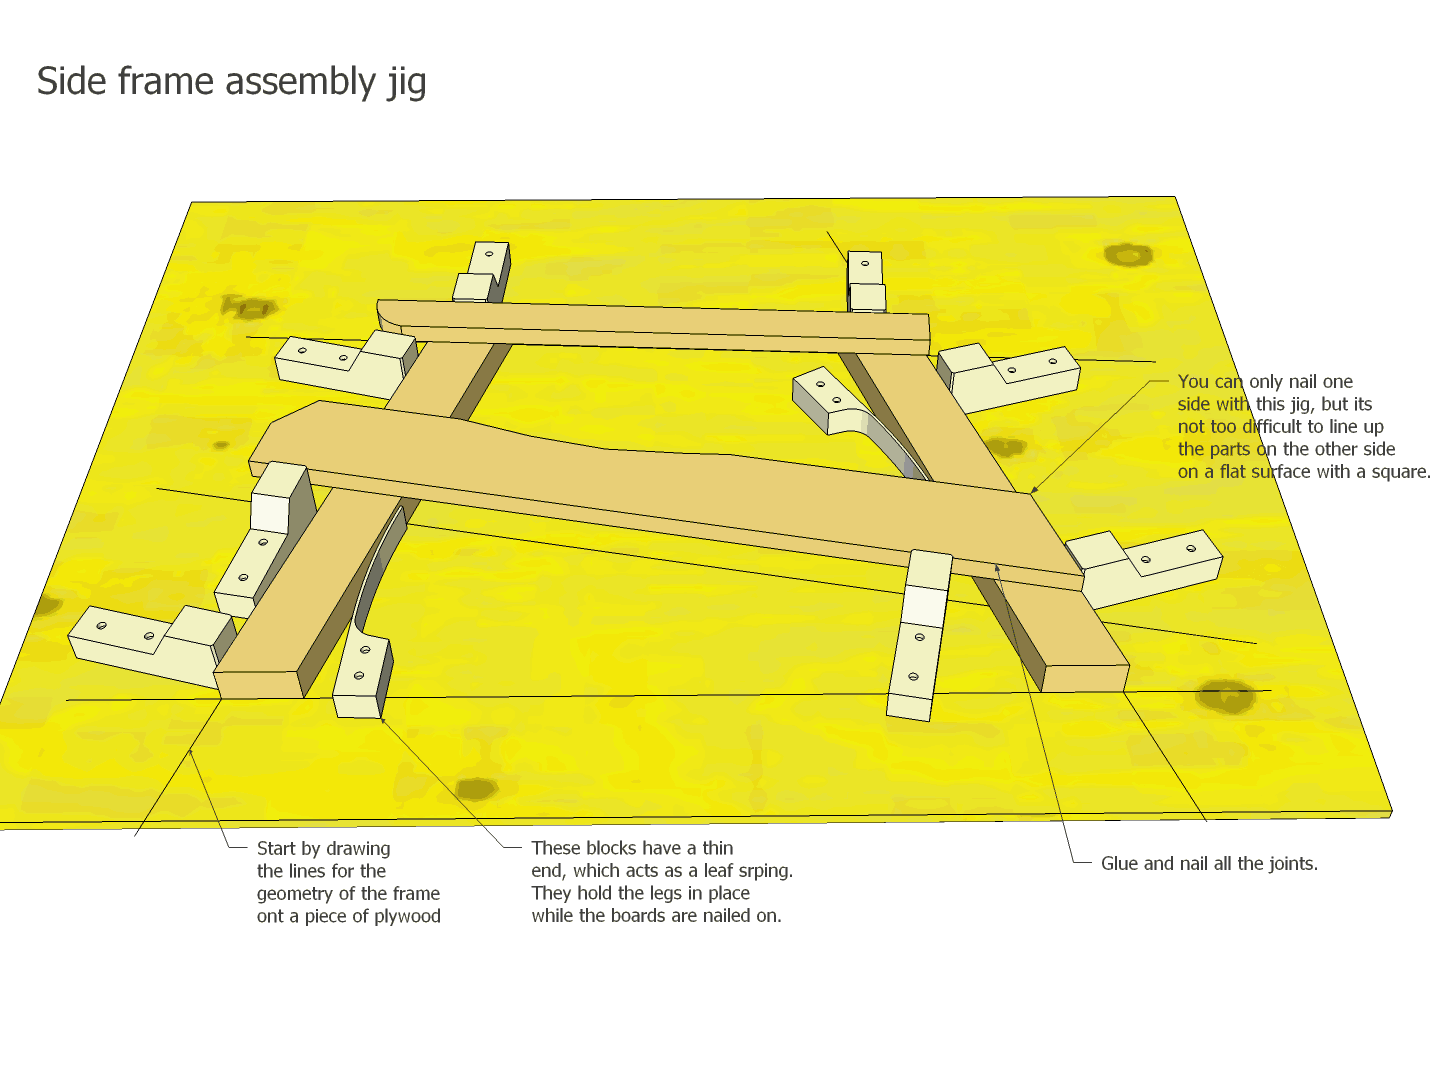
Transfer 1:1 Templates Without Measuring Errors
Print full-scale side frame templates using BigPrint software. Place your wood board directly over the paper and mark key points through the paper—no ruler needed. The side rail’s subtle central dip creates the chair’s ergonomic curve. For identical parts, cut your first frame on a bandsaw, then trace it for the remaining three pieces. Use a bevel gauge to copy leg angles directly from your template.
Prevent Moisture Damage With Glue-Only Joints
Drive two nails ½ cm deep into your top cross-rail to act as alignment pins for leg pairs. After dry-fitting, disassemble and apply generous glue to all mating surfaces—this creates a waterproof barrier that prevents rot at joints. Historical builds at Amogla camp prove tight WeldBond joints resist decay for decades. Skip this step and you’ll replace your chair every two years.
Install Seat Boards for All-Day Comfort
Bevel Edges to Shed Rainwater
The first three seat boards need 20-25° bevels along their mating edges. Copy this angle using your bevel gauge directly from the assembled frame. Glue the beveled edges together, then toenail at 45° for maximum strength. This critical detail creates a water-shedding surface that prevents pooling—flat-seated chairs develop rot within months.
Notch Boards for Frame Clearance
Boards three and four require notches where they meet the rear frame. Mark these in place on your assembled chair, then cut with a bandsaw. Trying to pre-cut these notches guarantees misalignment. For the final board, use a compass to trace the seat profile curve. If the remaining gap is narrow, glue two small strips together for structural integrity.
Add Professional Finishing Touches
Chamfer Edges to Eliminate Splinters
After assembly, chamfer all exposed edges with a palm plane—especially the front seat edge where bevels create sharp points. This simple step transforms rough lumber into comfortable seating. Pay special attention to armrest tops where drink spills accelerate splinter formation.
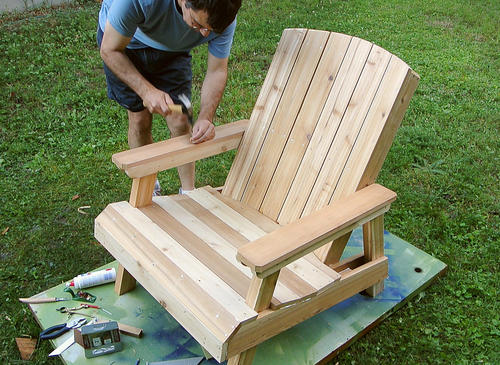
Install Armrests Last for Perfect Alignment
Nail armrests through the top of side frames after seat boards are secured. This avoids interference during critical assembly stages. Position them 8″ above the seat for optimal drink-holding height—measure twice before nailing to ensure level placement.
Build a Folding Chair in 2 Hours (Beginner Shortcut)
Skip complex curves with the Leopold-style bench:
1. Cut two 2×8 boards to 60″ lengths for seat and back
2. Create support braces by cutting 45° angles at board ends
3. Secure with 18 exterior screws and waterproof glue
Complete this $20 project using only a circular saw and drill. The flat-fold design stores vertically against walls—ideal for small patios. Time-saving hack: Pre-drill all screw holes to prevent splitting.
Guarantee 10+ Years of Outdoor Use
Block Moisture at Every Joint
Full glue coverage on mating surfaces is non-negotiable for rot prevention. Wipe excess glue immediately with a damp cloth—dried glue prevents stain absorption. For chairs in rainy climates, add silicone caulk in dado joints before inserting slats.
Follow This Annual Maintenance Routine
- Sand rough spots in early spring
- Apply exterior-grade stain (cedar) or paint (pine)
- Store folding chairs indoors during winter
Pressure-treated wood still needs this cycle—untreated chairs show significant decay within 18 months. Critical: Never leave chairs standing on damp grass—elevate on concrete blocks.
Final Note: You now have everything needed to build lawn chairs that outlast store-bought versions. Start with the folding chair design this weekend—its $20 cost and two-hour build time deliver instant confidence. As you master these techniques, progress to cedar Adirondacks with custom contours. Remember: Perfect alignment matters more than fancy tools. Your first chair might have minor imperfections, but each build refines your skill. Within months, you’ll create a backyard oasis with seating that reflects your craftsmanship—not a factory assembly line. Gather your materials tomorrow and take that first cut; your perfect lawn chair awaits.


