
That familiar creak as you settle into your favorite dining chair suddenly turns into a sickening crack—you’ve just broken a back rail. Before dragging it to the curb, know this: 90% of wooden chair failures involve glue joints or stripped hardware, not shattered wood. With $15 worth of glue, basic tools, and one afternoon, you can restore even heirloom chairs to rock-solid condition. This guide reveals field-tested techniques that work on wobbly legs, broken spindles, and stripped screw holes—no woodworking degree needed.
You’ll learn to diagnose failures in 60 seconds, choose the right adhesive for your specific break, and clamp joints so tightly they outlast the original factory glue. Most importantly, you’ll avoid the #1 mistake that ruins DIY chair repairs: over-tightening clamps and starving the joint of glue. Let’s get your chairs stable again.
Diagnose Chair Failures in 60 Seconds

Spot Critical Structural Weaknesses
Rock the chair side-to-side while gripping joints—any movement at mortise-and-tenon connections means glue failure. Cracks wider than a credit card along back rails or legs require immediate repair. For spinning hardware, check if bolts rotate freely in stripped wood holes. Non-structural cracks in decorative spindles won’t compromise safety but should be glued to prevent worsening.
When to Repair vs. Replace Immediately
Fix chairs with single loose joints or isolated cracks under 1/4 inch. Replace chairs if multiple legs are broken, construction relies solely on bolts into softwood (common in budget furniture), or repair costs exceed half the price of a new chair. Bolt-only chairs rarely justify repair time.
Perform the Critical Stability Test
Sit gently and shift your weight diagonally across the seat. Listen for creaks and note which joints separate. Mark problem areas with painter’s tape—this targets your repair efforts. If the chair collapses under 50% of your body weight, disassemble it immediately to prevent further damage.
Disassemble Broken Chairs Without Causing New Damage
Remove All Hardware Before Prying
Extract every screw, bolt, and nail first. For bolted chairs (common in modern dining sets), use a deep-socket adapter on your drill to speed removal. Skipping this step risks splitting wood when forcing glued joints apart.
Break Glue Bonds Without Splintering Wood
Slide a stiff putty knife into joint gaps, then twist gently like a lever—never pry aggressively. For stubborn spindles, wrap self-locking pliers in a cloth sleeve and rotate the spindle while pulling outward. If joints resist, apply heat from a hairdryer for 2 minutes to soften old glue.
Document Every Piece Before Separation
Take photos of complex assemblies like chair backs. Number mating parts with painter’s tape (e.g., “1A” on tenon, “1B” on mortise). This prevents reassembly nightmares—especially crucial for chairs with asymmetrical parts.
Choose the Exact Glue for Your Chair Repair
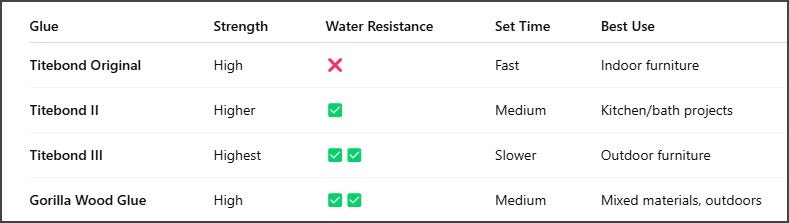
Titebond III for 95% of Household Repairs
This waterproof formula gives you 20 minutes of working time—critical when aligning multiple joints. It cures stronger than wood itself in 24 hours and withstands humidity swings near kitchen sinks. Avoid cheaper yellow glues; they lack waterproofing for dining chairs.
Epoxy for Gaps Wider Than 1/8 Inch
When worn joints create visible gaps, mix epoxy with matching sawdust from sanding scraps. For dark woods like walnut, add 10% black pigment to epoxy for invisible repairs. Unlike glue, epoxy fills voids while bonding—no tenon build-up needed.
Hide Glue Only for Valuable Antiques
Reserve this reversible adhesive for $500+ heirlooms. It requires heating to 140°F and special application tools most homeowners lack. Using it on everyday chairs wastes time—you’ll achieve stronger bonds with Titebond III.
Re-Glue Joints So They Never Loosen Again
Follow the 5-Step Professional Glue-Up
- Dry-fit all parts—confirm tenons slide snugly into mortises
- Brush glue like watercolor—thin, even coats on both surfaces (no pooling)
- Assemble in 90 seconds—glue grabs fast once moisture activates
- Clamp with book pressure—just enough to squeeze a bead of glue out
- Wipe excess immediately with damp cloth before it dries
Fix Oversized Tenons Three Foolproof Ways
Thread-wrap method: Coat tenon in glue, wrap tightly with silk thread (like gift ribbon), let dry 24 hours, then re-glue. Creates a custom-fit expansion layer.
Wedge technique: Saw a ¾-inch deep kerf into tenon end, insert softwood wedge, tap to expand, trim flush, then glue.
Shaving build-up: Glue thin wood shavings around undersized tenon until it fits snugly—ideal for antique chairs where precision matters.
Repair Specific Chair Parts Like a Pro
Stop Wobbly Legs Without Full Disassembly
Inject thinned yellow glue (50/50 water mix) via syringe into leg-to-seat joints. Clamp legs inward with bar clamps for 2 hours. For severe wobble, drill 1/8-inch holes through leg braces, insert glued dowels, and trim flush after curing.
Replace Broken Back Rails in 4 Steps
- Remove only the broken rail—leave other spindles intact
- Take the broken piece plus its undamaged mirror part to a millwork shop for duplication
- Apply Titebond III to new rail ends and chair frame
- Clamp with strap clamps overnight, then sand and refinish the entire chair for uniform color
Patch Non-Structural Cracks in 20 Minutes
Glue split spindle ends, wrap with wax paper and cotton cord, then tie knots to maintain alignment. No clamps needed—cord tension holds parts together. Leave for 12 hours; the wax paper prevents glue from bonding to the wrap.
Fix Stripped Screw Holes and Spinning Bolts
Reinforce Stripped Wood Holes Permanently
Pack holes with glue-coated toothpicks, snapping them off flush. Let cure 4 hours, then reinsert original screws. For larger holes (like chair leg bolts), drill out to 3/8 inch, glue in a tight-fitting dowel, and re-drill pilot holes after 24 hours.
Stop Spinning Bolts With Two Nuts
Thread two nuts onto the bolt end, then tighten them against each other. Use the outer nut to drive the bolt back into the leg—it won’t spin during tightening. Replace standard nuts with Nylock nuts (cost: $0.04 each) for vibration-proof security.
Clamp Joints Correctly: Avoid These Costly Mistakes
Use the Right Clamp for Each Joint
Bar clamps (12″ and 24″) handle leg-to-seat joints. Strap clamps conform to curved backs and spindles. Quick-grip clamps prevent marring delicate surfaces—always use scrap wood pads between clamp jaws and finished wood.
Never Over-Tighten—Here’s Why
Excessive clamp pressure starves joints of glue, creating weak bonds. Apply just enough force to squeeze a bead of glue from the seam. Test pressure by tightening until you feel slight resistance—like hand-tightening a jar lid.
Finish Repairs So They’re Invisible
Sand Glue Squeeze-Out Perfectly
Wait 24 hours after clamping, then sand dried glue with 120-grit paper in the wood’s direction. Progress to 220-grit for smoothness. Feather repair edges by sanding 2 inches beyond the joint into surrounding wood.
Match Existing Finish in 3 Steps
- Test stain on the chair’s underside first
- Apply wipe-on polyurethane with a lint-free cloth (2 coats, 4 hours apart)
- For antique chairs, use tung oil to enhance grain—buff with 0000 steel wool after drying
Prevent Future Failures With Simple Habits
Perform Annual Chair Tune-Ups
Every spring, check all joints and hardware. Tighten loose bolts before they cause stress cracks. Add self-adhesive felt pads to leg bottoms—this reduces lateral stress when sliding chairs. For dining chairs, apply paste wax to legs annually to minimize friction damage.
Control Environmental Damage
Keep chairs 3 feet from heating vents and out of direct sunlight. Humidity swings cause glue failures in previously repaired joints. In dry climates, place a humidifier near dining areas—ideal humidity is 40-50%.
Essential Tools Under $20
Must-Have Tools
– 2 bar clamps (12″ and 24″)
– Drill/driver with 1/8″ and 3/8″ bits
– Stiff putty knife and utility knife
– 120-grit and 220-grit sandpaper
Critical Materials
– Titebond III (8 oz bottle: $8)
– Assorted wood dowels ($3)
– Toothpicks or matchsticks ($1)
– Wipe-on polyurethane ($7)
Final Tip: The moment you hear that first creak, act immediately. Loose joints worsen 300% faster once movement begins—waiting guarantees broken wood. Start with your most wobbly chair this weekend; the thread-wrap tenon technique alone will save you hundreds on future repairs. Remember: every stable chair you restore keeps furniture out of landfills while preserving craftsmanship that mass production can’t replicate. Your dining room—and the planet—will thank you.


