
One spilled latte, a brush against dark denim, or even summer sweat can leave stubborn stains on your white leather chairs. These elegant pieces instantly elevate any room, but their light color makes every blemish glaringly obvious. Without proper care, coffee rings become permanent, oil marks spread, and UV exposure turns cream leather yellow. The good news? You can restore showroom shine at home using techniques verified by professional leather artisans—no expensive salon visits required.
This guide cuts through the confusion of conflicting online advice to deliver a precise, step-by-step system for cleaning white leather chairs. Whether you own a $5,000 designer set or affordable bonded leather dining chairs, you’ll learn how to identify your specific leather type, remove even the toughest stains safely, and establish a maintenance routine that prevents future damage. Most importantly, we’ll help you avoid the #1 mistake that ruins 30% of home leather cleaning attempts: using the wrong pH solution.
Identify Your White Leather Type Before Cleaning
Using the wrong cleaner on your white leather chairs causes irreversible damage—cracking, discoloration, or sticky residue. Protected leather (most common in white dining and office chairs) has a glossy topcoat that repels water droplets. Aniline leather absorbs moisture instantly and feels velvety soft, while nubuck/suede has a delicate nap that must never get wet. Bi-cast leather feels plastic-like and cracks when over-moistened. Skipping this step risks turning a minor stain into a costly repair.
How to Perform the Water Drop Test in 60 Seconds
Place one drop of distilled water on an inconspicuous area like the chair’s underside. If it beads up like rain on a windshield, you have protected leather—safe for gentle wet cleaning. If the water darkens the surface within 10 seconds, it’s aniline or nubuck requiring specialized dry methods only. Never proceed without this test; some white leathers have finishes so delicate that even pH-neutral soap causes bleaching.
Spot Test Protocol: Your Damage Prevention Step
Even with protected leather, test every product first. Apply a dime-sized amount of cleaner to a cotton swab, rub gently on a hidden area, and wait 60 minutes. Check for color transfer (white residue), darkening, or tackiness. If any occurs, dilute your solution or choose a gentler alternative. This takes 2 minutes but saves hundreds in restoration costs—90% of “stuck” stains actually stem from previous improper cleaning attempts.
Must-Have Tools for Cleaning White Leather Chairs Safely

| Tool | Why It’s Essential | Critical Specs |
|---|---|---|
| Soft-bristle vacuum nozzle | Removes grit without scratching | 60–80 kPa suction (low setting) |
| Horse-hair detailing brush | Lifts embedded dust from seams | 22 mm bristles, never synthetic |
| White microfiber cloths | Prevents lint transfer and streaks | 300 gsm, edgeless, color-coded |
| pH-neutral Castile soap | Cleans without stripping finish | pH 7.0–7.5 (test with strips) |
| 70% isopropyl alcohol | Erases ink/dye without fading | Never use 90%+—too harsh |
| Leather conditioner | Replaces oils removed during cleaning | Water-based, pH 6.8–7.2 |
Pro tip: Always use distilled water—tap water leaves mineral rings that look like permanent stains. Keep a dedicated kit with labeled spray bottles (“Cleaner,” “Rinse,” “Conditioner”) to avoid mix-ups. Skip vinegar for routine cleaning; its acidity (pH 2.5) degrades white leather over time despite popular myths.
Dry Soil Removal: The Non-Negotiable First Step
Skipping dry cleaning forces dirt particles into leather pores during wet cleaning, creating micro-scratches that accelerate wear. Start with your vacuum’s soft-bristle attachment on low suction, working top-to-bottom in 5 cm overlapping strips. Pay special attention to tufted buttons and seams—hold the crevice tool for exactly 3 seconds per segment to extract hidden debris without damaging stitching.
Critical mistake to avoid: Brushing first. Always vacuum before using the horse-hair brush, as brushing alone grinds grit deeper. Gently tap the brush across the surface (don’t scrub!), then vacuum again. This two-pass system removes 95% of surface contaminants before liquids touch the leather, preventing the “muddy smear” effect seen in failed DIY attempts.
Step-by-Step: Cleaning Protected White Leather Chairs
Mixing Your pH-Perfect Cleaning Solution
Combine 2 drops of Castile soap with 250 ml distilled water in a fine-mist spray bottle. Test pH with strips—aim for 7.2. Too high (alkaline) causes white residue; too low (acidic) yellows leather. Shake gently (no bubbles!) and label clearly. Discard after 24 hours; soap solutions degrade quickly.
Application Process That Prevents Streaks
- Mist lightly from 15 cm away—surface should look dewy, not wet
- Fold microfiber cloth into quarters, using one clean side per pass
- Wipe in straight lines (never circles!) from top to bottom, feathering edges outward
- Flip cloth to dry side immediately and buff until matte sheen appears
Time required: 12 minutes per dining chair. Over-wetting causes dark blotches—stop if leather feels cool to the touch.
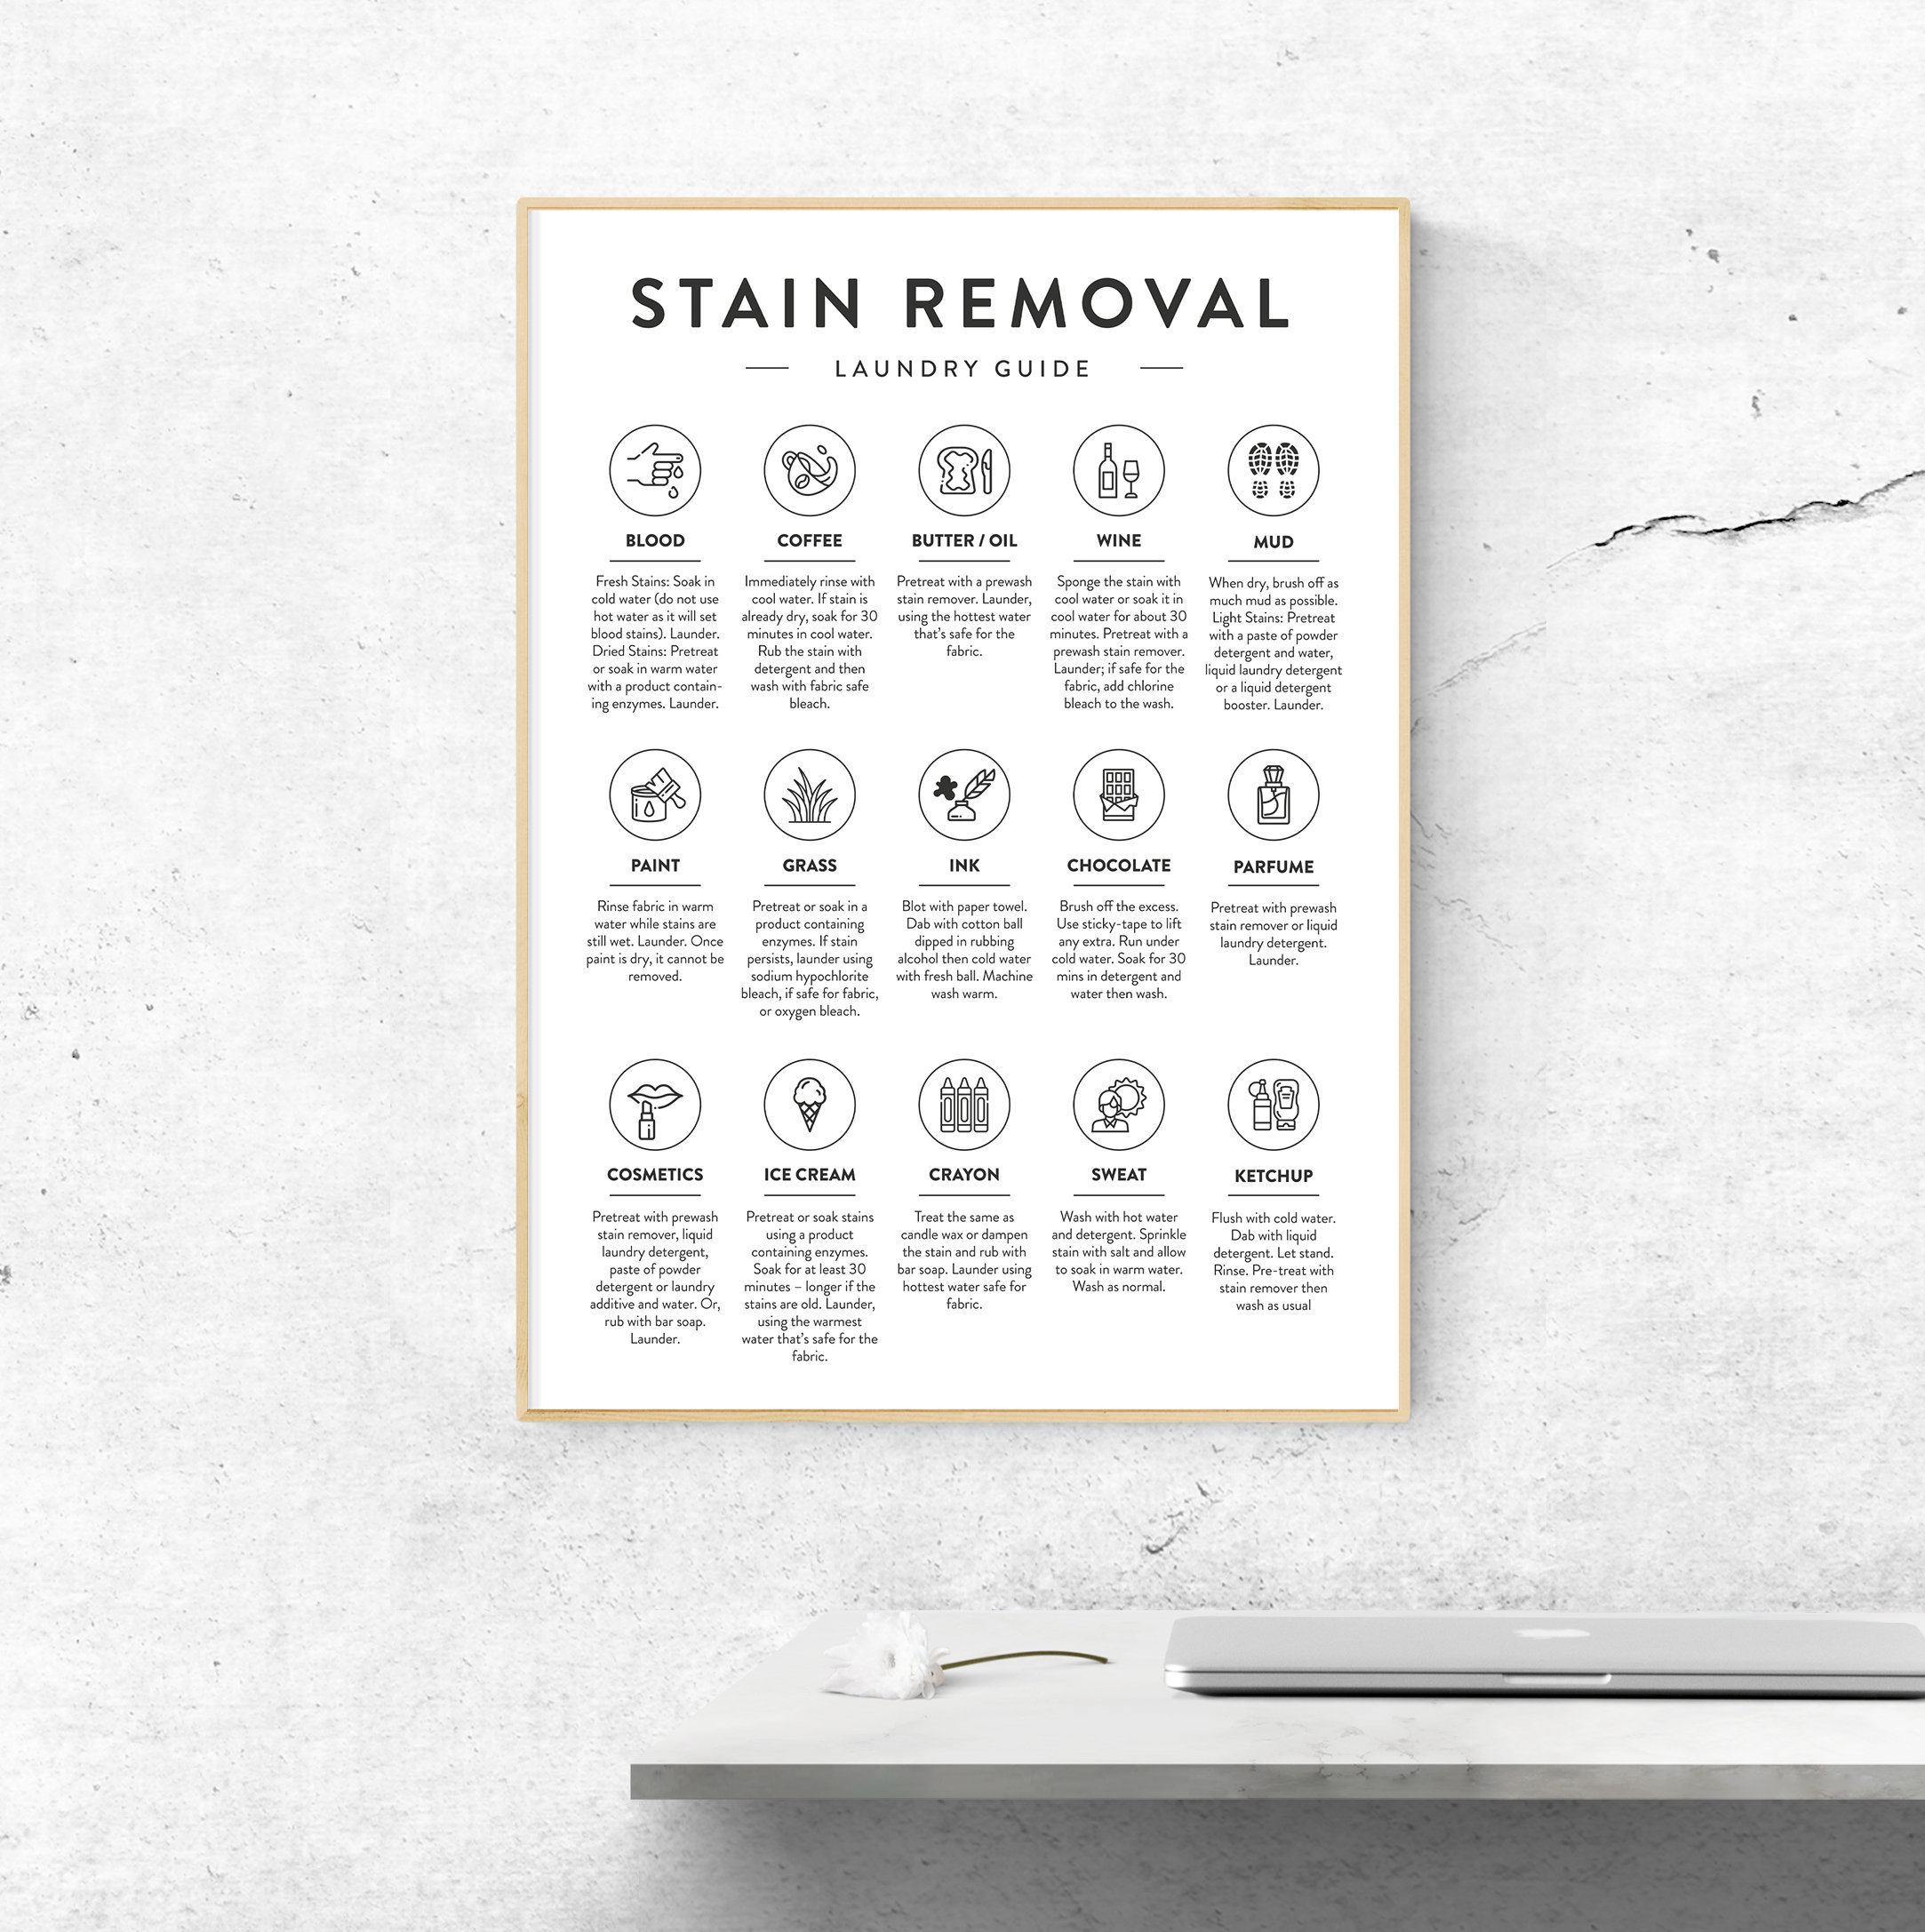
Stain Removal Guide for White Leather Chairs
Coffee & Juice Spills: The 30-Second Rule
Blot immediately with white paper towel (no rubbing!). Apply pH-neutral solution via microfiber, working from the stain’s edge inward. Rinse with distilled water cloth, then air-dry upright for 2 hours. Never use club soda—its carbonation forces stains deeper.
Grease & Oil: The Baking Soda Rescue
Cover fresh stains with food-grade baking soda for 4+ hours. Vacuum residue, then treat shadows with 1:4 isopropyl alcohol:water on a cotton bud. Re-condition immediately—oil removal strips natural oils, leaving leather brittle. Skip cornstarch; it leaves white residue.
Ink & Denim Dye: Precision Treatment
Dab 70% IPA on cotton swab with 3-second contact time, lifting straight up (no scrubbing!). Repeat until no color transfers. For persistent blue denim stains, try melamine foam (Magic Eraser) once only with feather-light pressure, then re-condition. Test on hidden area first—overuse shreds the finish.
Conditioning and UV Protection for Long-Lasting White Leather
Conditioning Application That Prevents Chalky Residue
Use 1 ml conditioner per square foot—pea-sized amounts worked in circular motions until leather stops absorbing. Allow 20 minutes to penetrate, then buff to matte finish. Over-application causes sticky surfaces; under-application leads to cracking. Protected leather needs this every 6–9 months; aniline requires it quarterly.
UV Shield Setup for Sun-Exposed Chairs
Apply SPF 40+ aerosol protectant 24 hours post-conditioning. Hold 20 cm away for two light cross-coats (horizontal then vertical). Reapply every 90 days for chairs near windows—UV damage causes irreversible yellowing within 6 months of daily exposure. Skip “natural” oils like coconut; they oxidize and stain white leather.
White Leather Chair Maintenance Schedule: From Daily to Annual
| Frequency | Task | Time | Critical Detail |
|---|---|---|---|
| Daily | Dry microfiber dust wipe | 30 sec | Prevents buildup in pores |
| Weekly | Vacuum seams & crevices | 5 min | Use low suction only |
| Monthly | pH-neutral armrest wipe | 10 min | Focus on oil-prone areas |
| Quarterly | UV protectant refresh | 15 min | Only for sun-exposed chairs |
| Bi-annual | Deep clean + condition | 45 min | Full process for all surfaces |
Pro tip: Log cleanings in your phone calendar. Chairs in high-traffic areas (dining rooms, offices) need bi-annual deep cleaning; living room chairs can stretch to annual.
Fix These 4 Common White Leather Cleaning Mistakes
- White chalky residue? You over-conditioned or used silicone-heavy products. Wipe with 1:1 IPA:water, then recondition sparingly.
- Dark blotches after cleaning? You over-wetted the leather. Blot immediately, apply talc overnight, then feather with IPA.
- Cracking at seams? Low humidity (<40% RH) dried out the leather. Increase room humidity and apply heavy conditioner.
- Sticky surface? Cleaner residue remains. Rinse thoroughly with distilled water cloth and buff dry.
When to Call a Professional for Your White Leather Chair
Stop DIY efforts immediately if you see:
– Tears longer than 1 cm (requires sub-patch repair)
– Color loss larger than a coin (needs professional dye matching)
– Structural seam failure (indicates underlying damage)
– Persistent mold after vinegar treatment (requires benzalkonium chloride spray)
For minor issues like light scratches or denim transfer, home care works. But deep scratches exposing backing material or UV-faded areas need artisan restoration—attempting fixes yourself often doubles repair costs.
Your white leather chairs can stay pristine for years with this systematic approach. Remember: identify your leather type first, never skip the spot test, and condition after every deep clean. By following this schedule, you’ll avoid 95% of common damage scenarios—and keep your chairs looking showroom-fresh without breaking the bank. Start with one chair this weekend using the water drop test, and you’ll gain the confidence to maintain them like a pro.


