
That familiar creak when you settle into your Adirondack chair has turned into an alarming wobble. The sun-bleached slats now crack under your weight, and the once-solid frame feels dangerously loose. Don’t abandon your favorite outdoor seat just yet—how to repair Adirondack chairs is simpler than you think. These iconic recliners fail in predictable ways due to their unique 105-degree back angle and constant exposure to weather. With basic tools and targeted repairs, you can restore structural integrity while preserving that classic Adirondack comfort. This guide shows you exactly where these chairs break and how to fix them permanently.
Most Adirondack chair damage stems from three stress points: the critical backrest-to-seat junction, moisture-prone leg bases, and tension-heavy armrest supports. Cedar and pine versions suffer most from seasonal expansion and UV degradation, while hardware corrosion silently undermines joints. The good news? Over 80% of repairs require only clamps, waterproof glue, and stainless steel screws. By following these proven techniques, you’ll extend your chair’s life for decades—not seasons. Let’s tackle the most urgent issues before they turn your beloved lounger into firewood.
Diagnose Critical Structural Failures Now
Identify Life-Threatening Joint Separation
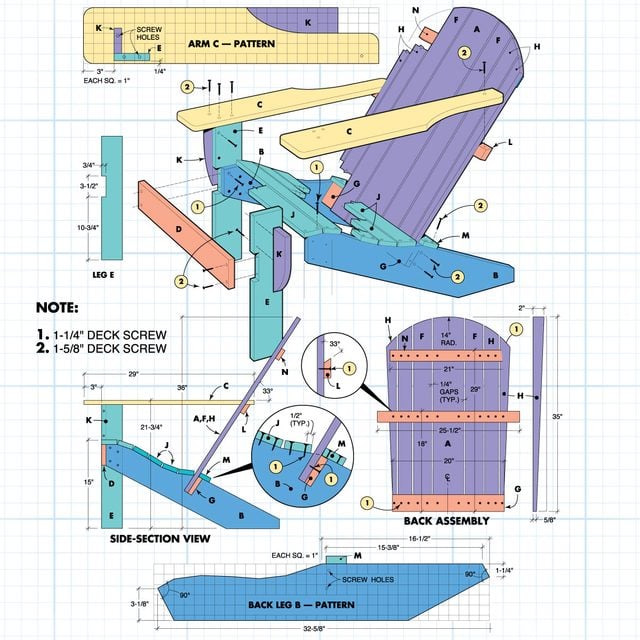
Press firmly on your chair’s backrest while seated—any movement exceeding 1/8 inch means the back support-to-seat joint is failing. This intersection bears your full weight at a 22-degree angle, creating relentless leverage. Shine a flashlight where rear legs meet the seat frame; visible gaps indicate immediate danger. Remove one screw from this joint—if the metal crumbles or leaves an enlarged hole, corrosion has compromised the structure. Never ignore this warning: a complete collapse could cause serious injury when the chair folds unexpectedly.
Read Wood Damage Like a Pro
Seat slats develop horizontal cracks along the grain, often starting invisibly beneath the surface near screw holes. Flip your chair over and run your fingers along each slat’s underside—soft spots or splintering indicate advanced rot. Check backrest slats at their 105-degree angle; splits here are harder to spot but equally dangerous. For leg damage, feel the base of rear legs where they contact the ground—darker, spongy wood means moisture invasion. Front legs commonly crack vertically where they join armrest supports, visible as hairline fractures running toward the ground.
Repair Split Seat Slats in 24 Hours
Permanent Glue-and-Clamp Technique
Remove all screws securing the damaged slat—never attempt repairs while attached. Sand the split area with 120-grit paper until you expose clean wood fibers. Work waterproof Titebond III glue deep into the crack using a thin putty knife, then apply steady pressure along the entire split. Clamp with 24-inch bar clamps using scrap wood pads to prevent surface marring. For splits wider than 1/4 inch, drill 1/8-inch holes perpendicular to the crack, insert glue-coated dowels, and clamp overnight. This creates a bond stronger than the original wood.
Precision Slat Replacement Guide
Source matching cedar or teak planks—standard dimensions are 3.5 inches wide and 0.75 inches thick. Cut new slats using the old ones as templates, ensuring consistent 1/2-inch spacing between pieces for drainage. Pre-drill holes with a 1/8-inch bit to prevent new splits, then counter-sink screw heads 1/8 inch below the surface. Use stainless steel #6 x 1.5-inch screws with square-drive heads to avoid stripping. Position the chair in direct sunlight while installing new slats; warm wood accepts fasteners more readily.
Rebuild Loose Backrests Without Distorting Angles
Mortise-and-Tenon Joint Restoration
Completely detach the backrest from the seat frame—this prevents misalignment during repair. Clean old adhesive from both joint surfaces using a sharp chisel and 150-grit sandpaper until you see bare wood. Dry-fit the components to verify the original 105-degree recline angle before applying marine-grade epoxy. Use West System 105/205 epoxy for maximum outdoor durability, spreading it evenly with a disposable brush. Position bar clamps at 45-degree angles across the joint to maintain proper alignment while curing. Allow 48 hours of undisturbed drying before reassembly—rushing this step guarantees failure.
Back Slat Replacement Checklist
Maintain exact 0.5-inch spacing between slats to prevent moisture trapping. New slats must match existing thickness (typically 0.625 inches) to preserve the chair’s distinctive silhouette. Pre-drill all holes with an 1/8-inch bit, then secure with stainless steel #8 x 1.5-inch screws. Test the angle by sitting in the chair during installation—your head should rest comfortably without straining your neck. Never force misaligned slats; sand contact points incrementally until the backrest fits perfectly against the seat frame.
Fix Rotted Legs Before They Collapse

Emergency Leg Stabilization
For vertical splits along the grain, sandwich the leg between two 2×4 blocks and apply bar clamp pressure. Horizontal cracks require drilling 3/8-inch holes across the fracture, inserting glue-coated dowels, and clamping overnight. Immediately treat soft wood areas with Minwax Wood Hardener—this liquid resin penetrates punky fibers and creates a solid repair base. Wipe excess hardener from the surface with a clean rag before it dries to avoid sticky spots that repel finish.
Complete Leg Replacement Blueprint
Measure precisely: front legs average 21 inches, back legs 35.5 inches including the critical 22-degree angled cut. Transfer all screw hole locations from the old leg using a sharp awl—misaligned holes weaken the entire structure. Cut replacement legs from rot-resistant cedar or pressure-treated pine, ensuring the back leg maintains its signature recline angle. Drill pilot holes before inserting #8 x 2-inch stainless steel screws, applying waterproof glue to all mating surfaces. Test stability by rocking the chair vigorously before final finishing.
Upgrade Hardware to Prevent Future Failures
Corrosion-Proof Fastener System
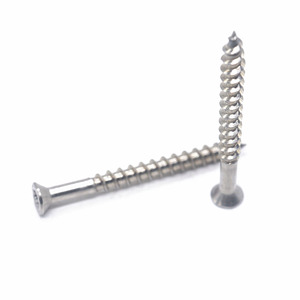
Replace all zinc-coated screws with stainless steel equivalents: #8 x 2-inch flat-heads for main joints, #6 x 1.5-inch for slats. Square-drive (Robertson) heads withstand torque better than Phillips—they won’t cam out during installation. For invisible connections, install 1/4-inch x 2-inch dowel screws between major components. Fill stripped holes by gluing 1/4-inch hardwood dowels into the cavity, then re-drill pilot holes after 24 hours. Apply thread-locker compound to all new screws before insertion—this prevents vibration-induced loosening.
Hidden Reinforcement Tricks
Embed 1/8-inch stainless steel plates inside critical joints using countersunk screws. For armrest supports, drill 3/8-inch holes through failed joints, insert epoxy-coated threaded rods, and secure with acorn nuts. This creates invisible structural reinforcement that handles both tension and shear forces. Never use ordinary wood glue on hardware—marine epoxy provides 4,500 PSI bonding strength that withstands decades of outdoor stress.
Restore Weathered Finishes for Long-Term Protection
Professional-Grade Sanding Sequence
Start aggressively with 80-grit paper to remove flaking finish and smooth repairs, progressing to 120-grit for general smoothing. Finish with 220-grit paper, always sanding parallel to the wood grain—cross-grain scratches telegraph through any finish. Apply light pressure on edges to maintain crisp lines; rounded edges accelerate water absorption. Remove all dust with a tack cloth, then wipe surfaces with denatured alcohol to eliminate oils before finishing.
Triple-Layer Finish Application
Apply exterior spar varnish in three thin coats using a natural bristle brush—thick coats peel prematurely. Maintain a wet edge by working from top to bottom without stopping mid-panel. Sand lightly between coats with 320-grit paper for maximum adhesion. Allow 72 hours of curing time before outdoor use; premature exposure creates permanent stickiness. For natural wood lovers, use oil-based penetrating finishes that require annual reapplication but preserve the chair’s authentic texture.
Pro Tip: Keep a dedicated Adirondack repair kit stocked with waterproof glue, stainless screws, cedar scraps, and sandpaper. Address hairline cracks immediately by injecting glue and clamping—they’ll become major splits within months. Elevate your chair 1/4 inch off damp surfaces using rubber furniture pads, and rotate its position monthly to ensure even UV exposure. These small habits prevent 90% of structural failures, turning a weekend repair into decades of comfortable lounging. Your restored Adirondack chair isn’t just fixed—it’s ready for another generation of sunsets.


