
That frustrating snap as you sink into your favorite lawn chair, only to find yourself sliding toward the ground—it’s a summer staple no one wants. Before you add another broken webbed chair to the curb, know this: these chairs were engineered for repair, not replacement. With basic tools and two hours of focused work, you can revive your chair for under $30, using techniques that outlast factory originals. This guide delivers the exact steps to diagnose damage, install UV-resistant webbing, and prevent future failures—so your patio stays furnished without breaking the bank.
Most webbed chair failures start at connection points where rivets pull free or UV-damaged straps crack under weight. But the good news? Aluminum frames rarely fail, meaning your repair investment targets only the replaceable webbing. You’ll discover why standard vinyl outperforms nylon in sun exposure, master the critical over-under weave pattern that prevents lopsided seating, and learn pro tricks like hot-water pre-stretching for perfect tension. Let’s get your chairs back in action.
Diagnose Webbing Failure Patterns First
Photograph Original Weaving Before Removal
Snap detailed close-ups of the weave pattern from multiple angles before removing a single strap. Most chairs use an alternating over-under sequence, but some employ complex basket weaves where vertical straps pass over two horizontals. Missing this step guarantees guesswork later—resulting in uneven tension that makes seating feel like a hammock. Focus your camera on how straps interlock at the frame’s attachment points, as these details dictate your reweaving sequence.
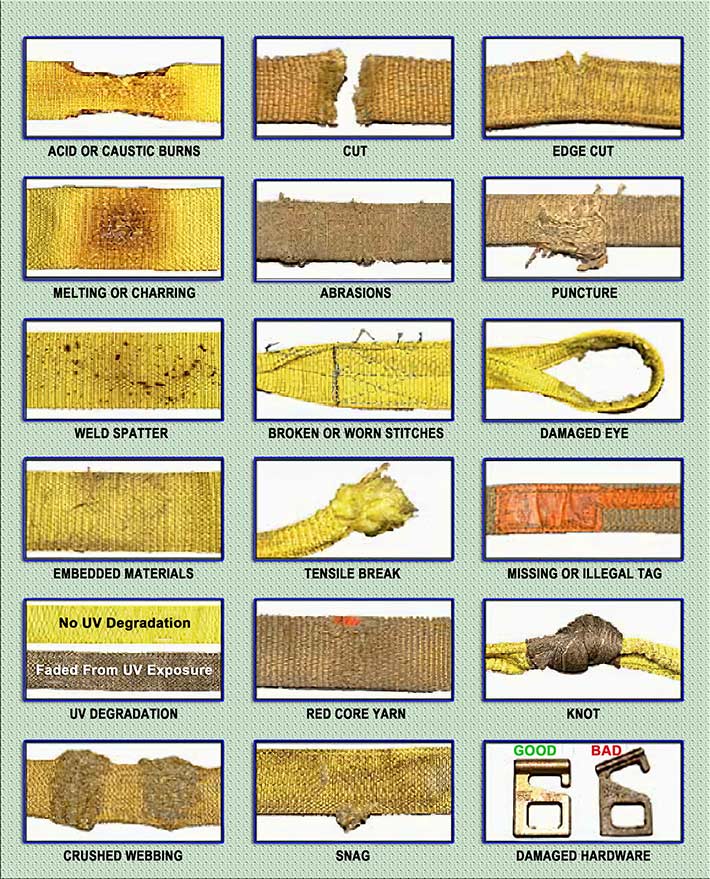
Identify UV Damage vs. Mechanical Failure
Press gently on each strap: flexible webbing with slight give remains serviceable, while brittle material that cracks like dry pasta needs full replacement. UV degradation appears as chalky white discoloration and surface powdering, often concentrated on sun-exposed top surfaces. Mechanical failures show as clean breaks at rivet holes or frayed edges where straps rub against frame corners. Critical warning: If you see white stress marks near attachment points, replace those straps immediately—they’ll fail under full weight.
Check Frame Integrity for Hidden Issues
Lay the chair upside-down on concrete and press each leg corner. Wobbling indicates bent rails, common in aluminum frames after heavy use. Test rust spots on steel frames by scratching with a screwdriver—if metal flakes off, sand to bare metal and apply rust-inhibiting primer. Ignoring these compromises new webbing lifespan, as uneven frames create stress points that shred straps within months.
Gather Sun-Resistant Repair Tools and Materials

Essential Toolkit for Stress-Free Installation
You’ll need heavy-duty scissors (household shears dull instantly on vinyl), a power drill with 1/8″ and 3/16″ bits, and a professional-grade rivet gun—the $25 model avoids the jamming that plagues cheap versions. Add needle-nose pliers for threading tight spaces, a rubber mallet for frame straightening, and safety glasses (drilling rivets creates sharp metal fragments). Skip the utility knife; it snags webbing edges causing premature fraying.
Select UV-Stable Webbing That Lasts
Vinyl webbing (2.25″ standard width) outperforms nylon in sun exposure with 500+ UV hours before degradation. Measure your existing straps—some chairs use narrower 2″ nylon—but never substitute indoor fabrics. Buy 20% extra material: a typical chair needs 6-8 yards total (count horizontal straps separately from verticals). For longevity, choose black or brown; white fades fastest despite staying cooler. Pro tip: Marine-grade polyester adds $15-20 but doubles lifespan in high-sun climates.
Remove Damaged Webbing Without Frame Damage
Drill Out Rivets Safely and Efficiently
Wear safety glasses and position the drill bit perpendicular to the rivet head. Apply steady pressure—aluminum rivets drill in 5 seconds, steel takes 15-20. Save one intact rivet to match size at hardware stores (common sizes: 1/8″ diameter, 3/16″ barrel). Never pry rivets with screwdrivers; this dents frame slots and compromises new installations. If a rivet spins, clamp needle-nose pliers on its shaft while drilling.
Clean Frame Attachment Points Thoroughly
Scrape frame slots with a flathead screwdriver to remove embedded webbing fibers, then wipe with rubbing alcohol. For rust spots, sand with 220-grit paper until metal shines, apply rust-inhibiting primer, and let cure 24 hours. Rushing this step traps moisture that causes new webbing to fail at rust bubbles within weeks. Finally, measure and pencil-mark every attachment point—some chairs have irregular spacing that looks symmetrical but isn’t.
Install Webbing With Professional Tension Control
Start Horizontal Straps From the Center Outward
Begin with the middle horizontal strap—it anchors all other positioning. Fold webbing ends twice (creating four layers) before riveting to prevent tear-through under weight. Pull snug but not guitar-string tight; webbing stretches slightly during initial use. Follow your photo reference for the exact over-under pattern through frame rails. Key mistake to avoid: Skipping the double-fold at rivet points causes 70% of early failures.
Master Vertical Weaving for Even Weight Distribution
Vertical straps must weave opposite to horizontals—where horizontals go over, verticals go under. Start at the chair back and work downward, maintaining consistent 1.5-inch spacing between straps. Check tension after every third strap by pressing seating areas; uneven pulling creates lopsided “hill” effects that strain the frame. For lumbar support, add an extra horizontal strap across the lower back zone.
Secure Critical Stress Points With Double Rivets
Double-rivet the front edge where legs hit the frame and where backrest meets seat—these handle 80% of load stress. Trim excess webbing to 1/2 inch beyond rivets, then carefully melt cut edges with a lighter to prevent fraying. Never use stainless steel screws on aluminum frames; galvanic corrosion destroys both materials within months. For wooden frames, add washers between screw heads and webbing.
Fix Common Post-Installation Problems Immediately

Eliminate Early Slack With Hot-Water Pre-Stretching
New webbing naturally loosens during the first week. Prevent this by soaking straps in hot water for 10 minutes before installation—they shrink as they dry, creating perfect tension. If slack appears, remove end rivets, pull tighter while damp, and re-rivet. Skipping this step means redoing the entire chair within 30 days.
Correct Uneven Seating From Frame Warping
If the chair feels lumpy, check frame alignment first: lay it upside-down on concrete. Wobbling indicates bent rails. Straighten aluminum frames with gentle rubber mallet taps on a flat surface—never strike directly on rivets. For persistent high spots, loosen surrounding webbing and retension systematically from the center outward. Steel frames require professional straightening; attempt only minor bends.
Extend Chair Lifespan With Professional Maintenance
Monthly Inspection Protocol
Check attachment points by wiggling each strap—loose rivets make subtle popping sounds. Look for white stress marks indicating imminent failure. Clean with mild soap and water only; bleach or ammonia-based cleaners dry out vinyl. Address single-strand failures immediately—one broken strap transfers stress to neighbors, causing cascade failures.
Seasonal Deep Care Routine
In spring: re-tension webbing and apply UV-resistant marine sealant. Mid-season: spot-clean stains with baking soda paste. Before winter storage: deep clean, reseal attachment points, and dry completely for 72 hours. Critical error: Storing damp chairs in unheated garages—temperature swings crack webbing faster than sun exposure.
DIY Repair Costs vs. Replacement Reality
Basic repairs cost $20-30 using hardware store vinyl and standard rivets—a fraction of the $150 replacement cost. Premium upgrades (marine-grade polyester webbing + stainless hardware) run $50-60 but deliver 7-10 years of service. Professional re-webbing averages $100 per chair, often exceeding replacement value. Your first DIY repair pays for tools; subsequent chairs cost only materials. That’s $3-5 yearly for comfortable seating versus $50+ for new chairs every three seasons.
Troubleshooting Quick Reference
– Loose webbing: Re-tension while damp using hot-water method
– Rivets pulling out: Upgrade to 3/16″ rivets or add washers
– Uneven seating: Check frame alignment before adjusting webbing
– UV discoloration: Clean with baking soda, apply UV sealant
Final Safety Verification Before Use
Test your repair gradually: apply 50 pounds of weight first (like stacked books), checking for unusual stretching. Progress to full weight over three days—never jump straight into lounging. Inspect all attachment points after the first week; these reveal installation errors before dangerous failures occur. With proper materials and technique, your restored chair now exceeds original factory durability. Expect 7-10 years of reliable service from this $30 investment—proving that in patio furniture, repair always beats replacement.


