
Your favorite lounge chair has become a frustration instead of a relaxation spot. The fabric sags under your weight, the frame wobbles dangerously, or those once-taut straps now hang like loose guitar strings. Before you replace that $300 investment with another flimsy model, know this: 90% of lounge chair repairs take less than four hours and cost under $50. Whether you’re battling worn sling fabric, creaky aluminum frames, or sagging vinyl straps, this guide delivers battle-tested fixes that restore showroom quality. You’ll learn exactly which tools to grab, how to avoid costly mistakes during reassembly, and why tightening bolts in the wrong sequence causes permanent fabric distortion.
Most DIYers fail because they skip critical diagnosis steps. Lounge chairs fall into three repair categories: sling chairs with fabric stretched between rails, strap chairs using woven vinyl strips, and chaise lounges combining both. Start by identifying your chair’s weak points—fabric tears usually mean replacement is needed, while wobbling frames often just require bolt tightening. Don’t assume all damage requires full restoration; sometimes a $5 hardware kit solves months of discomfort. This guide walks you through every scenario from quick weekend fixes to complete rebuilds, ensuring you never overpay for professional services again.
Diagnose Your Lounge Chair’s Specific Failure Points
Sling Fabric vs. Strap System Damage Identification
Sling fabric failure shows through diagonal sagging, visible tears, or complete detachment from frame rails. Strap system issues appear as uneven spacing, over-stretched vinyl, or broken weave patterns. For sling chairs, check if the plastic tubing inside fabric channels has snapped—that’s why fabric won’t stay taut. Strap chairs reveal problems when individual straps loosen while others remain tight, indicating improper tension during installation. Always inspect both seat and back sections separately; headrest failures often require different solutions than seat repairs.
Frame Weakness Warning Signs
Wobbling isn’t always about loose bolts. Test aluminum frames by applying downward pressure on each corner—if it flexes more than 1/4 inch, you likely have hidden cracks near weld points. Rust spots on steel hardware demand immediate attention; they spread five times faster when covered by fabric. For bent legs, place the chair on a level surface and check for rocking. If one leg lifts more than 1/2 inch off the ground, you’ll need straightening before any fabric work. Ignoring these structural issues guarantees your new fabric will sag within weeks.
Assemble Your Lounge Chair Repair Toolkit in 10 Minutes
Budget-Friendly Material Checklist ($20-70 Total)
- Heavy-duty polyester thread (cotton disintegrates outdoors)
- Aluminum-specific primer and matching spray paint
- Rust converter for steel components
- Replacement end caps (bring old ones to hardware stores)
- Plastic tubing matching original diameter (1/8″ or 3/16″)
- 2 yards Sunbrella fabric ($40-50 for two chairs)
Skip expensive specialty tools. A $5 flathead screwdriver, $8 socket wrench set, and $12 needle-nose pliers handle 95% of repairs. For fabric work, clamp the frame to your workbench instead of buying expensive tensioners—this saves $30 while achieving professional results. Never use household scissors for cutting sling fabric; they create uneven edges that cause premature tearing.
Replace Sagging Sling Fabric in 3 Critical Phases
Phase 1: Strategic Disassembly Without Damage
Remove stretcher bars by locating every bolt connection point—some hide under fabric edges. Use a socket wrench for hex bolts or Phillips head for screws, working counterclockwise to avoid stripping. Extract end caps by sliding a flathead screwdriver under the edge and tapping gently with a hammer; forceful prying cracks reusable plastic caps. When pulling old tubing, grip it with needle-nose pliers at frame curves where it bonds tightest—this prevents fabric shredding during removal.
Phase 2: Precision Measurement That Prevents Sagging
Lay old fabric flat and measure along its outer edge, adding exactly 1″ per side for seams (1.5″ for headrest sections with rigid bars). Critical mistake: measuring the frame instead of the fabric template causes 80% of fitting failures. Iron new fabric on low heat with a tea towel barrier—nylon melts at 250°F, so never place iron directly on material. Mark cutting lines on the fabric’s back side using a non-ballpoint pen; visible marks ruin the chair’s appearance.
Phase 3: Foolproof Reassembly Sequence
Insert plastic tubing into newly sewn channels before attaching to frame—this avoids mid-installation tangles. Start with the seat section, sliding fabric into stretcher bar tracks from the center outward. Tighten bolts in star pattern rotation: snug each bolt 1/4 turn before moving to the next. This distributes tension evenly, preventing diagonal sagging. For headrests, begin installation at the lowest point and work upward using side-to-side pulling motions—never pull straight out as this stretches fabric unevenly.
Eliminate Frame Wobble With Proven Techniques

Bolt Tightening Protocol That Lasts
Check every connection point systematically using a “clockwise inspection” method: start at 12 o’clock position and work around the frame. Apply thread-locking compound to bolts that repeatedly loosen—this prevents vibration-induced failure. Replace stripped bolts with identical metric or imperial sizes; mismatched hardware creates stress points that crack aluminum frames. After tightening, test stability by rocking chair side-to-side—any movement means missed connections.
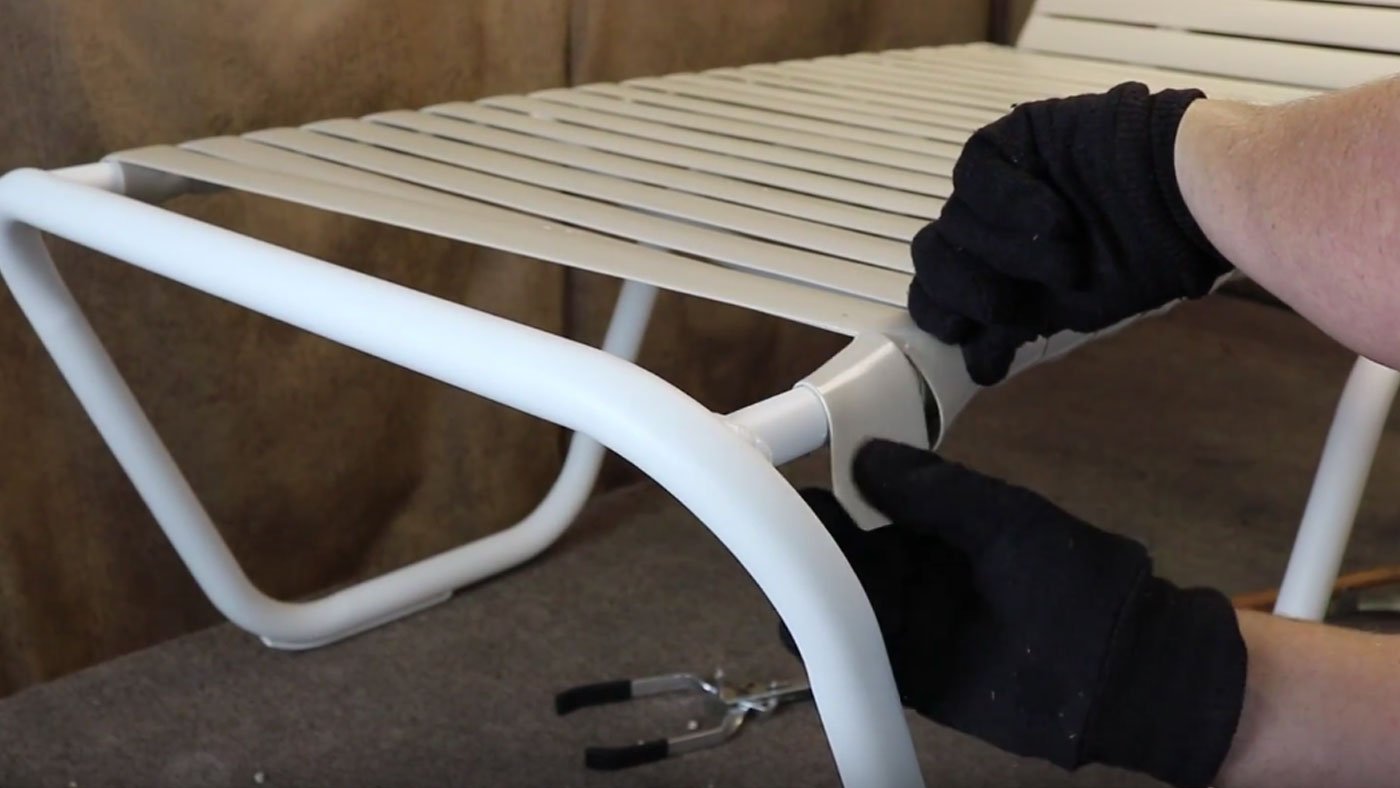
Aluminum Frame Straightening Without Cracking
For minor dents, place the bent section over a sturdy workbench edge and apply gradual downward pressure with your palm. Support the frame on both sides of the dent to avoid new weak spots. Severe bends require professional welding—DIY attempts often create hairline fractures. When sanding for repainting, use 220-grit paper to remove oxidation while preserving the frame’s structural integrity. Never sand down to bare metal; aluminum oxidizes instantly, ruining paint adhesion.
Install Vinyl Straps Without Common Tension Mistakes
Correct Measurement That Avoids Stretch Failure
Single-wrap straps require hole-to-hole measurement around the frame’s exterior. Double-wrap straps need the complete loop measured twice around the frame. Order straps 1-2 inches shorter than measurements—vinyl stretches 10-15% during installation. Measuring while straps are still attached prevents errors; cut one strap as a test piece before ordering replacements.
Tension Balancing for Professional Results
Install straps maintaining consistent spacing—use a ruler to ensure 1.5-inch gaps between straps. Apply even pressure across the entire strap during attachment; uneven tension causes premature wear at high-stress points. Test tension by pressing firmly on the center—straps should flex slightly but not sag more than 1/2 inch. Over-tightening strains the frame, while loose straps create uncomfortable hammocking.
Prevent Future Damage With Smart Maintenance
Weekly Care That Doubles Chair Lifespan
Clean frames with mild dish soap and water using a soft brush—never pressure washers that force moisture into joints. Apply vinyl protector quarterly to straps; this UV shield prevents cracking and fading. After rain, tilt chairs upright for 20 minutes to drain trapped water from frame channels. Never store chairs with wet fabric—this accelerates mildew that eats through fibers.
Off-Season Storage Protocol
Use breathable cotton covers instead of plastic tarps that trap moisture. Elevate chairs 2 inches off concrete with wooden blocks to prevent rust from ground contact. Store in a dry garage or shed—never leave chairs exposed during winter months, even with covers. Before storing, loosen all bolts slightly to relieve tension on metal components during temperature fluctuations.
When to Skip DIY and Call Experts
Structural frame cracks require TIG welding that home kits can’t replicate. Antique or designer chairs often need factory-matched materials worth professional restoration costs. If your chair fails weight tests after repair—showing frame flex under normal sitting—it’s unsafe for DIY fixes. Find specialists through the Outdoor Furniture Association directory; avoid general handymen who lack frame-specific expertise.
Realistic Time and Cost Breakdown
Simple fabric replacement takes 2-3 hours after your first attempt, with materials costing $25-40. Complete frame restoration including repainting requires 5-6 hours and $50-70 in supplies. First-time repairs add 90 minutes for learning curves—practice on an old chair if possible. Professional services charge $150-300 per chair, making DIY a 60-80% savings when you follow these exact steps.
Before using your repaired chair, conduct final safety checks: Apply weight gradually over 24 hours, recheck all bolts after initial use, and inspect fabric tension daily for the first week. Properly executed repairs deliver years of comfort—your DIY skills just saved a quality chair from landfill fate while keeping hundreds in your pocket. With these techniques mastered, you’ll approach every wobbly leg or sagging seat with confidence that professional results are within your grasp.


