
That pristine new chair staring at you from the corner of the room? It’s begging for character. Learning how to distress chairs transforms bland furniture into pieces with soul, creating the illusion of decades of cherished use. Whether you’re aiming for farmhouse charm or industrial edge, proper distressing techniques make the difference between “vintage-inspired” and “authentically aged.” Skip the cookie-cutter tutorials—this guide reveals professional methods that avoid the “beaten-up” look and deliver furniture that tells a believable story.
Most beginners make the critical mistake of random distressing—scratches everywhere, paint worn through to bare wood in unnatural spots. Authentic aging happens in predictable places from years of use. You’ll discover exactly where to focus your efforts and which techniques create realistic wear patterns rather than obvious damage. By the end, you’ll have the confidence to distress any chair like a seasoned furniture artist.
Essential Tools for Realistic Chair Distressing
Skip expensive specialty kits—authentic chair distressing requires basic tools you likely already own. The right tools create controlled aging that looks naturally earned, not artificially damaged.
Must-Have Hand Tools for Controlled Aging
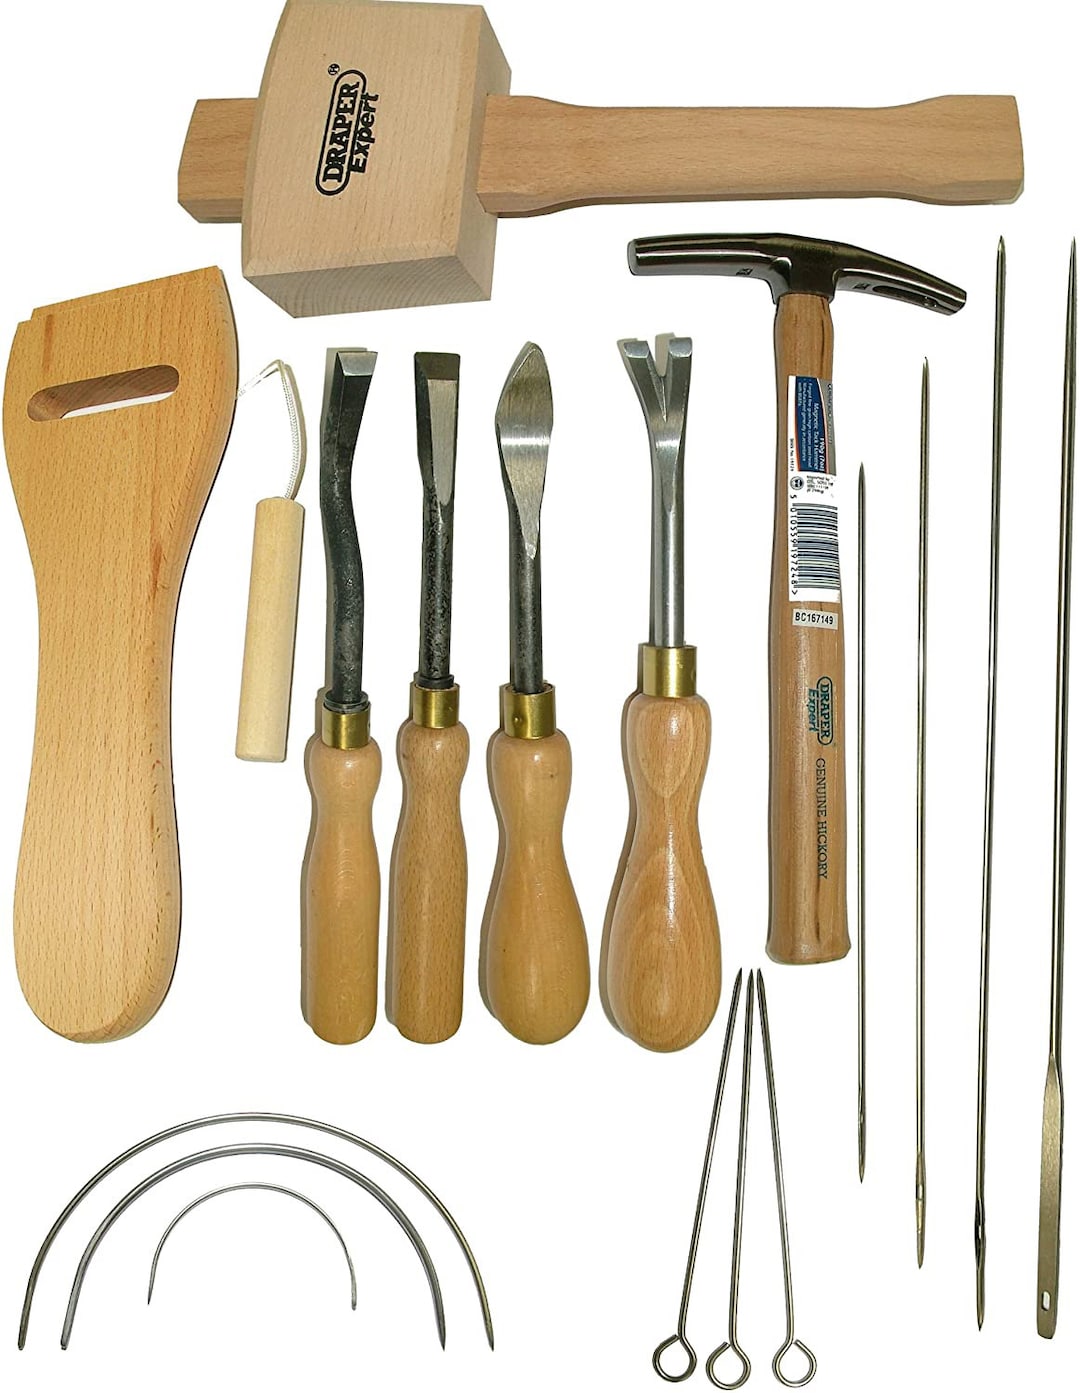
Grab these essentials before starting: 60-grit sandpaper for heavy removal in high-wear areas, 120-grit for medium distressing on edges, and 220-grit for fine finishing. Keep 0000 steel wool on hand for smooth blending between distressed and undistressed areas. A standard hammer creates authentic dents when paired with a chain, while a flathead screwdriver produces realistic scratch patterns that mimic jewelry contact. Don’t forget a utility knife for precise aging lines along chair legs.
Critical Safety Gear for Chemical and Physical Distressing
Safety glasses are non-negotiable—flying wood chips happen faster than you can blink. An N95 dust mask protects against sanding particles, while nitrile gloves shield your hands during chemical work with vinegar solutions or stains. Lay down drop cloths to protect floors from spills and debris. Many beginners skip proper ventilation when using chemical solutions—always work in a well-ventilated space to avoid inhaling fumes.
Budget-Friendly Alternatives to Professional Distressing Kits
You don’t need expensive tools to distress chairs effectively. Use an old chain from your garage for creating realistic dents instead of specialty hammers. Repurpose a worn-out toothbrush for applying dark wax into crevices. Keys work perfectly for creating subtle scratches on armrests where jewelry would naturally contact the wood. Save money by using black tea bags from your kitchen for authentic staining instead of commercial products.
Pre-Distressing Chair Preparation That Makes the Difference
Rushing preparation creates uneven distressing that looks amateurish. Proper prep ensures your aging techniques penetrate correctly and produce consistent results across the entire chair.
Complete Cleaning Process for Optimal Paint Adhesion
Start by removing all dirt, grease, and existing wax with a solution of mineral spirits or TSP. Scrub every surface—including hidden areas under seats and between spindles—with a soft brush. Pay special attention to crevices where decades of grime accumulate. After cleaning, run your hands over every surface—any remaining sticky residue will resist distressing and create patchy results. Allow 24 hours for complete drying before proceeding.
Strategic Disassembly for Accessing Hidden Distressing Areas
Remove all hardware, including seat cushions, screws, and decorative elements. This serves three critical purposes: prevents accidental damage to hardware during distressing, allows access to hidden areas that naturally age, and creates cleaner distressing lines around joints. If a joint feels wobbly, reinforce it now with wood glue—future distressing will camouflage the repair, but structural issues only worsen with age.
Structural Repairs Before You Begin Aging
Fill any cracks or holes with wood filler, matching the color to your chair’s wood tone. Allow filler to dry completely before sanding smooth. Never distress over structural damage—authentic aging occurs on sound furniture that’s simply worn from use. Test repaired areas by pressing firmly—you shouldn’t feel any give. Addressing structural issues now prevents frustration later when your “vintage” chair collapses from neglected damage.
Physical Distressing Techniques That Mimic Natural Wear
The secret to authentic chair distressing lies in understanding how chairs actually age. Real wear happens in predictable places from decades of daily contact—not randomly across the surface.
Creating Authentic Edge and Corner Aging
Focus wear on the seat front edge where legs constantly contact the wood. Wrap 120-grit sandpaper around a sanding block and create subtle rounding, concentrating wear on the center section. For corner chips, hold a screwdriver at a 45-degree angle and tap lightly with a hammer to create small imperfections. Make 3-4 chips per corner, varying sizes between 1/8″ and 1/4″. Avoid symmetrical patterns—nature isn’t perfect.
Nail Scratches That Look Like Decades of Use
Use a utility knife to add fine scratches parallel to the wood grain, particularly on armrests where jewelry would contact. Press lightly—barely score the surface. Add 5-7 scratches per armrest, concentrating near the front where hands naturally rest. For heavy-use areas like chair legs, drag a key across the surface to simulate shoe contact. Practice pressure on hidden areas first—the scratch should be visible but not deep enough to catch your fingernail.
Strategic Denting for Realistic Heavy-Duty Chairs
Create authentic dents by wrapping a chain around a hammer head and striking high-contact areas like chair rungs and leg braces. Focus on spots where chairs would naturally bump against tables or walls. Vary the force—some dents should be barely visible while others create noticeable depressions. Never create dents in areas that wouldn’t logically receive impact, like the underside of seats or protected back panels.
Chemical Aging Methods for Professional Patina
Chemical techniques create the subtle color variations that make distressed chairs believable. These methods work especially well on raw wood or stripped surfaces to simulate decades of environmental exposure.
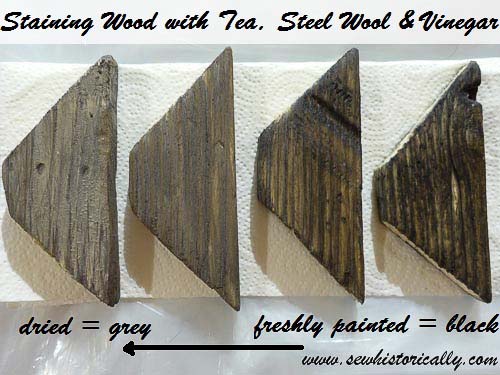
Vinegar and Steel Wool Solution for Weathered Wood
This classic technique creates beautiful gray, weathered tones. Pack 0000 grade steel wool into a glass jar, cover completely with white vinegar, and let sit 24-48 hours until the solution turns dark brown. Strain through a coffee filter to remove particles. Brush onto clean wood and watch the magic happen—the solution reacts with wood tannins, creating unique aging patterns. Different woods produce varying results: pine turns gray-brown, oak becomes silvery.
Tea Staining for Subtle Vintage Color Depth
Brew 10 black tea bags in one cup of hot water. Once cool, brush onto wood before applying vinegar solution. The tea adds tannins, creating richer aging patterns when combined with vinegar. Apply tea solution, let dry 30 minutes, then follow with vinegar solution for dramatic color variation. This technique mimics the amber patina that develops on furniture exposed to sunlight over decades.
Layering Chemical Techniques for Complex Aging
For gallery-quality results, layer multiple chemical techniques. Start with tea staining, then apply vinegar solution, followed by a light application of dark wax in crevices. Allow each layer to dry completely before adding the next. This creates depth and complexity that mimics how real furniture ages through different environmental exposures over time.
Paint Layer Distressing Like a Professional
Layered paint distressing adds incredible depth. The key is strategic color selection and controlled removal that reveals just enough underlying layers.
Strategic Color Selection for Period-Appropriate Aging
Choose historically accurate color combinations: farmhouse style uses warm cream base coats with sage green or dusty blue top layers, while industrial looks feature raw wood or dark walnut stains with charcoal or black paint accents. Research period-appropriate palettes—victorian chairs often feature deeper jewel tones, while mid-century modern pieces use muted earth tones. Always apply darker colors first, as natural aging reveals these underlying layers.
Controlled Paint Removal for Gradual Wear Patterns
After your final paint coat dries completely (minimum 24 hours), use 220-grit sandpaper to reveal underlying colors. Focus on high-contact areas: seat front edge (remove 60% of top layer), armrest tops (40% wear pattern), chair back grips (50% removal), and leg edges near floor (80% removal). Never sand through every layer to bare wood—leaving traces of each color creates visual depth that looks naturally worn.
Avoiding the “Too Distressed” Look Beginners Make
The most common mistake is over-distressing—making furniture look intentionally damaged rather than naturally aged. Limit heavy distressing to 2-3 focal points per chair. Step back every 15 minutes to assess your progress. Authentic aging shows gradual transitions between worn and unworn areas—sharp, defined edges scream “artificial.” If in doubt, less is more—you can always add more distressing, but you can’t remove what you’ve already taken off.
Protective Finishes That Enhance Your Distressed Look
The right finish protects your hard work while enhancing the aged appearance. Choose based on your chair’s intended use and desired aesthetic.
Dark Wax Application for Authentic Vintage Detail
Apply dark antique wax with 0000 steel wool using circular motions, focusing on crevices where dirt would naturally accumulate. Allow 15 minutes to haze, then buff with a soft cloth. This creates authentic-looking patina in recessed areas while providing protection. Dark wax enhances the three-dimensional quality of your distressing, making carved details pop with age.
Matte Polyurethane for High-Traffic Area Protection
For kitchen chairs or children’s furniture, use matte polyurethane instead of wax. It provides heavy-duty protection without the plastic shine that ruins vintage aesthetics. Apply thin coats with a foam brush, sanding lightly between coats with 320-grit paper. Three coats create durable protection while maintaining the authentic distressed appearance. Water-based polyurethane prevents yellowing on light-colored finishes.
Weekend Project Timeline for First-Time Distressers
Complete a beautiful distressed chair in just two days with this realistic schedule. Proper planning prevents rushed work that compromises quality.
Friday Evening: Prep and Base Coating
Spend 2 hours cleaning, disassembling, and making structural repairs. Apply your base coat and allow to dry overnight. Proper preparation now saves hours of frustration later when your distressing techniques work as intended on a properly prepped surface.
Saturday: Distressing and Layering
Allocate 4 hours for the distressing process—2 hours for physical techniques and 2 hours for chemical aging. Work methodically, stepping back frequently to assess your progress. Apply subsequent paint layers if using multi-color distressing, allowing adequate drying time between coats.
Sunday: Finishing and Assembly
Spend 3 hours applying your protective finish and performing final touch-ups. Allow 24 hours for complete curing before reassembling the chair and putting it into use. Rushing the finish application creates brush marks that ruin your authentic vintage look.
Your distressed chairs should now tell a convincing story of decades of loving use. The beauty lies in subtle details—the way paint naturally wears from edges, how wood darkens where hands have rested. Remember, authentic distressing isn’t about beating furniture with chains—it’s about thoughtfully recreating the gentle patina that develops from years of daily life. Start your first project this weekend—by Sunday evening, you’ll have transformed an ordinary chair into a conversation piece that looks like it’s been in your family for generations.


