
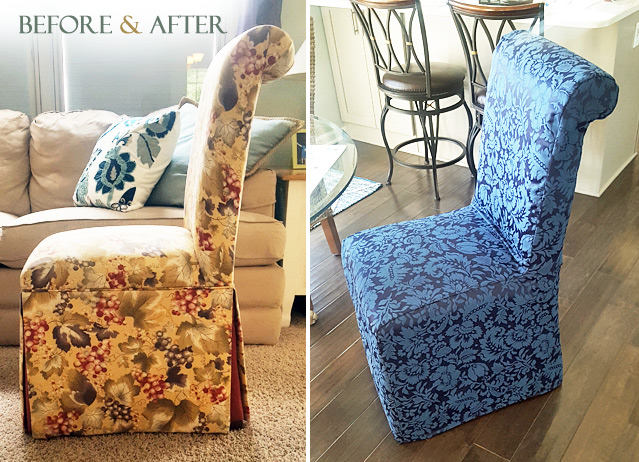
That chair in the corner has become your home’s worst-kept secret—sun-faded fabric, suspicious stains, or a pattern that screams “1990s time capsule.” Before you schedule a trip to the dump, consider this: covering ugly chairs is often the most cost-effective way to completely revitalize your space without breaking the bank. Whether you inherited a dining set that clashes with your modern decor or your favorite reading chair has seen better days, you can transform it from eyesore to centerpiece in less time than it takes to order takeout. This guide reveals practical methods for every skill level, from no-sew solutions that take minutes to professional-looking upholstery techniques that deliver lasting results.
The best approach depends entirely on your chair type, timeline, and comfort with DIY projects. You’ll discover how to choose between slipcovers that fit like custom tailoring, fabric makeovers that require zero sewing skills, and clever styling tricks that work whether you’re renting or own your home. No expensive tools or professional experience needed—just practical solutions that deliver visible improvements from the moment you start.
Identify Your Chair’s Covering Potential in 60 Seconds
Before spending a dime, determine exactly what makes your chair “ugly” and which covering methods will work best for your specific situation. Grab a tape measure and assess these critical factors: the type of damage (stains, fading, or outdated patterns), your chair’s construction (dining, office, or recliner), and precise measurements of seat width, depth, back height, and arm dimensions if applicable.
Critical measurements to take:
– Seat width at front edge (most important for slipcovers)
– Seat depth from front to back
– Back height from seat to top
– Arm width and height (for chairs with arms)
– Overall chair height for proportion assessment
This quick assessment reveals whether your chair has “good bones”—a solid frame worth covering versus one needing complete replacement. Chairs with structural damage, broken springs, or severe frame issues often aren’t worth covering, while those with intact frames but tired upholstery are perfect candidates for transformation.
Slipcovers That Actually Work Without Looking Sloppy
Most people give up on slipcovers after one bad experience with a baggy, ill-fitting cover that slips off at the first sign of movement. The secret to success lies in precise measurements and fabric selection—skip either step and you’ll end up with disappointing results.
Measure Like a Professional (Not Guessing)
Measure your chair while it’s upright in its normal position—don’t lay it on its side. Start with seat width at the front edge (not the widest part of the chair), then measure seat depth from front to back. For the back, measure from the seat to the highest point. If your chair has arms, measure their width at the top and height from the seat. Add exactly 2 inches to seat width and 1 inch to seat depth for stretch fabrics, but use exact measurements for structured cotton covers.
Common mistake to avoid: Measuring only the seat cushion dimensions while ignoring the chair frame underneath—this causes covers to bunch unnaturally at the seat edges.
Fabric Choices That Hide Imperfections
Not all slipcover fabrics perform equally. Stretch jersey (85% polyester, 15% spandex) works wonders on chairs with complex curves, while cotton duck creates crisp lines on traditional dining chairs. Microfiber offers practical stain resistance for family homes, and velvet transforms dated chairs into luxurious seating with its light-absorbing properties. When selecting patterns, choose small-scale prints that camouflage stains better than large motifs, and opt for dark colors along seat edges where wear shows most.
Pro tip: Test fabric drape by holding potential materials against your chair before purchasing—good slipcover fabric should flow smoothly over chair contours without creating unnatural folds.
No-Sew Fabric Transformations for Permanent Results
When you want a custom look without sewing skills, staple gun upholstery delivers professional results in under an hour. This method works particularly well for dining chairs with flat seats and backs, creating a tailored appearance that won’t slip or shift.
Staple Gun Method That Won’t Damage Your Chair
Start by removing the seat cushion if possible—most dining chairs have screws underneath. Choose medium-weight fabric like cotton twill or decorator linen that’s substantial enough to hold its shape but not so thick it won’t fold neatly. Cut your fabric 4 inches larger than the seat dimensions on all sides. Center the fabric pattern on the seat, staple the center front and back first, then work toward the sides, pulling taut but not stretching. At corners, create hospital folds (like wrapping a present) by folding excess fabric inward before stapling.
Tool recommendation: An electric staple gun prevents hand fatigue and ensures consistent staple depth—look for models with adjustable power settings for different fabric weights.
Strategic Textile Styling for Renters and Budget-Conscious
If permanent changes aren’t an option, strategic placement of throws and pillows creates dramatic transformations while protecting your investment. This approach works especially well for rental properties where you can’t modify furniture.
The Waterfall Throw Technique
Fold a medium-weight throw blanket lengthwise to match your chair’s width plus 6 inches. Drape it over the back so equal lengths cascade down the front, then tuck the top edge behind the cushion to secure it. Adjust folds to strategically cover stains or faded areas—position patterned sections over problem spots. For dining chairs, choose washable waffle weave or textured knit throws that stay in place during use.
Pattern mixing rule: Combine one solid, one geometric, and one textured element for visual interest without chaos—like a charcoal solid cushion, black-and-white striped throw, and faux fur accent pillow.
Targeted Fixes for Problematic Office Chairs

Ugly office chairs present unique challenges with their moving parts and ergonomic shapes, but specific solutions address common issues without compromising functionality.
Mesh Back Cover Solutions
Standard mesh office chair backs accept stretch covers made from athletic wear fabric (95% polyester, 5% spandex). Measure your chair back width and height precisely—most standard chairs fit universal covers between 18-24 inches wide. Install by stretching the cover from top to bottom, adjusting any bottom straps for tension. For a DIY alternative, cut the torso section from an old performance t-shirt, hem the edges with fabric glue, and slip it over your chair back.
Warning: Avoid covers that obstruct ventilation holes on mesh backs—this defeats the purpose of breathable mesh design.
Dining Chair Revival Without Refinishing
Dining chairs typically show the most wear from daily use, but targeted covering methods restore them without refinishing the entire set or matching wood tones.
Individual Seat Covers That Stay Put
Create custom seat covers using circular fabric cut 4 inches larger than your seat diameter. Fold a 1-inch hem around the edge, thread ribbon through the casing, and cinch tight underneath the seat. For slippery surfaces, add non-slip rug padding between the cushion and fabric before securing. This method works beautifully for mismatched chairs where you want uniform seating without covering the entire chair.
Time-saving shortcut: Use pre-made circular cushion covers designed for outdoor furniture—they often have elastic edges that grip chair seats securely.
Weatherproofing Outdoor Chairs on a Budget

Outdoor furniture faces sun, rain, and mildew challenges that require specialized fabrics and protection strategies. Solution-dyed acrylic fabrics like Sunbrella maintain color integrity with less than 2% fading per year and resist water penetration while allowing breathability.
UV Protection Tactics That Actually Work
Apply UV-protective fabric spray before installation and reapply every 6 months in sunny climates. Store cushions during peak summer months or position furniture under shade structures during the strongest sunlight hours. Choose darker colors for outdoor covers—they show fading less noticeably than light shades. When selecting materials, prioritize solution-dyed acrylics over regular polyester—they cost more upfront but last 3-5 times longer in direct sun exposure.
Budget alternative: Use indoor-outdoor reversible blankets as temporary covers—you get two looks for one price and can bring them inside during harsh weather.
Cost Comparison: What Actually Delivers Value

Slipcovers offer the fastest transformation at $20-60 per dining chair, while DIY fabric methods cost $25-75 per chair including materials. Professional reupholstery ranges from $150-300 per dining chair but delivers the longest-lasting results. The sweet spot for most homeowners is the DIY fabric method—it creates a custom look at one-third the cost of professional work with similar visual impact.
Money-saving insight: Check fabric store remnants for small projects—these leftover pieces often sell for 50-70% off retail prices and work perfectly for individual chair seats or back panels.
Maintenance Secrets for Lasting Results
Vacuum slipcovers weekly with a brush attachment to prevent fabric breakdown from embedded dirt. Rotate cushions monthly to distribute wear evenly, and spot-clean stains immediately with a mild detergent solution. For slipcovers with elastic, replace worn bands annually before they lose tension completely. When washing removable covers, use cold water and air dry to prevent shrinkage—never put slipcovers in the dryer.
Red flag to watch for: Fabric thinning at high-wear areas like seat edges or armrests indicates it’s time for replacement before the underlying structure becomes visible.
Transforming ugly chairs isn’t about hiding flaws—it’s about reimagining possibilities. Whether you spend $20 on a ready-made slipcover or invest in quality fabric for a custom look, the right covering method turns your problem piece into the room’s focal point. Start with the quickest fix that addresses your biggest complaint, then layer in additional elements as time and budget allow. Your perfect chair transformation awaits, no curb appeal required.


